Overview
Starting in Imatest 4.4, it is possible to perform basic analysis of a video system’s ability to auto focus (AF), auto white balance (AWB) or auto expose an image (AE). Combined, these three tests may be referred to as AAA analysis.
Currently, temporal analysis is only compatible with the following modules:
- Auto Focus: SFR
- Auto White Balance: Colorcheck
- Auto Exposure: Stepchart, Arbitrary Charts
- Mean Normalized Pixel Level (Auto Exposure): CMP DT003, Colorchecker 24, Colorchecker SG, ColorGuage 6×5, RezChecker 6×7, Contrast-Resolution, ChromaDuMonde 28, DreamCatcher 48, EIA Grayscale, 36 Patch Dynamic Range, ISO 14524, ISO 15739, IT8.7, ITEGrayscale, OECF 20, QA-61, QA-62, QA79, QP Card, SpyderCHECKR, TE226, TE269
- Exposure Error (Auto Exposure): CMP DT003, Colorchecker 24, Colorchecker SG, ColorGuage 6×5, RezChecker 6×7, Contrast-Resolution, ChromaDuMonde 28, DreamCatcher 48, EIA Grayscale, 36 Patch Dynamic Range, ISO 14524, ISO 15739, IT8.7, ITEGrayscale, OECF 20, QA-61, QA-62, QA79, QP Card, SpyderCHECKR, TE226, TE269
- CPIQ Quality Loss (Auto Exposure): Colorchecker 24, Colorchecker SG, ColorGuage 6×5
- Correlated Color Temperature (Auto White Balance): CMP DT003, Colorchecker 24, Colorchecker SG, ColorGuage 6×5, RezChecker 6×7, Contrast-Resolution, ChromaDuMonde 28, DreamCatcher 48, EIA Grayscale, 36 Patch Dynamic Range, ISO 14524, ISO 15739, IT8.7, ITEGrayscale, OECF 20, QA-61, QA-62, QA79, QP Card, SpyderCHECKR, TE226, TE269
When you select one of these modules and read a video file, the fourth option in the Imatest Video Reader, plot metric with respect to time, will be made available. Selecting this option begins the appropriate setup for a temporal analysis. If you no longer wish to perform temporal analysis, the run and start again.
When performing temporal analysis, navigate to the location of the video file where the analysis is to begin and click . Then, navigate to the location of the video file where the analysis is to end and click . When a valid pair of in and out points are selected, the duration of the analysis range of the video file will appear in the blue region of the video timeline.
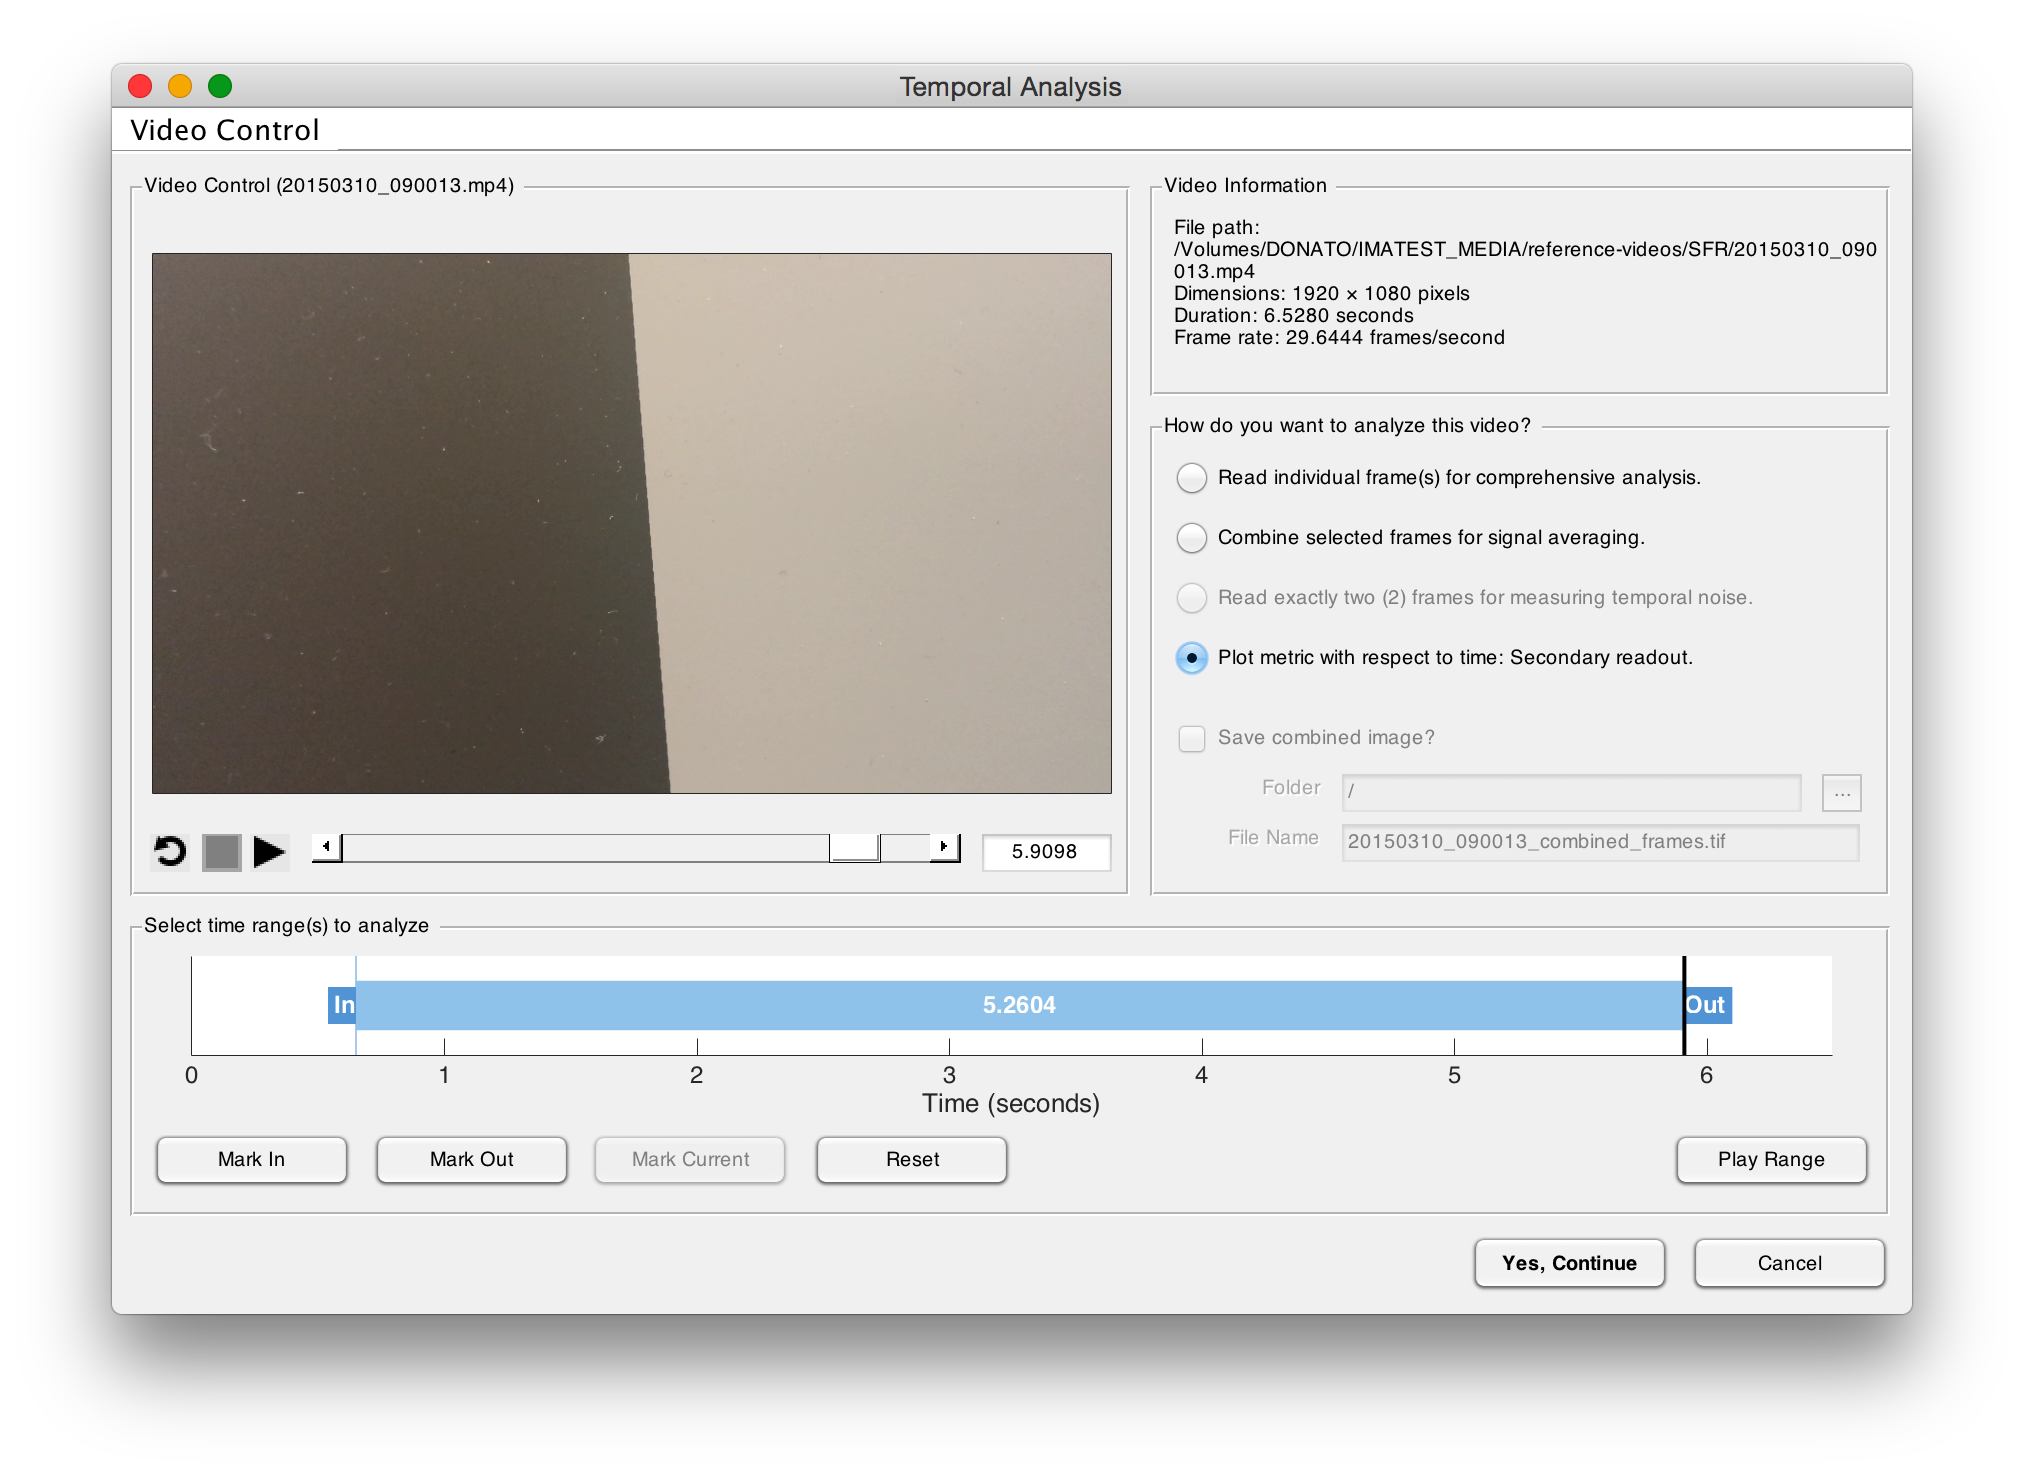
After proceeding with temporal analysis, you will notice that some features and settings may change compared to working with standard image files. For example, many still-image plots will not be available in temporal analysis mode. Other settings, like region of interest (ROI) settings, remain the same.
Imatest will iterate through the selected frames in the video file, saving the appropriate metric as a function of video time value and automatically generate results plotting the metric as a function of time in the video file. This result is automatically saved in the Results directory for the current run.
Auto Focus (AF)
When SFR is selected, a number of sharpness metrics are available to be plotted as a function of time to measure a video system’s focus stability or auto focus ability. In SFR Settings, all options unavailable in temporal analysis mode will be disabled.
When capturing a video for auto focus analysis, begin by capturing an out-of-focus image of a slanted edge. Then, while capturing video, trigger the auto-focus mechanism in your video system. Open the SFR module, and select this video file.
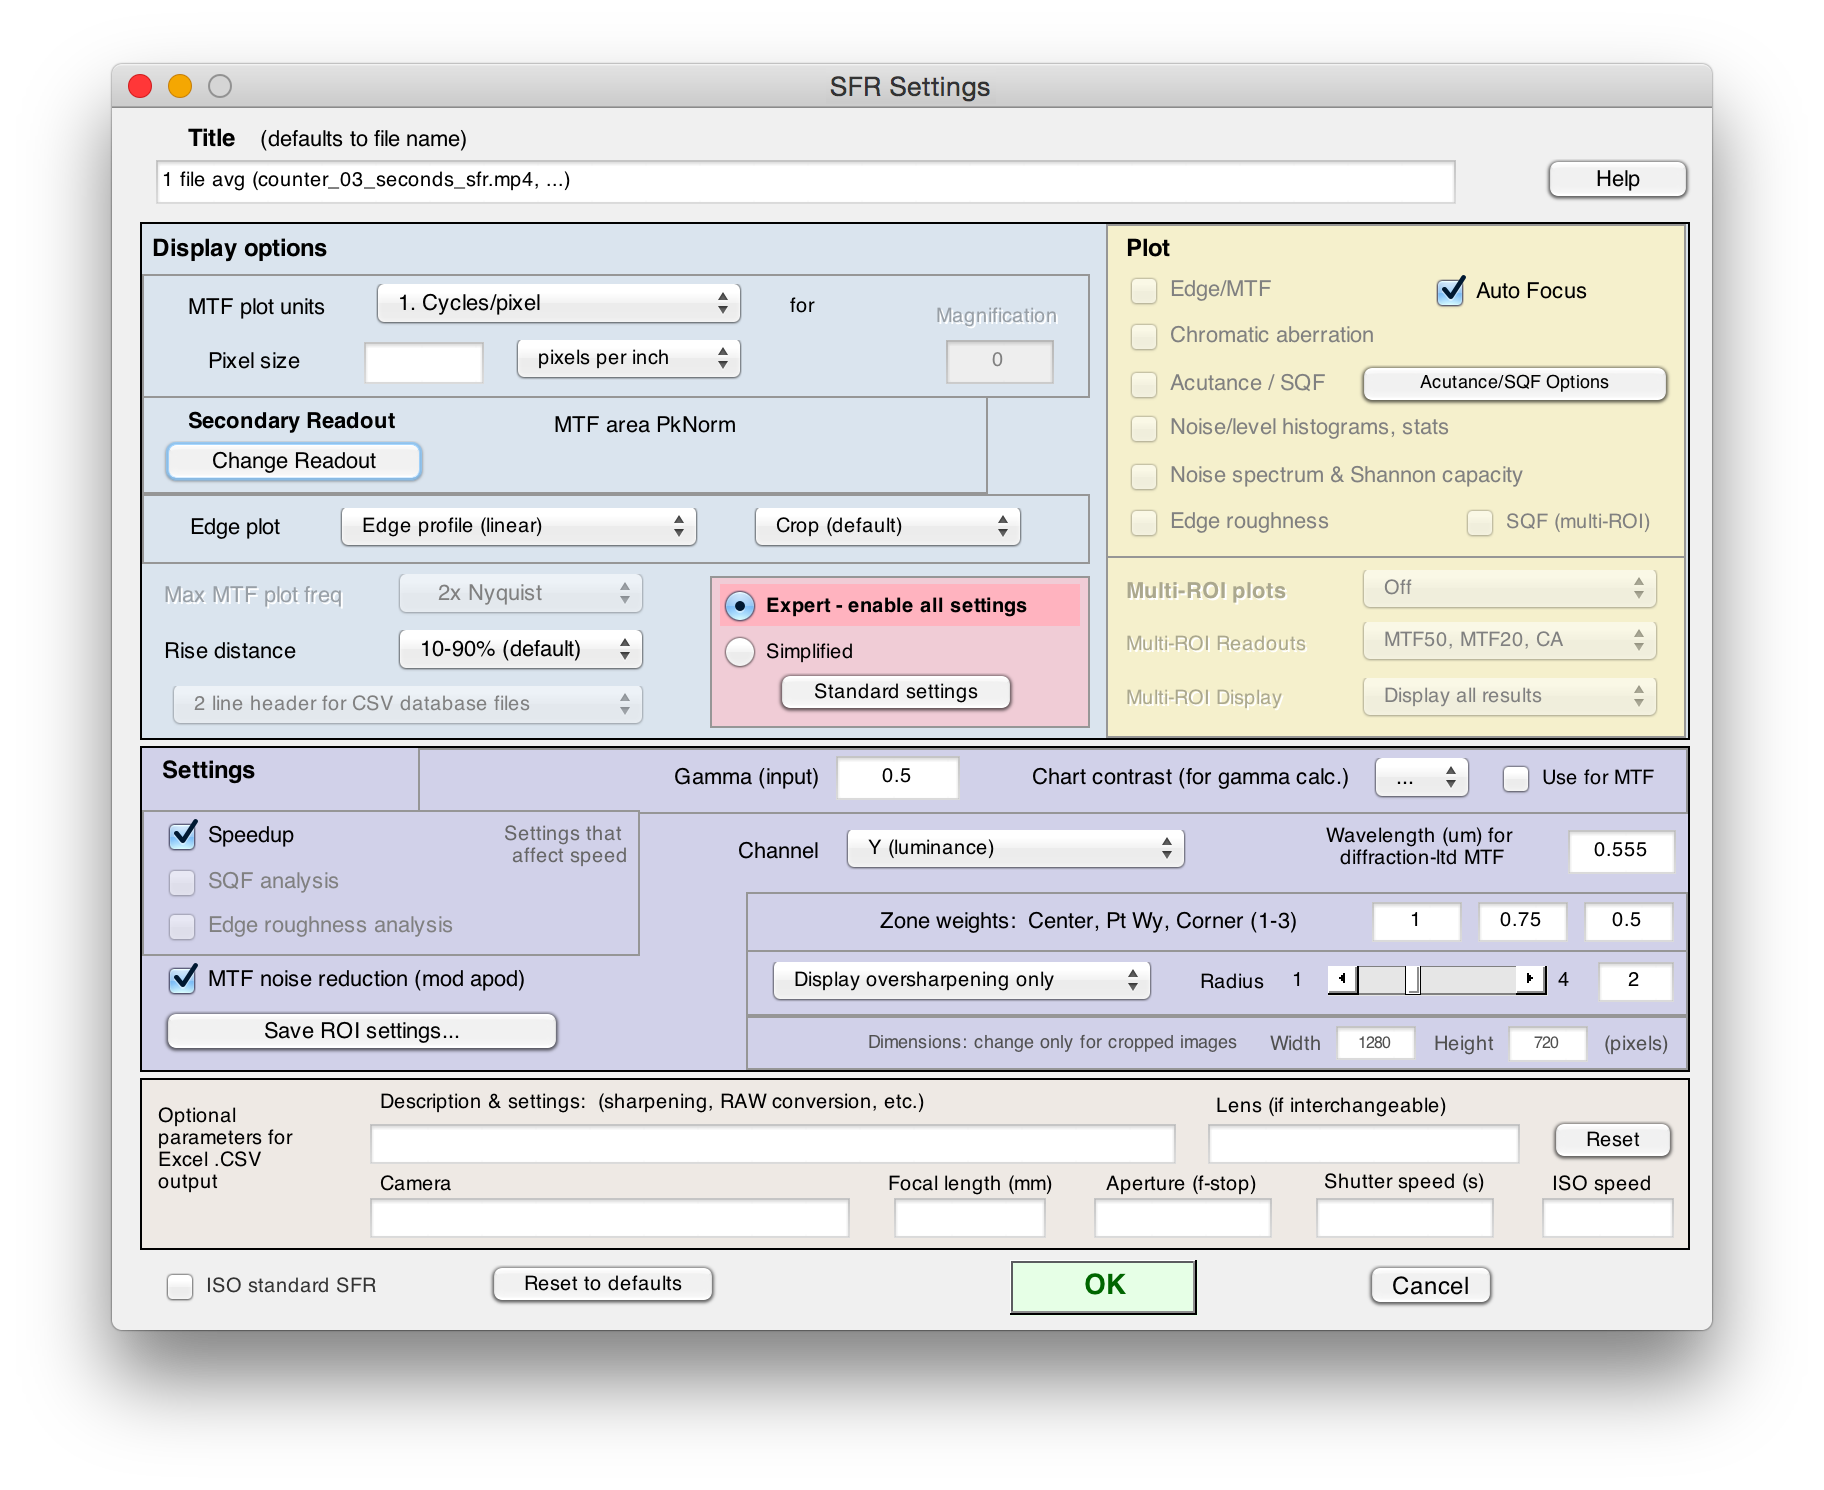
The sharpness metric that is plotted as a function of time is determined by the Secondary Readout. Only the first of the three secondary readouts will be used for this plot. To set up the auto focus analysis metric, click .
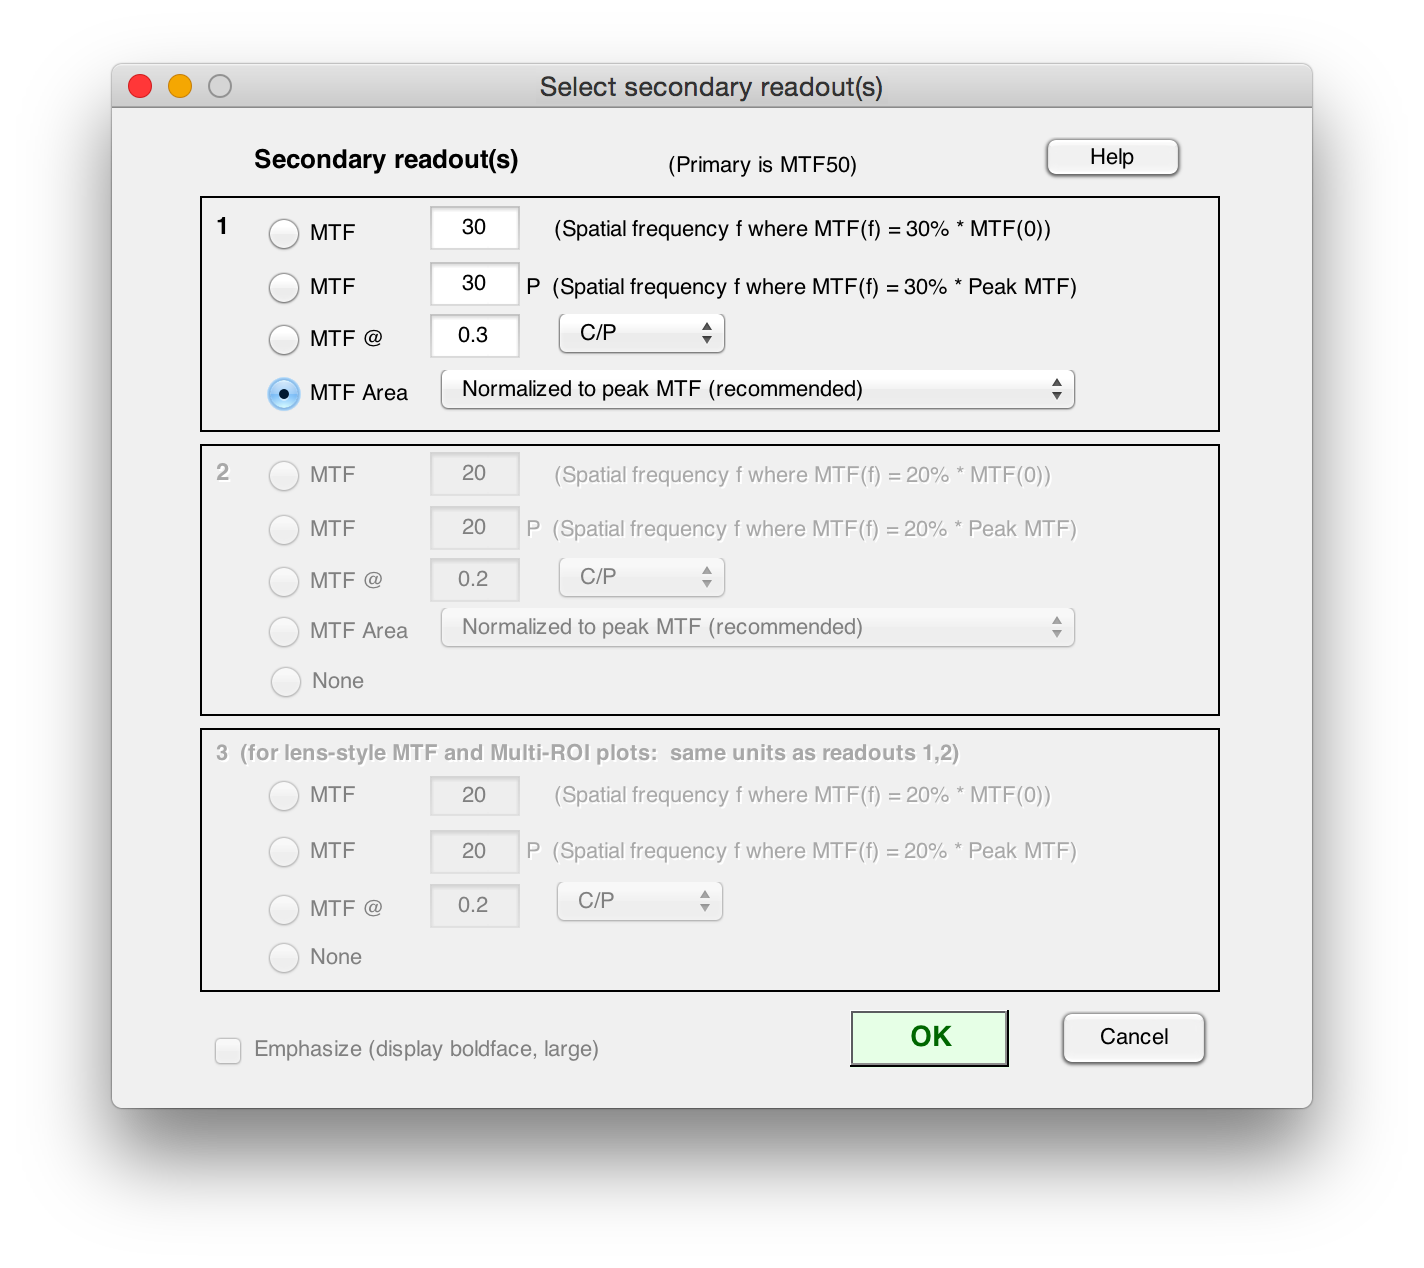
Here, select the desired metric to plot as a function of time. MTF Area Normalized to peak MTF is a stable MTF metric that works well for auto focus analysis. When finished, click . In the SFR Settings window, check Auto Focus in the yellow plot box so that results are viewed at the end of the run.
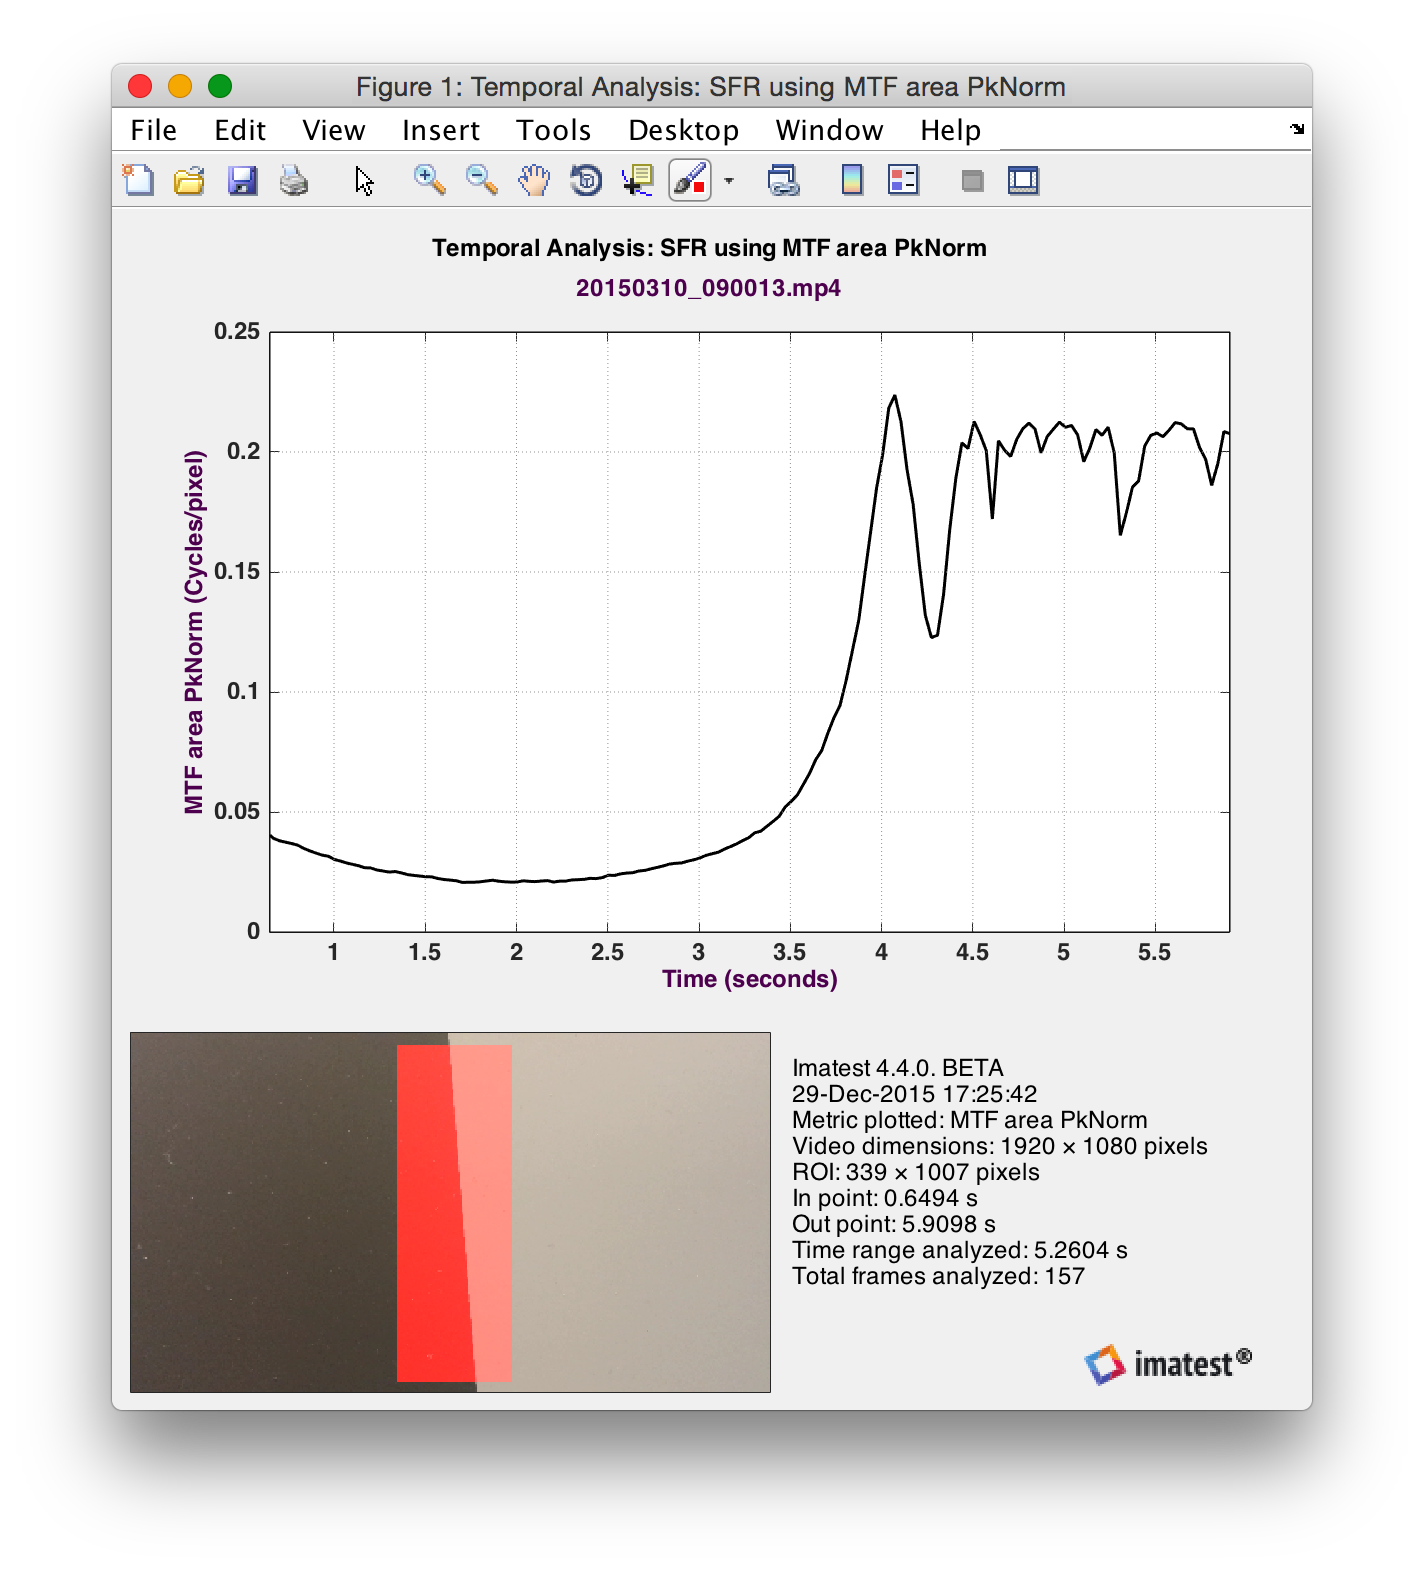
The results plot for auto focus appears at the end of the run. The plot shows the selected secondary readout MTF metric as a function of time, along with additional video analysis data and metadata.
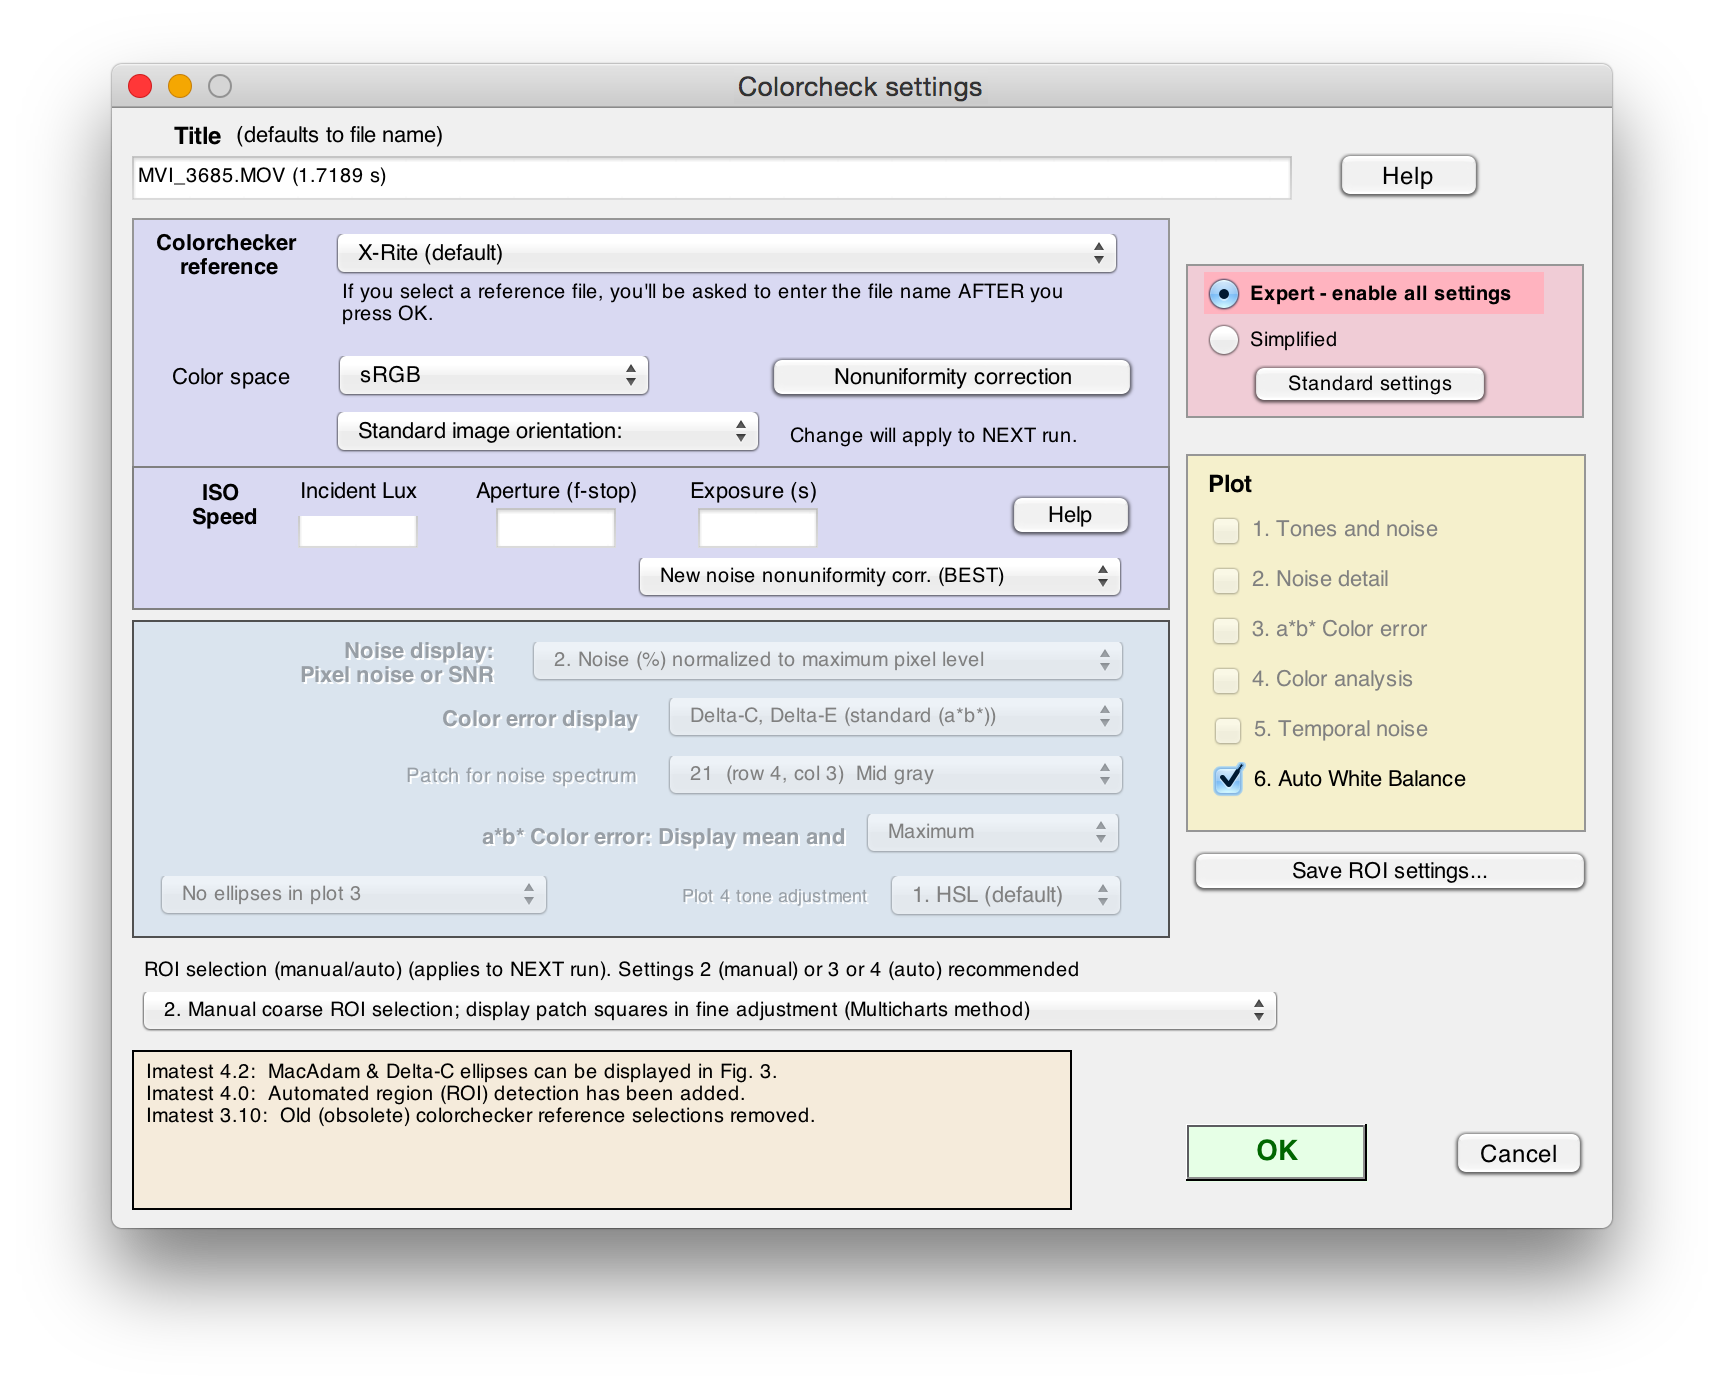
Auto White Balance (AWB)
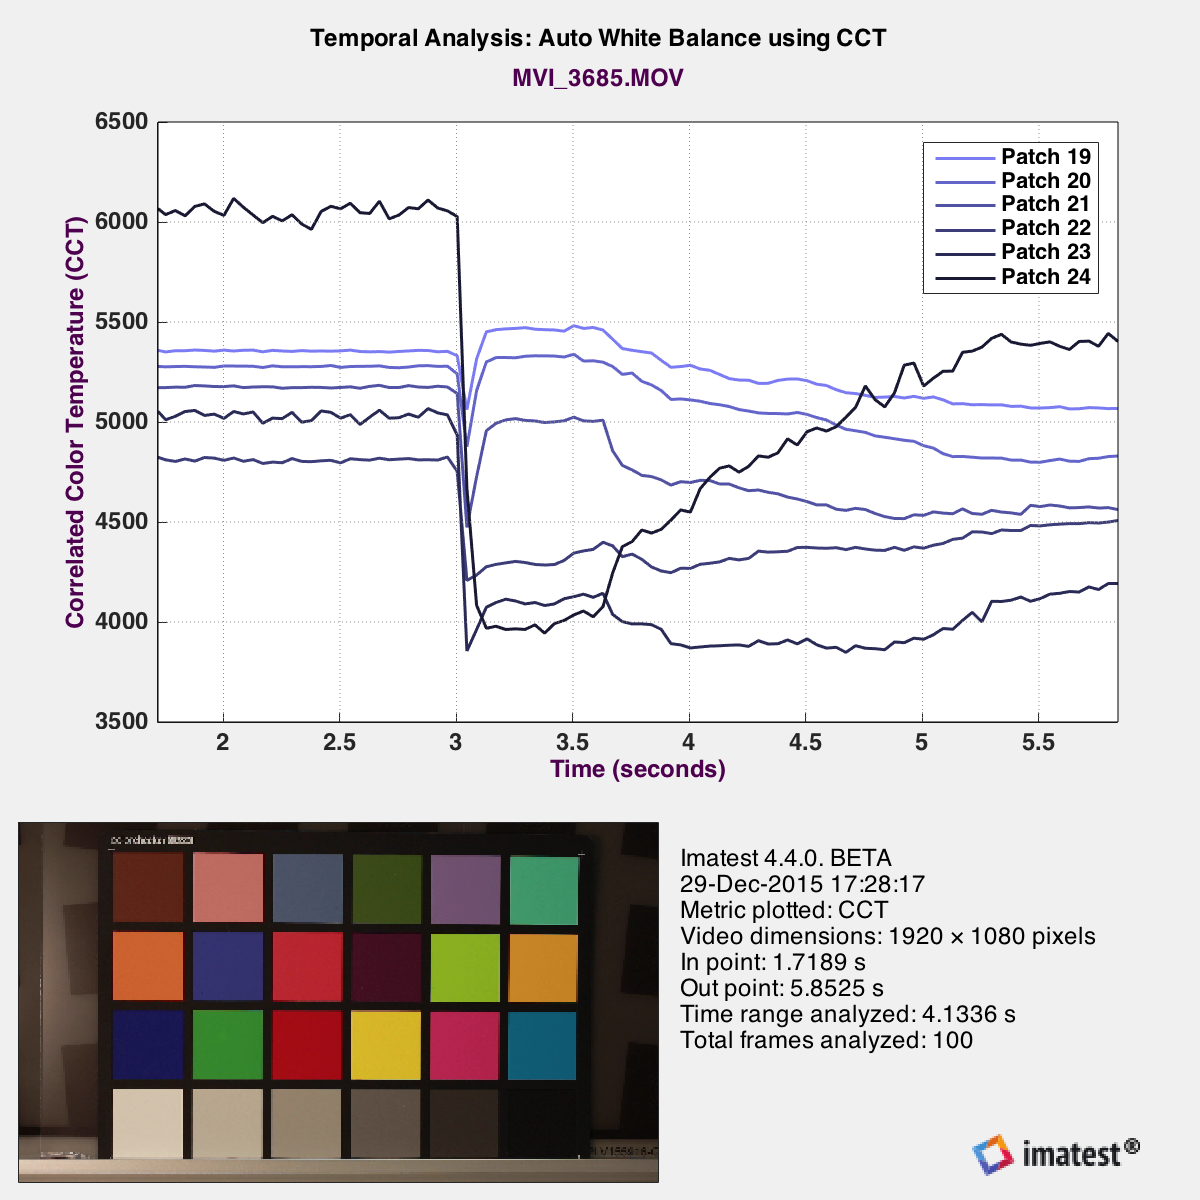
When Colorcheck is selected and a video is read for temporal analysis, Imatest measures correlated color temperature (CCT) of a 24-patch X-Rite (formerly GretagMacbethTM) ColorChecker® as a function of time.
This mode is useful for assessing a video system’s speed and ability to automatically white balance an image. To perform this test, illuminate a scene containing a ColorChecker chart with a particular illuminant. Begin capturing a video. Then, change illuminants. Stop capturing the video. Open the captured video file in Imatest using the ColorCheck module, and select the time range for analysis.
The settings window will appear. Tests unavailable for temporal analysis will be disabled. When the Auto White Balance plot is checked, correlated color temperature will automatically be assessed as a function of time. There are no additional settings for measuring auto white balance. Click .
When the run is complete, a plot containing the correlated color temperature of the ColorCheck greyscale series will be displayed.
Auto Exposure (AE)
When Stepchart is selected and a video is read for temporal analysis, Imatest measures mean normalized pixel level as a function of time for assessing a video system’s ability to automatically expose an image.
To perform this analysis, frame an image of a Stepchart with any number of patches. Begin capturing video. While video is being captured, change the intensity of the illuminant. After capturing the video file, open it with Stepchart.
Similarly to auto white balance, the settings window open, and all plots will be disabled except for the temporal analysis plot. Select the Auto White Balance plot, and mean normalized pixel level as a function of time will be calculated and displayed for all of the patches in the Stepchart. If the plot is too crowded, redo the run with fewer patches in the Stepchart. It may only be necessary to choose a single middle grey patch for an understanding of the video system’s auto exposure ability.