How Imatest IT/DLL works
Imatest IT/DLL (Industrial Testing DLL; formerly API/DLL) is a library that allows developers to access Imatest‘s powerful image quality analysis tools via calls to functions residing in a Dynamic Link Library. At the present time (in Imatest 4.4) it supports calls from C and C++ , .NET (including C# and VB.NET), and Python. Support for LabVIEW is under development. DLL modules perform the same calculations as the corresponding GUI-based Imatest Master modules. Fifteen modules are available:
Imatest IT/DLL is a complete package that includes the module libraries, support documentation including detailed function definitions and sample code, and basic programs that interface to modules. Although Imatest IT/DLL operates independently of Imatest Master, we strongly recommend that IT/DLL users have at least one Master installation on site. When Imatest IT/DLL is linked into a program, you can call functions in the library to perform Imatest image quality analyses. Currently, Imatest IT/DLL requires separate image files and returns limited results directly as well as CSV and XML files and images. The module interface allows for the passing of raw image data into Imatest routines for analysis. |
 |
| EXE | DLL |
| Called from any program (C++, LabVIEW, etc.) using a DOS command | Called directly from C, C++, .NET, and LabVIEW. C-Sharp is under development. |
| Input includes an INI control file and an image file (raw or processed). | Input includes an INI control file. The input image (raw or processed) may be read from a file or directly passed from the calling program (much faster). |
| Output to CSV, JSON, and XML files, and (optionally) to figure image files. | Output to all files supported by EXE. In addition, variables can be returned to the calling program. Most of the key results included in the CSV files can be returned directly using a JSON object. |
| Slow on first run because the Matlab Runtime library has to be loaded and unpacked. Faster on succeeding runs. | Generally faster, especially with direct image passing. |
Installing Imatest IT/DLL
Windows Dynamic Link Library (DLL) files
Imatest IT consists of multiple libraries that contain function sets based on Imatest modules. These are included in the following library suffixes:
| imatest_library | A universal library that contains all of the analysis modules | |
| imatest_acquisition | Acquire images directly from supported devices. |
C Header and Library Files:
Imatest IT/DLL includes C header and libraries that you can use to link to Imatest IT functions. Header files contain function definitions, and the corresponding function in the source file is used to link into the Imatest function that lives inside of the DLL file. The C functions are located in the ‘c’ subfolder of the corresponding IT/DLL module. For questions about function definitions inside of the header file, please write support@imatest.com.
C++ Header and Source DLL Files:
Imatest IT/DLL includes C++ header and source files that you can use to link to Imatest IT functions. Header files contain function definitions, and the corresponding function in the source file is used to link into the Imatest function that lives inside of the DLL file. The C++ libraries and corresponding files are located in the ‘cpp’ subfolder of the corresponding IT/DLL module. For questions about function definitions inside of the header file, please write support@imatest.com.
MATLAB and Image Files:
Imatest IT/DLL also comes with the Matlab Compiler Runtime Libraries. More information can be found at the MathWorks website or below. The package also contains PNG format image files, which are placed on Imatest Library generated graphics. The /images folder should be placed in the run time directory of your program to avoid errors when trying to display Imatest generated graphics.
How to build an executable utilizing Imatest IT libraries:
- Be sure to install that Matlab Compiler Runtime Library, which can be downloaded here.
- Have imatest_ .h in the project directory. Libname is for the IT library you wish to utilize. It will be sfr, sfrplus, etc.
- Update your VC project with correct paths to extern\include and extern\lib\win32\microsoft
- Your project will be ready to build.
.dll files and the images folder for plotting Imatest graphs must be in the same location the project is run from (or specified in project), .
Path: You should add folders to the system path if they are not present.
- Open the Control Panel.
- Double-click on System in Windows XP. In Windows 7, click on System and Security, then System.
- Click on the Advanced tab in the System Properties window (Advanced system settings in Vista/7).
- Click on s. If Matlab is installed on your system, see the Path conflicts box, below.
- Select PATH in the User variables… window.
- Click on.
- Check to see if the folders listed below are included in the Variable value field for Path. (Note: the Edit window is annoyingly tiny and can’t be resized. You may find it useful to copy the contents by clicking control-A, control-C, then pasting it into a text editor.) See explanation of %ProgramFiles%, below. If they are not there, add them to the Variable value field. (You may copy and paste.)
- Before Imatest 3.6: ; %ProgramFiles%\Imatest; %ProgramFiles%\Imatest\bin\win32; %ProgramFiles%\Imatest\toolbox\matlab\;
- Imatest 3.8-3.9:: (The IT-DLL folder represents the folder where DLL is installed; it might be different in your installation):; “%ProgramFiles%\Imatest\IT-DLL; %ProgramFiles%MATLAB\MATLAB Compiler Runtime\v714\runtime\win32;%ProgramFiles%\MATLAB\MATLAB Compiler Runtime\v714”.
- Imatest 3.10-4.1: “; %ProgramFiles%\Imatest\IT-DLL; %ProgramFiles%MATLAB\MATLAB Compiler Runtime\v81\runtime\win32;%ProgramFiles%\MATLAB\MATLAB Compiler Runtime\v81”.
- Imatest 4.2: “; %ProgramFiles%\Imatest\IT-DLL; %ProgramFiles%MATLAB\MATLAB Runtime\v85\runtime\win32;%ProgramFiles%\MATLAB\MATLAB Runtime\v85”.
- Imatest 4.3: “; %ProgramFiles%\Imatest\IT-DLL; %ProgramFiles%MATLAB\MATLAB Runtime\v90\runtime\win32;%ProgramFiles%\MATLAB\MATLAB Runtime\v90”.
- %ProgramFiles% is an environment variable that represents the system default program installation folder in Windows XP and 32-bit Vista/7 installations. Use %ProgramFiles(x86)% for 64-bit Vista/7. %ProgramFiles% is equivalent to C:Program Files in 32-bit English-language installations. These folder have different names in non-English installations, for example, %ProgramFiles% is C:\Programme in Deutsch. %ProgramFiles% and %ProgramFiles(x86)% should be consistent for all languages. Alternatively, you may use the actual folder names. ; C:\Program Files\Imatest\IT-EXE; C:\Program Files\MATLAB\MATLAB Compiler Runtime\v81\runtime\win32; C:\Program Files\MATLAB\MATLAB Compiler Runtime\v81” (English-only) After you add the folders, be sure the Path list is well-formatted— that it consists of proper folder names separated by semicolons (;).
- Click … to close the System window.
|
Path conflicts If a different version of Matlab from the one used for Imatest (6.5.1 prior to version 3.6) has been installed on your system, you may experience a path conflict that causes an error message similar to the message below— or Imatest IT/EXE may simply fail to run, without returning an error message.
If you receive such a message, you can try two solutions. 1. Alter the Path environment variable in System variables, located below User variables in the Environment Variables window. Be sure that the folders listed above appear before the similar folders for the installed version of Matlab. This may involve some careful copying and pasting. Be sure to check the path carefully before you click OK. 2. Initiate IT/EXE programs using the second method shown below: call a DOS BAT file, which sets the path and calls the command line. (Do this instead of directly calling the command line.) This often resolves conflicts. |
Setting up IT/DLL, using Imatest Master and configuring the imatest.ini file.
There are two methods for configuring the settings used by Imatest for analyzing images.
- Specify the input keys directly into the function when it is called.
- Utilize Imatest master and configure the imatest.ini file, which the Imatest libraries will use by default. This is the method that will be discussed here.
For information on specifying your own control parameters to Imatest Libraries, see the sections below.
To setup your testing environment using Imatest Master:
Set up the test system (lights, camera, etc.) and photograph a test chart lighted and framed as it would be in the actual tests.
Save the image in a standard file format. It should have the same pixel count as the actual test images.
Analyze the image using (GUI-based) Imatest Master.
When the settings are correct— when the ROI (region of interest), the calculation details, and the output files and folder locations are what you need for production— press Save settings… (or Settings, Save Settings…) in the Imatest main window. This allows you to save the control information for Imatest IT/SDK in a named .INI file, which can be viewed and edited with any standard text editor. Be sure to save it in a convenient, accessible folder. The contents of .ini files are largely self-explanatory. Here is a sample.
[sfr]
nht_save = 2052
nroi = 2
nwid_save = 3076
roi_mult = 1606 931 1735 1149;334 1693 466 1912
aper =
CA = Min
camera =
cyclesper = Max
cyclesper_value = 1
foclth =
gamma = 0.5
The INI file is divided into sections that start with a bracketed name. [sfr], [q13], [colorcheck], [distortion], [uniformity] are the sections for the five programs that will eventually comprise IT/SDK. Of the remaining sections, only [api] (described below) affects IT/SDK operation.
INI file: more detail
The settings described below are listed in the Imatest INI Reference.
General settings Press Settings, IT options in the Imatest Master main window to open a dialog box that sets options that only affect IT programs— they do not affect regular Imatest operation. These options are written into the [api] section of imatest.ini. See the [api] section of the INI File reference.
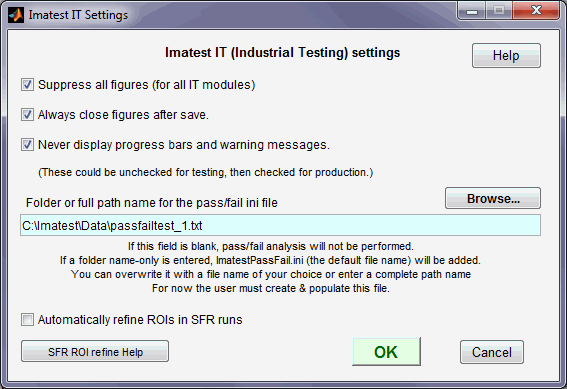
Imatest IT (Industrial Testing) settings
Checking Always save then delete figures makes sure all figures are closed at the end of the run, no matter what the other settings indicate.
Checking Never display progress bars and warning messages disables these graphic displays. These settings affect the contents of the following lines in the INI file.
[api]
nomsg = 1
savedel = 1
These lines can be edited using any text editor or the INI File Editor; the IT Options box is merely a convenience. Certain other options in the [imatest] section may be of interest to IT users.
[imatest]
readexif = 1 (Reads EXIF data from JPEG images when set to 1; readexif = 0 turns off EXIF read.)
Figures The INI control determines which figures are generated and saved. Any figures that aren’t needed they should be turned off for speed. Most are set to either Min (figure off) or Max (figure on), but some (noted in the table below), are set to 0 (figure off) or a number >= 1 (figure on, depending on conditions). These parameters can be set using a text editor, but it’s usually more convenient to uncheck the appropriate boxes in the Imatest Master input dialog box prior to saving the INI file.
| [Section] (module) |
Plot name
|
Plot or CSV/XML file |
save_file_list
index |
| [sfr] | cyclesper | MTF in cycles/(pixel or distance) | 1 |
| LWPH | MTF in LW/PH | 2 | |
| CA | Chromatic Aberration | 3 | |
| shannon | Shannon capacity | 3 | |
| CSV output file (detailed results) | 6 | ||
| XML output file (detailed results) | 7 | ||
| SFR_cypx.csv (summary with Cycles/pixel) | 4 | ||
| SFR_lwph.csv (summary with LW/PH) | 5 | ||
| [sqf] (affects SFR, SFRplus) |
SQF | SQF (Subjective Quality Factor)SQF is in its own section, but affects SFR. | 8 (in [sfr]) |
| [q13] (Stepchart) | pltpix | Patch levels and noise (First figure) | 1 |
| pltnoise | Density response, noise, Dynamic range (Second figure) | 2 | |
| pltallch | Density response details (all colors) (Third figure) | 3 | |
| CSV output file (detailed results) | 4 | ||
| XML output file (detailed results) | 6 | ||
| [colorcheck] | pltones | Grayscale tonal response and noise (First figure) | 1 |
| pltnoise | Noise detail (Second figure) | 2 | |
| pltaberr | a*b* error plot (Third figure) | 3 | |
| pltcolor | Color analysis (Fourth figure) | 4 | |
| CSV output file (detailed results) | 5 | ||
| XML output file (detailed results) | 6 | ||
| [distortion] | distfig | Distortion figure (0 or 1) | 1 |
| dispcorr | Corrected image(if 1, displays if cropped; if 2, always displays) | 2 | |
| outs | Intersection point figure (0 or 1) | 3 | |
| CSV output file (detailed results) | 4 | ||
| XML output file (detailed results) | 5 | ||
| [uniformity] (Light Falloff) |
contour | Light falloff contour plots (pixels and f-stop)(0 or 1) | 1 (pixels)2 (f-stop) |
| shading | Color shading plot (0 or 1) | 3 | |
| detail | Noise detail plot | 4 | |
| CSV output file (detailed results) | 5 | ||
| XML output file (detailed results) | 6 |
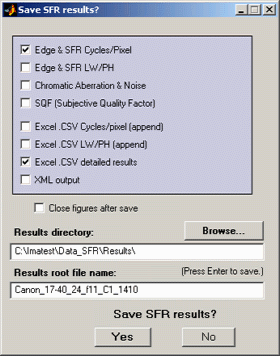 The rightmost column in the above table is the index of array save_file_list, which is included in each module’s section ([sfr], [sfrplus], [q13], [colorcheck], [distortion], [uniformity], [blemish], and [dot]). This index indicates which output figures and files to save. It is generated by the Save dialog box (shown on the right for SFR; Note that the order of the indices may differ from the figure.) For example,
[SFR] …
save_file_list = 1 0 0 0 0 1 0 0
directs the SFR module to save the MTF plot in cycles/(pixel or distance) and the CSV output file that contains detailed results.
Another important variable that appears in the sections for the five modules is closefigs. If closefigs = 1, figures will be deleted after being saved.
Some specific settings
[SFR]
roi_mult contains the coordinates of the region(s) of interest, four entries per region: Left, Top, Right, Bottom (L T R B, with the number of regions specified by nroi). Units are in pixels from the top-left of the image. Note that this is different from the order displayed on the SFR Edge/MTF figure: L R T B.
Function Prototypes & Definitions:
Imatest IT/SDK programs are initiated by calling them inside of your C/C++ program. The steps (excerpted from Matlab documentation) are:
- Declare variables and process/validate input arguments.
- Call mclInitializeApplication(), and test for success. This function sets up the global MCR state and enables the construction of MCR instances.
- Call, once for each library, Initialize, to create the MCR instance required by the library.
- Invoke functions in the library, and process the results. (This is the main body of the program.)
- Call, once for each library, Terminate, to destroy the associated MCR.
- Call mclTerminateApplication to free resources associated with the global MCR state.
- Clean up variables, close files, etc., and exit.
More information about handling MATLAB based C/C++ libraries can be found here under the subsection, “Libraries”. See also, mwArray. For advice on best practices for calling the Imatest IT library, please review this post.
| imatest_libraryInitialize(void) | To initialize the library. |
| imatest_libraryTerminate(void) | To close the library. |
| imatest_libraryPrintStackTrace(void) | To resolve a stack trace within the library. |
| mlxSfrplus(int nlhs, mxArray *plhs[], int nrhs, mxArray *prhs[]) |
C call to the SFRplus function. See parameter spec below. See Calling a (C) Shared Library. |
| sfrplus_shell(int nargout, mwArray &nret, mwArray &inputFile, mwArray &inputDir, mwArray &inputKeys, mwArray &opMode, mwArray &varargin) | C++ call to the SFRplus function. See parameter spec below. See C++ Shared Library Target. |
| acquire_image(int nargout, mwArray &im_orig, mwArray &vstr, const mwArray &source_id, const mwArray &varargin); | To directly acquire from a supported device. |
All other library modules (sfr, colorcheck, blemish, etc.) have similar calling methods, visible in the imatest_library header file.
Parameters of type mwArray are Matlab Array objects. For both the sfr and sfrplus libraries, nlhs and nargout (the number of output fields) are zero. *plhs[] and mxArray &nret are place holders for the data returned by sfr_shell and sfrplus_shell. Currently the libraries do not return information. mxArray &inputFile is the parameter that specifies the full path to the image file to be analyzed; see below for an example of how to pass this information to the Imatest libraries. mxArray &inputDir is a full path name that specifies the folder where the application is located.mxArray &inputKeys is the parameter that specifies the results to be returned by the module (“JSON” is recommended in Imatest 3.9+). mxArray &opMode specifies DLL Mode and how images or image files are passed to the module. Details below.
| mwArray &inputFile | Image file name. The full path name should be used, e.g.,”c:\program files\imatest\IT\Stepchart_DR_Canon_G2.JPG” in the example below. Multiple files can be analyzed if it contains the wildcard character (*). | |
| mwArray &inputDir | The folder where the IT/SDK and other programs are located. | |
| mwArray &inputKeys |
inputKeys = 0 or ‘0’; out[] contains no output, no outputs should be specified in the sfrplus() call as the function will only generate test artifacts. inputKeys = ‘JSON’; out[] contains a JSON object with the important results found in the CSV output file. Strongly recommended when a single file is analyzed. (Use caution when multiple files are analyzed; only results from the last file will be returned.) [JSONlab license notice] |
|
| Parameters and corresponding outputs for sfrplus (deprecated; will be kept through 2012: ‘JSON’ recommended):inputKeys = 1; out[] corresponds to MTF50 results, cy/px of selected regions of interest. This will always be for whatever the number of ROIs you have selected in rescharts or the “roisel” [ROI Selection Pattern] parameter is in the imatest.ini file.inputKeys = 2; out[] corresponds to MTF50 results, cy/px of selected regions of interest and additionally the deltaE values of color patches 2, 3, and 4 in the SFRplus colorchart analysis. This requires the “colorchart = 1” to be set in the imatest.ini file. The deltaE values will be appended to be after the MTF50 results.inputKeys = 3; out[] corresponds to MTF50 results, cy/px of selected regions of interest and additionally the deltaE values of color patches 2, 3, and 4 in the SFRplus colorchart analysis. This requires the “colorchart = 1” to be set in the imatest.ini file. The deltaE values will be appended to be after the MTF50 results. Additionally, the l*a*b results from input will be appended after the DeltaE data, for color patches 2, 3, and 4.In SFR_Direct, inputKeys = 3 is used for signalling the system to use raw data in the image processing, and it will return the mtf50 result of a single SFR analysis. | ||
| mwArray &opMode |
-5 through -10 and -15 through -20 indicate DLL Mode. Prior to December 2011 only -5 was recognized; the others were added in December 2011 and January 2012. -5, -6, -9, and -15: imatest.ini in the &inputDir folder (the default) is used as the INI control file. n = 1 in references to varargin{n}, below. -7, -8, -10, and -17: varargin{1} contains the full path name of the INI control file. n = 2 in references to varargin{n}, below. -5, -7: One or more input files is read in. The full path name of the first file is located in &inputFILE. This file may contain a wildcard character (‘*’). If one or more additional arguments are present (in &varargin{n}, …), additional files are read in and analyzed separately. -6, -8: Two input files are read in for measuring temporal noise. &varargin{n} is the second image file name (full path name) for measuring temporal noise (colorcheck and stepchart-only). -9, -10: One or more input files is read in. The full path name of the first file is located in &inputFILE. This file may contain a wildcard character (‘*’). If one or more additional parameters are present (in &varargin{n}, …), additional files are read in and combined for analysis (rather than analyzed separately) to improve the Signal-to-Noise Ratio (SNR). -15, -17: The input image is passed directly from the calling program; no file is read in; &inputFILE is ignored. &varargin{n} contains the image data (which may be raw or processed; UINT_8 or UINT_16); &varargin{n+1} contains a JSON object with metadata required for interpreting (i.e., decoding) the image. Details below. |
|
| mwArray &varargin | List of additional files or data to process. &varargin consists of one or more parameters (varargin{1}, varargin{2}, etc.). These parameters are specified in &opMode, above. In references to varargin{n} (above), n = 1 if the default imatest.ini file is used (&opMode = -5, -6, -9, -15); n = 2 if the INI control file is specified in varargin{1} (&opMode = -7, -8, -10, -17). |
|
| Note: The following two parameters, which were used in sfr_direct, have been deprecated, but will be kept through 2012. They have been replaced by &varargin entries for &opMode = -15 and -17. | ||
| mwArray &image_raw | A raw stream of image data, as type uint_8 which can then be cast into a WxHxBitsize matrix for passing into SFR routine for analysis. See the main2.cpp example of the SFR library example routine. | |
| mwArray &res | Resolution of image data, width by height, this can then be used to define the image_raw data into a mwArray type so that the Imatest SFR function can treat your image as a 24-bit BMP, for example:// For direct input of image: dimensions are height x width, this uses functions from the imatest_sfr header which includes MathWorks mwArray types (mclmcrrt.h) int image_res[2] = {1024, 768}; mwSize dims[3] = {image_res[2],image_res[1],3}; mwArray image_rawParam(3, dims, mxUINT8_CLASS); //This creates a WxHx3 matrix, for a 24-bit BMP mwArray resParam(1, 2, mxINT16_CLASS); resParam.SetData(image_res, 2); image_rawParam.SetData(<image_buffer_pointer>,<size_of_buffer>); |
|
Returning results with JSON
JSON objects are a convenient and easy-to-implement means of passing Imatest IT/DLL results back to the calling program. In most programming languages (what, no FORTRAN?) a single call is available to convert a JSON object to a data structure or vice-versa. Here is a portion of the JSON object returned by sfr (with skipped or shortened lines indicated by … ). For the most part, names in the object (and hence in the corresponding data structure) are self-explanatory. JSON output files are being added to Imatest Master modules (in addition to CSV and XML). [JSONlab license notice]
{
“sfrResults”: {
“dateRun”: “26-Dec-2011 16:34:18”,
“roi_mult”: [
[1706,1327,1898,1605],
[3685,374,3978,542]
],
“mtfPeak”: [1.316749102,1.125382339],
“mtf50”: [0.4023813085,0.3236112599],
“mtf50p”: [0.3663296738,0.3100313299], …,
“mtf10”: [0.5373973791,0.4691161373],
“mtf10p”: [0.5228006564,0.4591916907],
“edgeRoughSTD”: [
[0.09443263439,0.1002447785],
[0.0423559873,0.04494066213],
[0.06807294473,0.1000587208],
[0.04869192922,0.05593847561]
],
“CA_crossPxls”: [0.1156214328,0.1508858711], …,
“MTFfreq”: [0,0.025,0.05,0.075,0.1,0.125,0.15,0.175,0.2,0.225,0.25,0.275,0.3,0.325, …],
“MTFinterp1”: [1,0.9557716778,0.9434756776,0.9619840588,1.017016935,1.040196171, …],
…,
“MTFinterp4”: [1,0.9621111279,0.969935489,1.007033219,1.069689419,1.107938549, …]
}
}
roi_mult is the [Left,Top,Right,Bottom] pixel locations of the Regions of Interest (ROIs). MTFfreq are frequencies in cycles/pixel of interpolated MTF results. MTFinterp1 and MTFinterp4 are the interpolated MTFs of the Red and Luminance (Y) channels, respectively (with 2 for Green and 3 for Blue skipped).
Please contact us if you’d like additional results added.
Passing images directly
Images (processed RGB or RAW) can be passed directly from the calling program to the IT/DLL module when &opMode is set to -15 (default imatest.ini control file; n = 1) or -17 (named ini control file in &varargin{1}; n = 2). Passing images directly is generally much faster than reading them from files, and strongly recommended for speed-critical high-volume testing.
For direct image passing, &varargin{n} contains the image (passed as a binary stream, 8 or 16 bits per pixel), and &varargin{n+1} contains a JSON object with information needed to decode (or reconstruct) the image.
Processed (RGB or monochrome) Images
For RGB images the JSON object must contain the image width, height, number of colors, and image type indicator (‘rgb1’ below), as shown in the following Matlab test case, which reads an image (to test IT/DLL), prepares it to be passed as a binary data stream (reshape), then calls
im_orig = imread(rdfname); % Read a processed RGB image. For test example-only.
disp([‘Read ‘ num2str(numel(im_orig)) ‘ byte image.’]);
sz_orig = size(im_orig);
jstr.height = sz_orig(1); % Number of rows (image height in pixels).
jstr.width = sz_orig(2); % Number of columns (image width).
if length(sz_orig)>=3 jstr.ncolors = sz_orig(3); % Number of colors for this file.
else jstr.ncolors = 1;
end
jstr.extension = ‘rgb1’; % MUST be RGBn or correspond to Read Raw extension!
jstr.fileroot = rdfname; % Root file name for saving CSV, JSON, etc. output files
jsonObj = savejson(”,jstr,[]); % Convert structure into JSON object.
im_orig = reshape(im_orig,1,numel(im_orig)); % Reshape to one-dimension.
disp(char({”;’DIRECT READ: SINGLE PROCESSED IMAGE, NO PLOTS’}));
iniFile = ‘C:\Imatest\matlab\trunk\API\it_samples\stepchartcontrol_file.ini’;
output = stepchart_shell(”, ‘C:\Imatest\matlab\trunk\API\it_samples\stepchart’, …
‘JSON’, ‘-17’, iniFile,im_orig,jsonObj); % Output contains results in a JSON object.
Notes
- File type indicator indicator ‘rgb1’ indicates a standard RGB or monochrome image in the default Matlab order. We will add additional types upon user request.
Raw images
Raw images with properties described in Generalized Read Raw can be passed directly to Imatest modules. Note that this does not refer to commercial raw files (NEF, CR2, etc.), which contain metadata and are typically packed (to minimize file size— pixels often straddle bytes). To pass raw files directly you need to set up parameters for interpreting (decoding) them using Generalized Read Raw.
- Save the raw image as a simple binary stream, one or two bytes per pixel (as required). Give the saved file a unique extension (up to 4 characters), which should not be a recognized image file extension (JPG, TIF, PNG, GIF, PPM, etc.— see the Mathworks imread documentation) or a commercial raw image file extension recognized by dcraw (NEF, CR2, etc.— many are listed in the rawphoto.c GIMP plugin). ‘raw’ is acceptable, but something less generic is recommended.
In Matlab you would save the image with a statements of the form,
fileID = fopen('filename.raw3','w');
fwrite(fileID, imageArray, precision),
where precision might be ‘uint8’ or ‘uint16’. - Following instructions in Generalized Read Raw, set up decoding parameters for this extension. Test them by pressing , then opening the saved raw image file. A few iterations may be required to get the settings right. They are saved in the [rdraw] section of imatest.ini (in the standard location for saved settings), which should be copied to a named file location (inifile in the example below) by clicking Settings, Save settings…
Here is a Matlab test case, showing the key settings for reading a raw image.
jstr.extension = ‘raw3’; % MUST correspond to Read Raw extension!
jstr.fileroot = rdfname; % Read a raw image. For test example-only.
jsonObj = savejson(”,jstr,[]); % Convert structure into JSON object.
endian_str = ‘ieee-be’; precision = ‘uint16=>uint16’;
fd = fopen(‘filename.raw3’, ‘r’, endian_str) ; % Open the image test file for reading.
[ im_orig count ] = fread(fd, inf, precision) ; % Test file.
output = stepchart_shell(”, ‘C:\Imatest\matlab\trunk\API\it_samples\stepchart’, …
‘JSON’, ‘-17’, inifile, im_orig, jsonObj); % Output contains results in a JSON object.
Using acquire_image()
Images can be directly acquired from supported devices using the acquire_image() function (available in the imatest_acquisition library) function, and then passed directly to Imatest. For an example of usage, please see the ImatestLibAcq::CaptureFrame() function in the ImatestLibAcq.cpp file from our open source OperatorConsole.
Examples:
Included in the library package are six example coding examples written in C++ that demonstrate the proper framework for invoking a Matlab based library using the Imatest IT DLL libraries. Return parameters and how to handle them in different methodologies are explored in some of the examples. To build an example program, be sure that you have followed the setup requirements above, locating the /images subfolder into the run-time directory and correctly specifying where the imatest.ini file and example.jpg image file having been unzipped on your local machine. The main.cpp has all examples and program directories in the file name and program run directory parameters specified as C:imatest_example and C:imatest_exampleexample.jpg
Error handling:
Imatest IT/DLL functions return a value of 0 if they terminate correctly or 1 or larger if they terminate in error. C++ interface functions handle errors during execution by throwing a C++ exception. Use the mwException class for this purpose. Your application can catch mwExceptions and query the what() method to get the error message and the print_stack_trace() method to output the stack trace. To correctly handle errors when calling the C++ interface functions, wrap each call inside a try-catch block.
try
{
                ...
                (call function)
                ...
}
catch (const mwException& e)
{
                ...
                (handle error)
                ...
}
For information about the exception hierarchy that is new in Imatest IT/DLL 4.2, please read Imatest IT Exception hierarchy.
Upon library initialization, Imatest IT/DLL outputs “Starting Imatest…” to standard out.
If an error is detected, a message is
- appended to the error log file, which has the name of the form module.log (sfr.log, colorcheck.log, stepchart.log, distortion.log, uniformity.log, …), and is located in %APPDATA%Imatest.
- written to the CSV and/or XML file that would otherwise contain the results of the run. For the example above,
if a CSV output file were called for, it would be c:program filesimatestITResultsStepchart_DR_Canon_G2_summary.csv ;
if an XML output file were called for, it would be c:program filesimatestITResultsStepchart_DR_Canon_G2.xml .
APPDATA is a DOS environment variable whose value can be found by opening a DOS (CMD) window (you can double-click start-dos.bat in the Imatest folder), and typing
set APPDATA (Returns the folder name corresponding to APPDATA)
–or–
dir “%APPDATA%\Imatest”
APPDATA has values of the form
- C:\Users\your name\AppData\Roaming in Windows Vista/7.
- C:\Documents and Settings\your name\Application Data in Windows XP.
Lines in the log file have the format,
[Date Time], file_name, error_message
Example:
[05-May-2007 23:34:08], c:\Imatest\data_distortion\distgrid101.jpg, Inconsistent Vert lines 17 det.; 18 avg. Incomplete line?
We are constantly working to improve the robustness of Imatest algorithms to minimize the occurrences of errors, which are typically caused by poor region (ROI) selections or poor quality images.