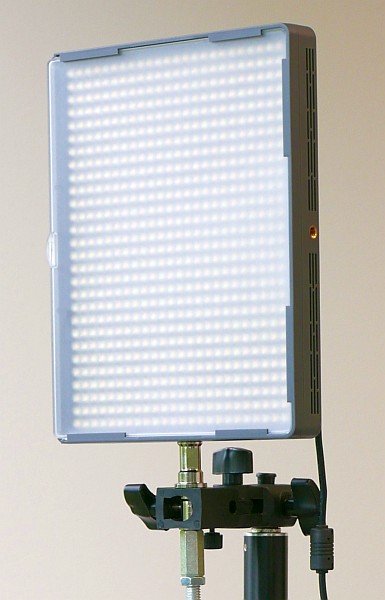
The Aputure HR672c LED lights are a good choice for illuminating Imatest reflective test charts. Among their many features:
|
 |
 |
Although the Aputure HR672c lights are quite good, they have several limitations.
- Their rectangular shape makes it necessary to combine two or three lamps per side to achieve uniform illumination with larger charts (SFRplus, eSFR ISO, etc.). This can be quite awkward (see below). A longer aspect ratio such as 80 (or more) x 30 cm would be much nicer.
- More dimming is desirable. Many control chips are capable of >100:1 dimming, products end up with 10:1 dimming because this is sufficient for photography studios (the primary customers).
- Computer control (DMX, etc.) is highly desirable.
| Number of lamps | Description |
| 2 | Sufficient for illuminating smaller charts (Colorchecker, ISO 12454, ISO 15739, Spilled coins, etc. |
| 4 | (Two lights per side) Sufficient for illuminating larger charts, such as 40×60 inch SFRplus or eSFR ISO charts with sufficient illumination. The critical grayscale and color patterns near the center of these charts will be much more evenly illuminated than the chart as a whole. Includes one hardware kit for combining lights. Recommended for most applications. |
| 6 | (Three lights per side) Slightly more even illumination and 50% more brightness than 4 lamps. Useful when 1000 lux is required at all color temperatures. Includes two hardware kits for combining lights. |
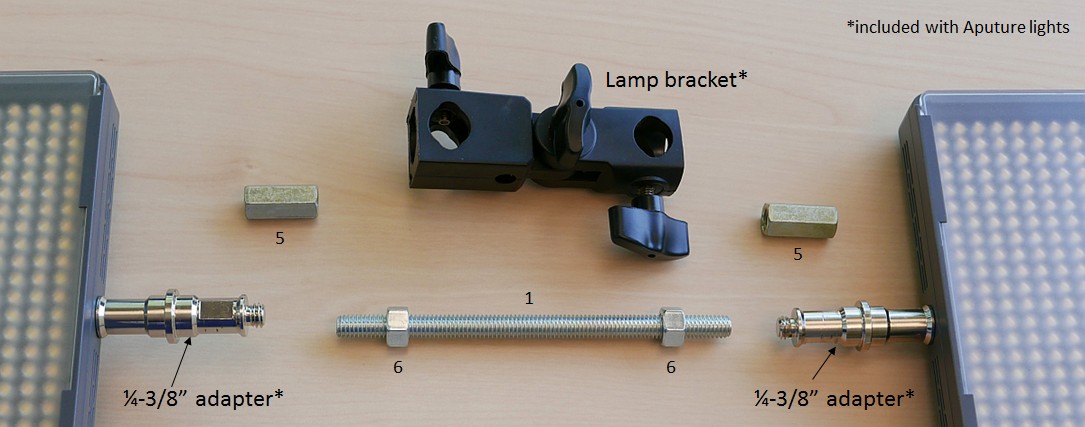
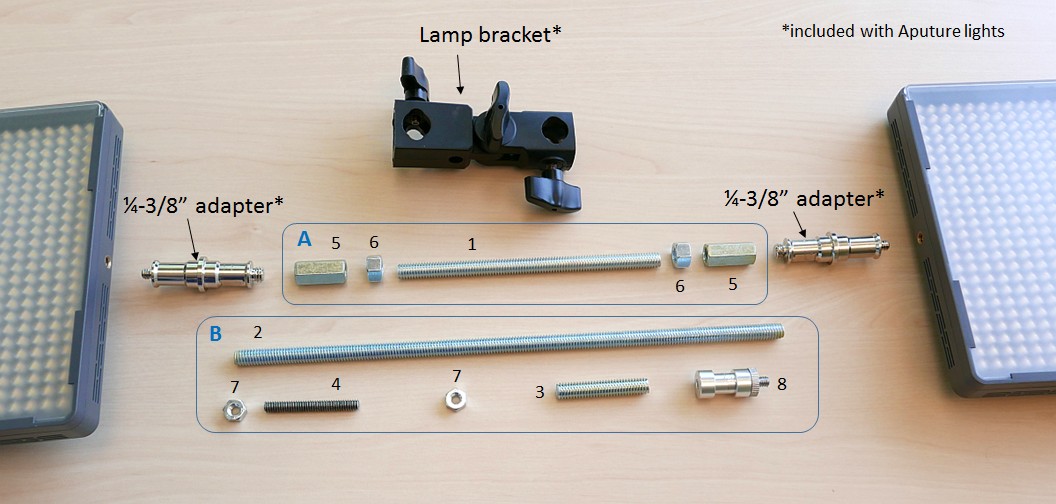 Aputure HR672 lights, Aputure-supplied hardware, and hardware kit contents (in boxes A and B)
The contents of box A are used for the setup described below.
| N | Count | Part | Description |
| 1 | 4 | 6″ 3/8×16 threaded rod | Used in recommended configuration. Two 6″ rods can be combined (using coupling + regular nuts) to increase spacing for larger charts. |
| 2 | N/A | For larger charts. | |
| 3 | 2 | 2″ 3/8×16 threaded rod | For smaller charts. |
| 4 | 2 | 2″ 1/4×20 threaded rod | For closest possible coupling between lights. |
| 5 | 6 | 3/8×16 (1.25″ long, 1/2″ OD) coupling nut | |
| 6 | 8 | 3/8×16 standard nut | For tightening coupling nuts. |
| 7 | 4 | 1/4×20 standard nut | For closest possible spacing. |
| 8 | 2 | 1/4″ to 3/8″ Tripod Screw (Ø16mm x H40mm) Mount Converter Adapter Bracket Holder (smaller than the adapter supplied with the Aputure lights) | Used to connect third light when 3 per side (6 total) are used. Consists of 3 parts shown below.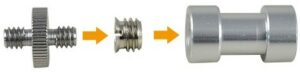 |
 Combining (stacking) the lamps
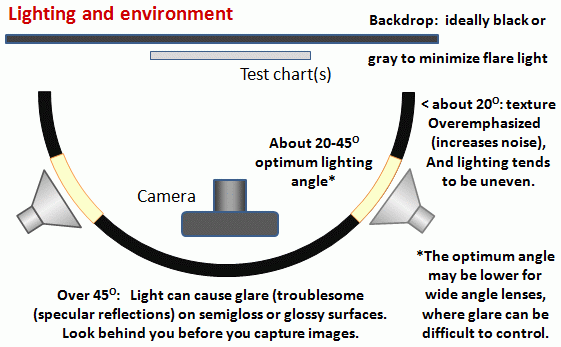
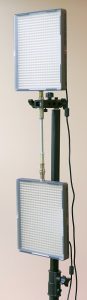
In most Imatest lab setups, lights are set up according to the diagram on the right, which is viewed from the top. The lights shown on each side typically represent banks of two or three lights stacked vertically.
The Aputure HR672c lights are designed to be mounted individually, but can be adapted for stacked banks of lights using the contents of the hardware kit described in the above table.
These instructions use a single 6 inch stud 1 (Box A in the above image), which is a good choice for most setups, and works well with a wide range of chart sizes. With the 6 inch studs the separation between the lamps is aproximately 10.5 inches and the top-to-bottom distance is approximately 29.5 inches, which is sufficient to evenly illuminate large charts (40×60″ = 1×1.5 m.
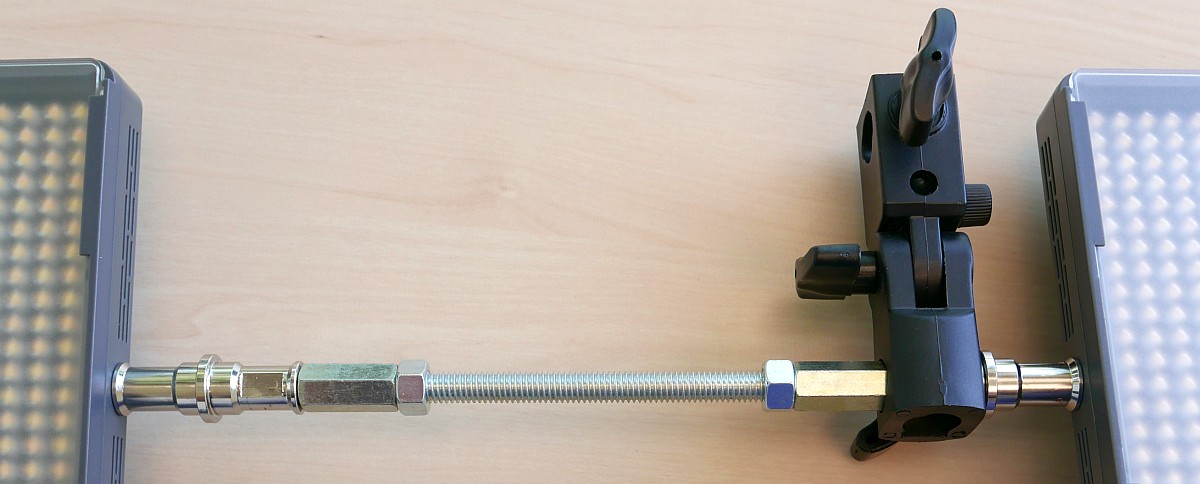
- Screw the two 1/4-3/8″ adapters (supplied with the Aputure lights) into the 1/4″ sockets on the short side of the lights. There are sockets on each of the short sides (as well as one of the long sides). Choose sockets so the sockets on the long side (which can be used for installing “barndoors” to shield the camera from light) will be on the same side (facing the camera). This means that you will select opposite ends for the second pair of lights.
- Screw the 3/8″ standard nuts on to the threaded rod, leaving about 1″ (2.5 cm) on the ends of the rod.
-
-
Stacked lights
Mount the lamp bracket (supplied with the Aputure lights) on the 1/4-3/8 adapter attached to that lamp that will be on top when mounted on the stand.
-
- Screw the 3/8″ connecting nuts 5 on the ends of threaded rod 1 so that the rod nearly fills the thread. Do not tighten the 3/8″ standard nuts 6 yet.
- Screw the connecting nuts 5 on to the 1/4-3/8″ adapters, then tighten.
- Make sure the two lamps are facing the same direction, then tighten the standard nuts 6.

- Rotate the lamp bracket as needed and mount the lamp assembly on the light stand (as shown on the right).
- Variations: To space lamps further apart, connect two 6″ long threaded rods using a 3/8″ connecting nut tightened with two 3/8″ standard nuts. For closer together, use the 2″ long 3/8″ threaded rod. For minimum spacing, use the 2″ long 1/4″ threaded rod with two 1/4″ nuts connected directly to the lamps.
With two pairs of lights (4 total) 55 inches (1.4 meters) from the center of the chart at about a 30 degree angle (relative to the chart surface) the maximum illumination at the chart center is about 1300 lux at color temperature setting = 43 ≅ 4300K,where both sets of LEDs have maximum output.
Operating the lights
The manual is included with the lamps. It can also be downloaded from this link on the Aputure website.
The lights are supplied with two batteries each. They are not needed in most test lab environments.
There two buttons on the back of the lights: Channel and Group. Set all lights to either Group C or D. (Groups A and B don’t allow color temperature control.) Set all lights to the same channel. Use the CH button on the remote control to set it to the same channel as the lights. (Use different settings only in the rare event that you want the lights to be controlled individually.)
Light stands
You will need two light stands. They should be able to support at least 10 lbs (5 kg). 6 feet high (2 meters) is more than sufficient, but most light stands are taller. A minimum height of 3 feet or less is recommended if you want to mount the lights from the bottom (not what we did in the example). A black finish is preferred. We plan to supply them, but for now here are a few results of some searches. Here are a few of the many choices under $100 USD per stand.
Flashpoint Pro Air Cushioned Heavy Duty Light Stand – 7.2′ Adorama’s cheapest stand that meets the requirements. 6kg load capacity, 33.5″ – 7.2′ high.
Flashpoint 7′ AutoStand Adorama 7kg load capacity
Matthews Medium Duty Aluminum Kit Stand with Brake, Maximum Height 92.5″ (7’7″), Supports 20 lbs., Black. Adorama
Dracast DLS-805 Air-Cushioned Light Stand (7.2′) B&H # DRDLS805 MFR # DR-DLS805 B&H’s cheapest stand that meets the requirements.
Impact Air-Cushioned Heavy Duty Light Stand (Black, 9.6′) B&H # IMLS96HAB MFR # LS-96HAB Supports 22lb. $50. Minimum height is 51.2″ (1.3 m).
Manfrotto 366B Basic Black Light Stand – 6.4′ (1.9m) B&H # MA366B MFR # 366B Supports 11 lbs.