| For any Imatest analysis module, you can store the ROI (Region of Interest) from the most recent run in a named file for use for future runs. |
Normal ROI saving & use – Roi Options – Saving a custom ROI – Retrieving a custom ROI
|
News – Imatest 2020.1 (builds after mid-July 2020) include data for fill factor (fillf) and distortion( distort) in the ROI file where appropriate. These were omitted in earlier versions. This information was originally in the 2015 pose, How to store and retrieve region (ROI) selections |
How ROIs are normally saved and retrieved
To appreciate the value of this feature, we must start with background knowledge of how Imatest stores and uses (or automatically detects) ROIs.
All Imatest modules (except for SFR and Wedge*) save up to 20 ROIs in their section in imatest-v2.ini ([cc24], [colorcheck]. [sdr-36], etc.). This section is updated whenever the module is run. Each ROI consists of four or eight numbers (depending on the module). The image width and height (and, where appropriate, the fill factor and distortion) are also saved. Here is an example of the key settings (shortened to fit in the page). Settings are shown for six images (with six different sizes, indicated by nht_save and nwid_save), but ROIs (8 per image) are only shown for two images.
[sdr-36]
fillf = 0.6 0.4 0.6 0.55 0.6 0.6
distort = 0 0 0 0 -0.04 -0.2
nht_save = 3448 1112 5304 1461 650 1732
nwid_save = 4592 1936 7952 1673 1155 2304
roi = 921 323 3699 3127 902 3115 3707 342 154 470 621 1019 104 1000 646 526 ... (ROIs for 2 files shown)
|
Charts and modules that use one outer ROI to select multiple inner rectangular patches (most Color/Tone charts) use eight numbers (one for each corner, x(UL), y(UL), x(LR), y(LR), x(LL), y(LL), x(UR), and y(UR)) to define each ROI. (Stepchart uses a different order, kept for backwards compatibility.) Modules that use only simple rectangular ROIs (e.g., Dot Pattern, Distortion, Uniformity, and Blemish Detect) use only four numbers for each ROI (x(UL), y(UL), x(LR), and y(LR)). *Since SFR and Wedge can analyze multiple regions in a single image, ROIs (several if appropriate) for only one image are stored. Each ROI consists of four numbers. |
When an Imatest module is run, the ROI is selected either manually or automatically (for modules that support Automatic ROI detection). Saved ROI settings (except for fill factor and distortion) are not used for Automatic ROI detection; they are only used for manual detection. Manual vs. Automatic selection is set in the ROI Options window, which can be opened from the Imatest main window (on the lower-right), or the Color/Tone Interactive window (Settings dropdown).
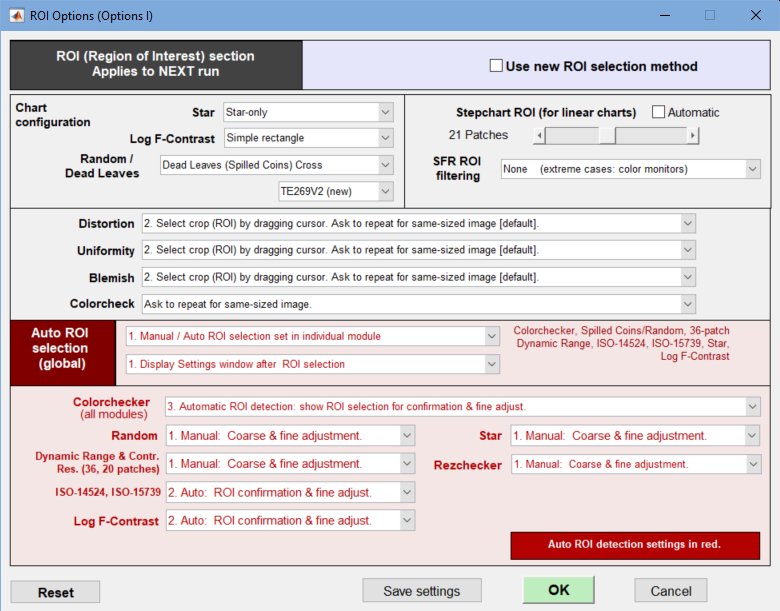 ROI Options window
If Automatic detection has not been selected, the ROIs for the most recent image with the same width and height as the current image will be located, and if they are found, you’ll be asked if you want to repeat the same ROIs. If you answer “No”, you will be asked to make a new manual selection.
A saved (custom) region selection can be handy if you want to use the region from an older run (i.e., not the most recently-run image). This region should be saved during or immediately after the (older) run.
Saving the region selection
Regions of Interest (ROIs) can be stored in small named ini files that only contain region information, and can be retrieved whenever needed. This can be done for any Imatest analysis module, whether or not regions were selected automatically. (To use the saved ROI, automatic region detection needs to be turned off, i.e., unchecked in the above ROI Options window).
The ROI settings from the most recent Imatest analysis run can be saved in a named file by one of the following methods.
1. The Save ROI settings… button in the settings window
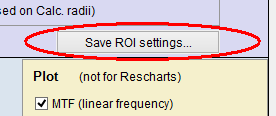
When you open a module, select a Region of Interest, then press Yes (not Express mode), a settings window opens that that contains a Save ROI settings… button, typically located somewhere in the Settings section. Its location is not consistent: it can be different for different modules. This method is not recommended for Stepchart*. Examples:
 |
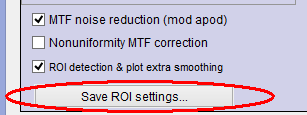 |
Save ROI settings… button for Random/Dead Leaves and SFR modules
2. The Save ROI settings… button in the Save results window that typically appears when a run is complete.
3. From the Imatest, Multicharts, or Rescharts windows:
INI File Settings –> Save ROI Settings can save settings from the most recently run module (if you didn’t save it in the Settings window).
| *The Stepchart Settings window differs from other modules in that it lets you select the grayscale chart type. The Fine ROI adjustment window opens after the Settings window, so it is never a good idea to save the ROI from the Stepchart Settings window. You can set it afterwards with methods 2 or 3 (described above). This is one of several reasons that Color/Tone Interactive and Color/Tone Auto (which can analyze color as well as grayscale charts and display more noise detail) are recommended. |
Selecting Save ROI settings… opens a window that lets you select the file for saving the ROI settings.
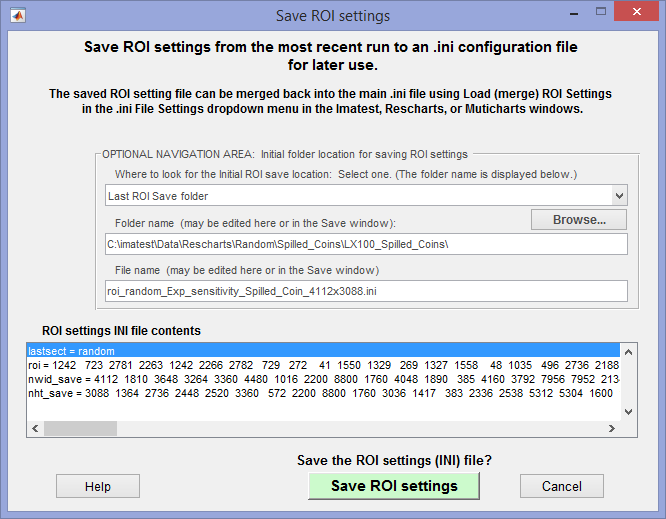 Save ROI settings window
The Optional Navigation Area assists with navigation: It affects the initial folder that appears when you click Save ROI Settings. The ROI settings INI file contents list box displays the ROI file contents, described in the gray box below. When you press Save ROI settings you can navigate to the desired folder and specify the file name.
How it worksWhenever an Imatest analysis module is run, several lines are saved in the [imatest] section of imatest-v2.ini These lines remain there until another analysis is run. the line, lastsect = … (random in the above example) contains the section name of the analysis module. It will become the section name of the ROI file. The other lines shown in the Save ROI settings will be copied to this file. For certain files, lines for fillf (fill factor) and distort (distortion amount) will appear. The section indicated by lastsect and the lines that follow will be written to the named ROI file. |
Retrieving the region selection
Because the region selection window opens first for most modules (before the Settings window) you should load the ROI before running the module. This can be done from the Imatest, Color/Tone Interactive, or Rescharts windows by clicking
INI File Settings –> Load (merge) ROI Settings
This opens the following window that lets you select a previously-saved INI file. It will be merged into the main INI file (imatest-v2.ini, unless otherwise specified).
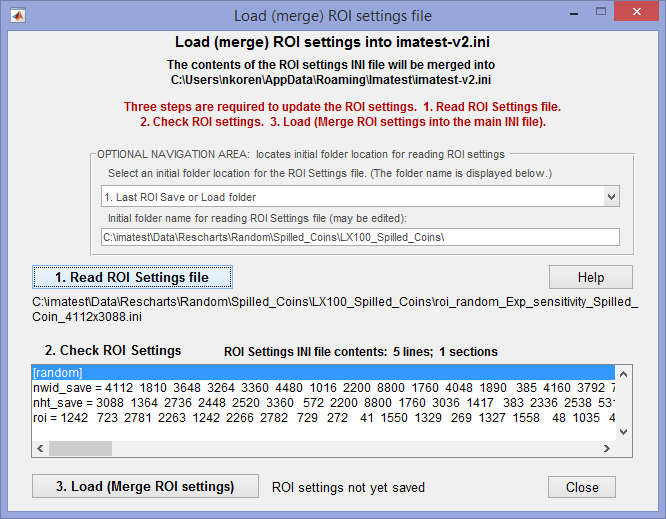 Load ROI settings window
The upper box (OPTIONAL NAVIGATION AREA) assists with navigation by helping to locate the initial location for reading the ROI Settings file. It is completely optional and may be ignored.
Once the Load (merge) ROI settings window is opened,
- Press 1. Read ROI Settings file. You can specify the actual file location to load in the Open dialog box.
- Examine the contents of the ROI settings file, which are displayed when the file is loaded.
- Press 3. Load (Merge ROI Settings). If this operation is successful a message will be displayed to the right of the button.
The settings will apply if Automatic ROI detection (set in the ROI Options window, described above) is turned off.