The Device Manager allows the user to select and initialize supported image sensors and frame grabbers.
Introduction
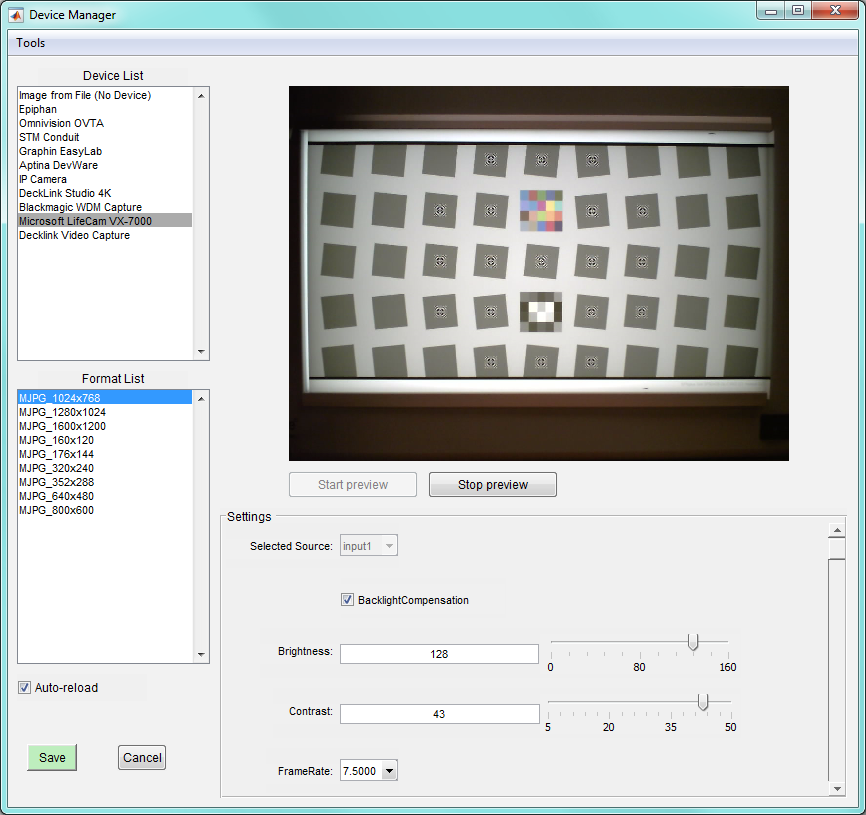
The Device Manager is opened by pressing the Device Manager button on the Imatest Master main window. Shown below is an example of the Device Manager in Windows with a small sampling of devices in the Device List.
The Device List contains the list of supported capture interfaces (‘Image from file’, ‘Epiphan’, ‘Omnivision OVTA’, ‘STM Conduit’, ‘Graphin Easylab’, ‘ON Semi Devware’, ‘IP Camera’ on Windows) followed by the detected devices from other interfaces (‘Microsoft LifeCam VX-7000’, in this example). Many devices will support a number of image capture formats (e.g. different resolutions, color spaces, bit depths, etc.), such as the MJPG_1024x768 format of the VX-7000. After selecting a device, the supported image capture formats will be displayed in the Format List.
Selecting a format will cause any available controls to be displayed in the Settings panel and enable the Start preview button. The controls in the Settings panel allow the user to modify the capture characteristics of the device. Pressing the Save button will save the settings of the current device and select it for acquisition by Imatest Master.
Saved settings
After pressing the Save button the settings for the current device are saved to a JSON-formatted file for later use by Imatest Master. For example, after pressing Save in the example above, the following data is written to ‘ImageAcqToolboxSource.json’:
{
“ImageSource”: {
“name”: “ImageAcqToolboxSource”,
“data”: {
“videoFormat”: “MJPG_1024x768”,
“adaptorName”: “winvideo”,
“deviceID”: [1],
“deviceName”: “Microsoft LifeCam VX-7000”,
“videoSource”: {
“BacklightCompensation”: “on”,
“Brightness”: [128],
“Contrast”: [43],
“FrameRate”: “7.5000”,
“Gamma”: [3],
“Hue”: [0],
“Pan”: [0],
“Saturation”: [48],
“Sharpness”: [13],
“Tilt”: [0],
“WhiteBalance”: [4600],
“WhiteBalanceMode”: “auto”,
“Zoom”: [0]
}
}
}
}
In this example, the control values are stored in the ‘videoSource’ sub-object and can be altered, within the bounds allowed by the controls.
By default, the JSON device settings files are saved to, and read from, the same default directory as the Imatest INI file. The save location can be changed either from the ‘Change folder for device settings files … ‘ item in the Tools menu (see below), or by manually changing the [imatest] ImageSource_JSON_folder key in the Imatest INI file.
Note: As with the Imatest INI file, the device file names must not be changed, otherwise Imatest Master will not recognize them.
Tools menu
In the Tools menu are various items that allow the user to manipulate and view the JSON device file location, as well as refresh the Device List.
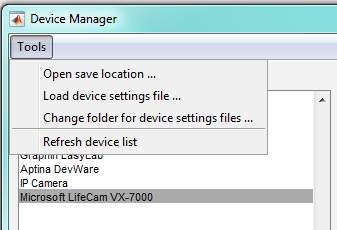
- ‘Open save location …’: Opens a folder browser to the location in which the device files are currently being saved and read.
- ‘Load device settings file …’: Opens a file browser that allows the user to select a device settings file to load. Note: Pressing Save after loading a device will overwrite the settings stored in the current save directory.
- ‘Change folder for device settings files …’: Opens a folder browser that allows the user to change the directory for saving and loading device files
- ‘Refresh device list’: Refreshes the device list by polling for attached devices on any non-standard interface. Note: Refreshing takes several seconds and is not necessary for the standard supported devices (i.e. ‘Image from file’, ‘Epiphan’, ‘Omnivision OVTA’, ‘STM Conduit’, ‘Graphin Easylab’, ‘ON Semi Devware’, or ‘IP Camera’)
Note: Starting in Imatest 5.0, Imatest Master contains all image acquisition features and Imatest IS has been discontinued.