Find the sharpest files in a batch
Thanks for Andrea Nivini for suggesting this module.
|
New in Imatest 5.2: A major redesign of Find Sharp Files. A summary plot is available. Results can be shown in an easy-to-read Table format. Results can be saved in CSV and JSON files. |
Find Sharpest Files lets you quickly and conveniently rank the sharpness of a set of images. It works on any image— it doesn’t have to be a test chart. It runs much faster than any of the standardized sharpness measurements (slanted-edge, star, etc.).
There are a number of situations where this capability can benefit a photographer or engineer.
- to quickly rank the sharpness of a sequence of images taken at different apertures, ISO speed settings, (software) noise reduction settings, etc., without performing a detailed (and much slower) MTF analysis.
- You may want to check autofocus performance and/or consistency by comparing a batch of images acquired with autofocus with each other or with manually-focused images (made at small focus increments around the autofocus setting).
- You may have taken a sequence of images under slightly different conditions, e.g., images of a flower taken when there is a slight breeze— and you want to quickly determine which is sharpest.
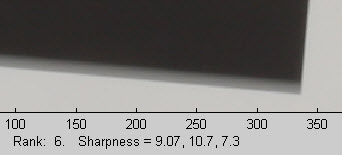
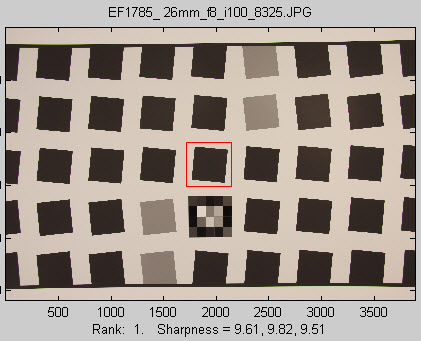
Here is an example showing three images of the SFRplus test chart from a sequence of six.
| Note that Find Sharpest Files does NOT give standardized sharpness measurements, which require one of the test chart patterns described in Rescharts. It is used onlyto compare groups of similar images. It is extremely fast (it can be used to rank large numbers of images) and doesn’t require a standard test chart. |
| Sharpest image: f/8 | 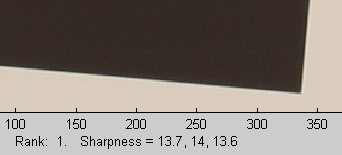 |
| Fifth sharpest: f/5.6 | 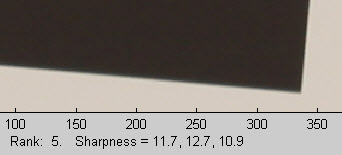 |
| Fuzziest image: f/22: Evidently shaken during the long (4 second) exposure. Vertical edges are OK, but Horizontal edges will give misleading results. |
 |
|
Sharpness ranking: |
Algorithm: Focus Score and Find Sharpest Files use similar algorithms for ranking sharpness or measuring relative sharpness. The image is cropped then linearized. For linearized pixel level P(x,y), the gradient ∇P(x,y) = i ∂P/∂x + j ∂P/∂y (2-dimensional derivative in the x and y-directions) is calculated at each point.
X-sharpness = sx = mean(|∂P/∂x|)/mean(P), where mean is taken over the crop. Similarly,
Y-sharpness = sy = mean(|∂P/∂y|)/mean(P)
Total sharpness = sTotal = sqrt(sx2 + sy2). This algorithm is extremely fast and works with any image as long as it has some detail.
Operation
Start by acquiring a sequence of images. As described above, it could be a set of test chart images taken with different settings or a set of natural scenes where you wish to find the one least blurred by the wind. If needs be, run the sequence through View/Rename Files to give them a sensible name, instead of the IMG_7201.jpg,
IMG_7202.jpg, IMG_7203.jpg etc. The images should be of the same subject with the same framing and similar lighting.
Since Find Sharp Files does not give a standardized measurement,
it should never be used for comparing different images. Results will be misleading!
Open Find Sharp Files by clicking on the button in the right of the Imatest main window.
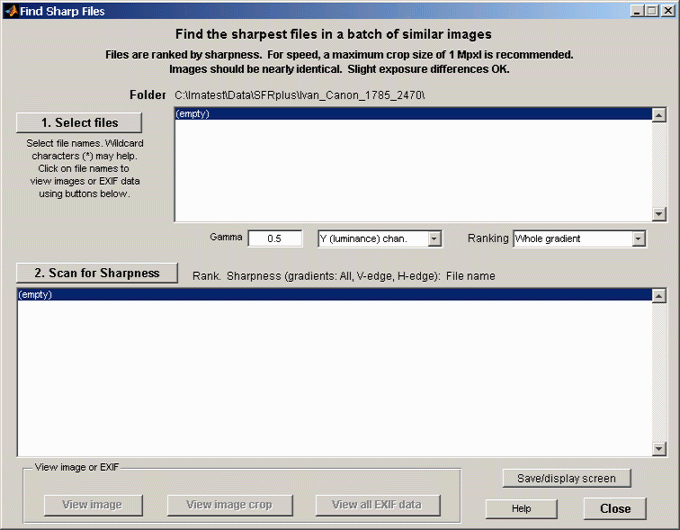
Find Sharp Files opening window
Click on to select a group of files using standard Windows techniques. The folder below contains both CR2 and JPEG images. *.jpg was entered in the File name window at the bottom, then Enter was pressed. This displays only the JPEG (.jpg) files, which makes batch selection easier. You can click on a file and then either control-click on another file (to add that file) or shift-click (to add a range of files). The yellow tooltip that appears when you hover the cursor above an image thumbnail shows the full file name, date, and size.
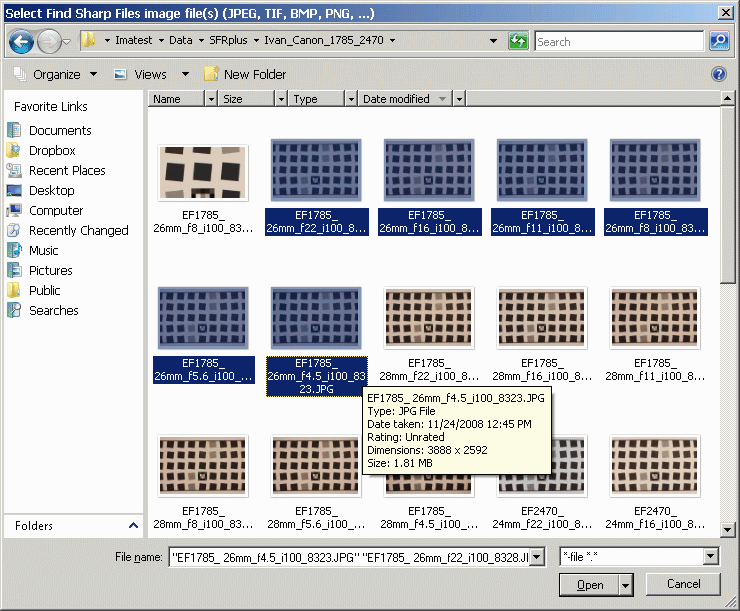
File selection
After files have been selected, the upper box will be populated and the lower (results) box will be empty. Now update the settings if needed (they’re not critical).
- Gamma is used to linearize the (crops of) files before the Sharpness ranking is calculated. It has little effect on the results when images are exposed the same, but it may improve the accuracy when there are different exposures. Gamma is measured by several Imatest modules. 0.5 is the default, typical of many digital cameras.
- Channel: Choose Y (luminance), R, G, and B. Individual channels tend to have better Sharpness numbers than the Y (0.3*R + 0.59*G + 0.11*B) channel because of chromatic aberration.
- Ranking: Determines which gradient is used for ranking. Choose Whole gradient for all directions (this is the default), Horizontal (Vertical edges), or Vertical (Horizontal edges). All three are selected and displayed.
Click on , then crop the image. If the pixel size is the same as the previous run, you’ll be asked if you want to repeat the same regions. Otherwise you’ll be asked to select a crop, using the same dialog boxes as other Imatest modules.
Crop selection criteria In most instances (if you’re measuring image sharpness) the crop should include lines and edges: features that reveal image sharpness. The rare exception is when you’re measuring the effects of (software) noise reduction, where smooth or finely textured crops may be appropriate. Crop size strongly affects speed. We recommend crop sizes under 1MB.After the crop has been selected, the analysis is performed, and the large box below is populated. Small crops of these images were shown in the Introduction, above. The Sharpness numbers are different because the crop is slightly different.

Find Sharp Files results (sorted by Rank). The three numbers on each line
are for combined, vertical, and horizontal gradients, respectively.
The sharpness gradient numbers are NOT standard measurements; they are for comparing relative sharpness only. They are strongly dependent on image features and region selection, and should not be saved or used for any purpose beyond simple sharpness comparisons within a single batch of images.
Viewing image details
Once the Sharpness scan is complete you can view the entire image, the selected crop, or the EXIF data by clicking on a file name in either of the large boxes, then clicking on the , , or buttons at the bottom. (Phil Harvey’s EXIF tools must be installed to view all EXIF data.)
|
|
|
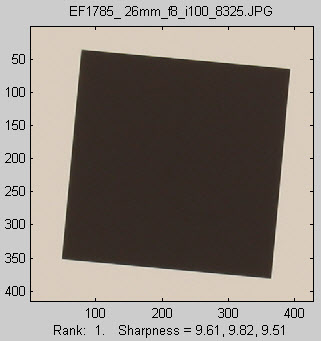
These images are shown here reduced. They can be enlarged and zoomed in.
Example from MTF Curves and Image appearance
The images in MTF curves and Image appearance provide an ideal example of how Find Sharp Files can be used— for general images as well as images of test charts. This page contains ten images each of a portion of the SFRplus test chart and an art gallery. Starting from a reference image (typical of a good quality image from a DSLR cameras), the chart and gallery images were subjected to identical processing: sharpening, blurring (similar to what a poor lens or misfocus would do), and combinations of the two (blurring + the sort of sharpening you might apply to compensate for the blurring). The results for the gallery image are shown below. More details can be found in MTF curves and Image appearance.

Gallery image results, showing ranking
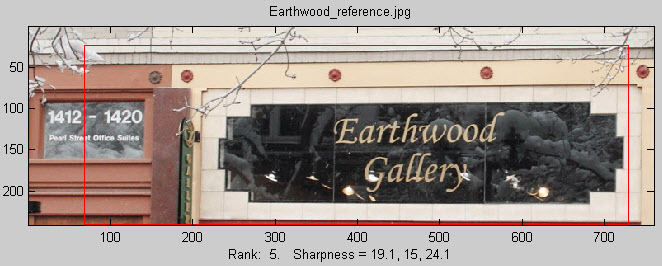
Gallery image, showing crop (in red)

