A proper testing lab setup is essential for obtaining reliable, repeatable image quality measurements. And before configuring your lab with charts and equipment, consider the following:
Note: If you are photographer, student, and artist using Imatest Studio user, please refer to our Photography lab setup guide for relevant information.
Environment
To obtain precise measurements, your test lab should be set up in a space with little ambient lighting such as an interior, windowless room. Walls should be painted neutral middle gray (N5) to black, using a matte, flat, or eggshell wall paint to minimize reflected light. Reflective surfaces, such as polished metal or white/light colored surfaces, should be minimized. All additional light sources, including room lights, windows, doorways to other rooms, and LED indicators on equipment, should be covered or eliminated while conducting tests.
Test Lab Equipment
Imatest offers many solutions for setting up a professional image quality test lab:
- Imatest Modular Test Stand—This test chart mounting system offers great efficiency and versatility. Available with three rail lengths to accommodate different test distances, the base module of our modular test fixture system can accommodate chart sizes 22cm x 28cm (8.50″ x 11″) through 110cm x 144cm (43″ x 56″). The MTS is compatible with Imatest Light Panel sizes C through G (and sizes A and B with an adaptor).
- IMTS Reflective Module – The Reflective Lighting Module seamlessly integrates with MTS base module and the KinoFlo LED Lighting System (sold separately).
- IMTS Wide Field of View Module—integrates with the MTS Base Module to provide an easy to use platform for sharpness testing of wide FOV camera systems up to 200º with test distances between 0.5m – 1.5m.
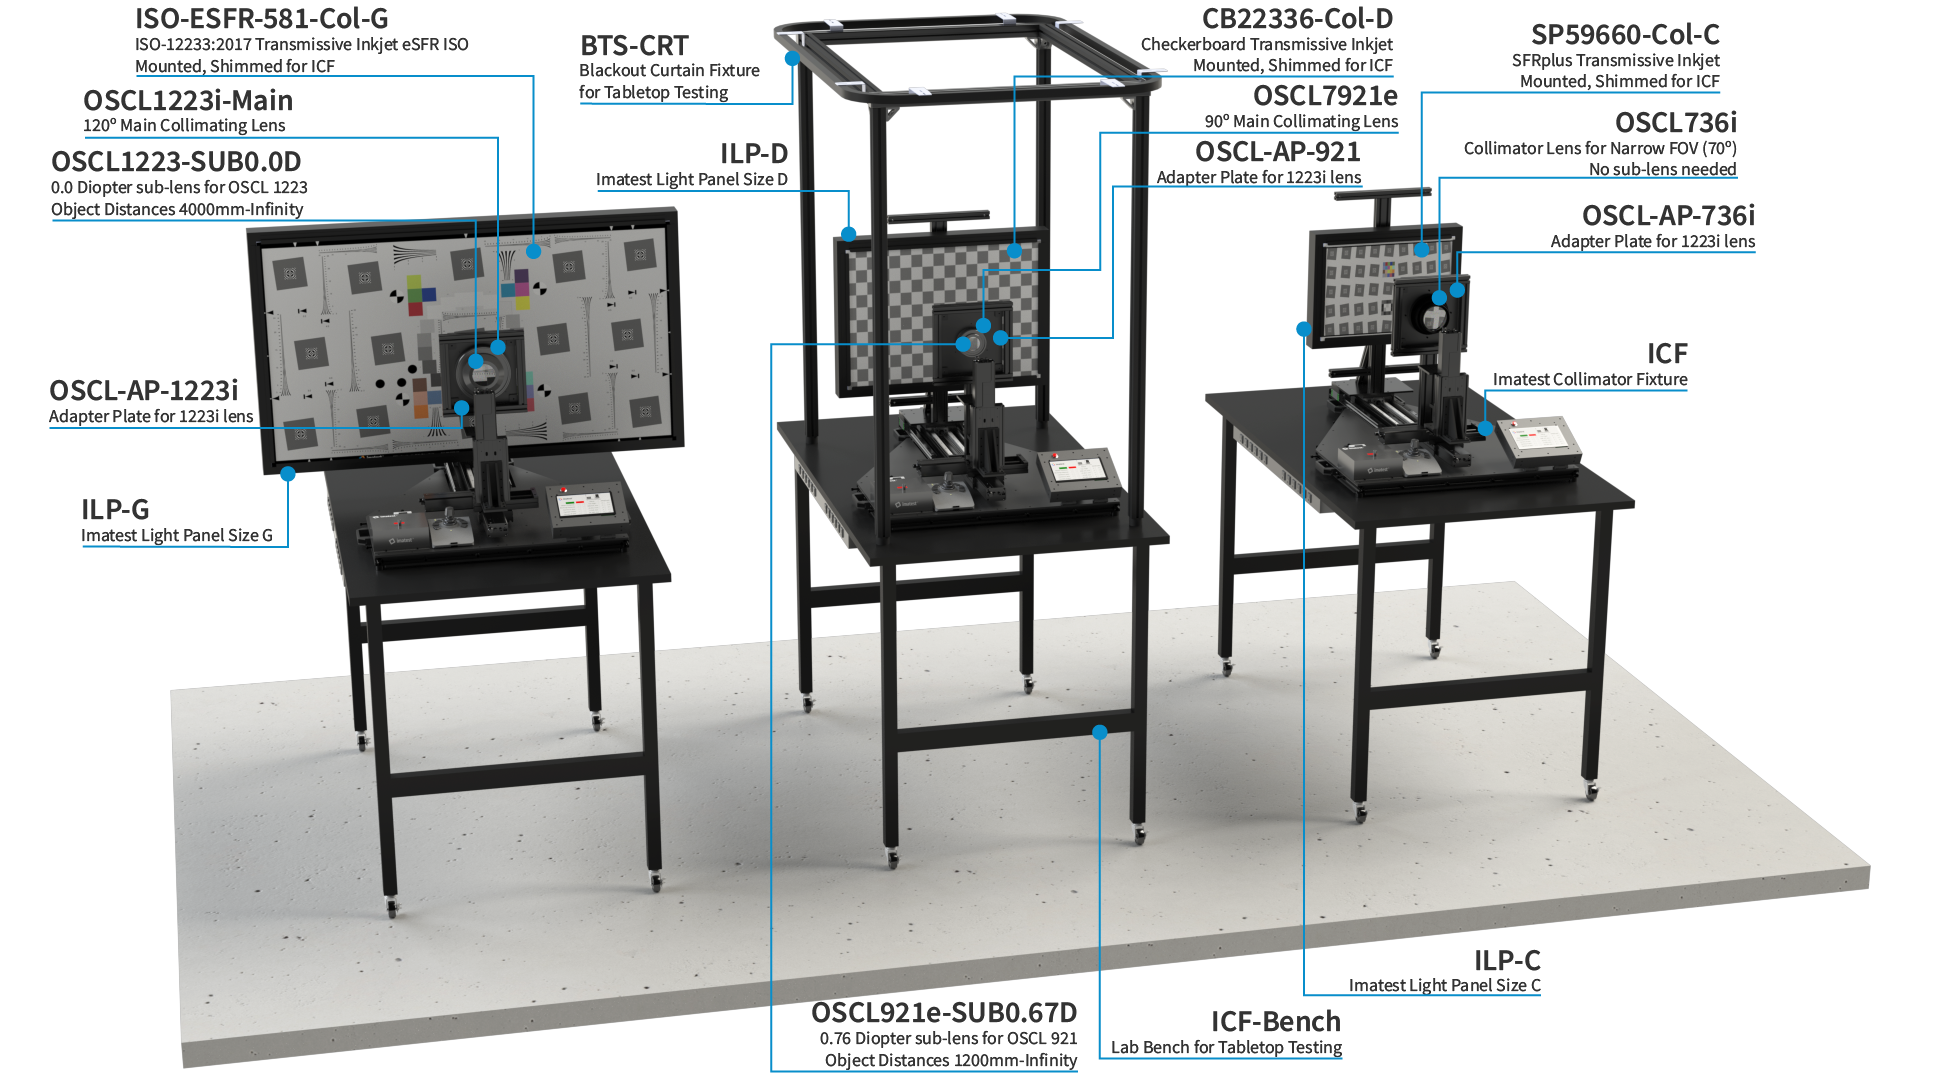
- Collimator Fixture—allows long-range testing in space-restricted environments. Each Collimator Fixture includes a validation procedure that ensures a minimal work-distance error and an onboard computer that display and saves camera positions, lens and light panel configurations, and simulated distances.
- Automatic Test Chart System—uses robotics for the automatic placement of test charts into the imaging plane, offering quick interchangeability between many charts with the touch of a button.

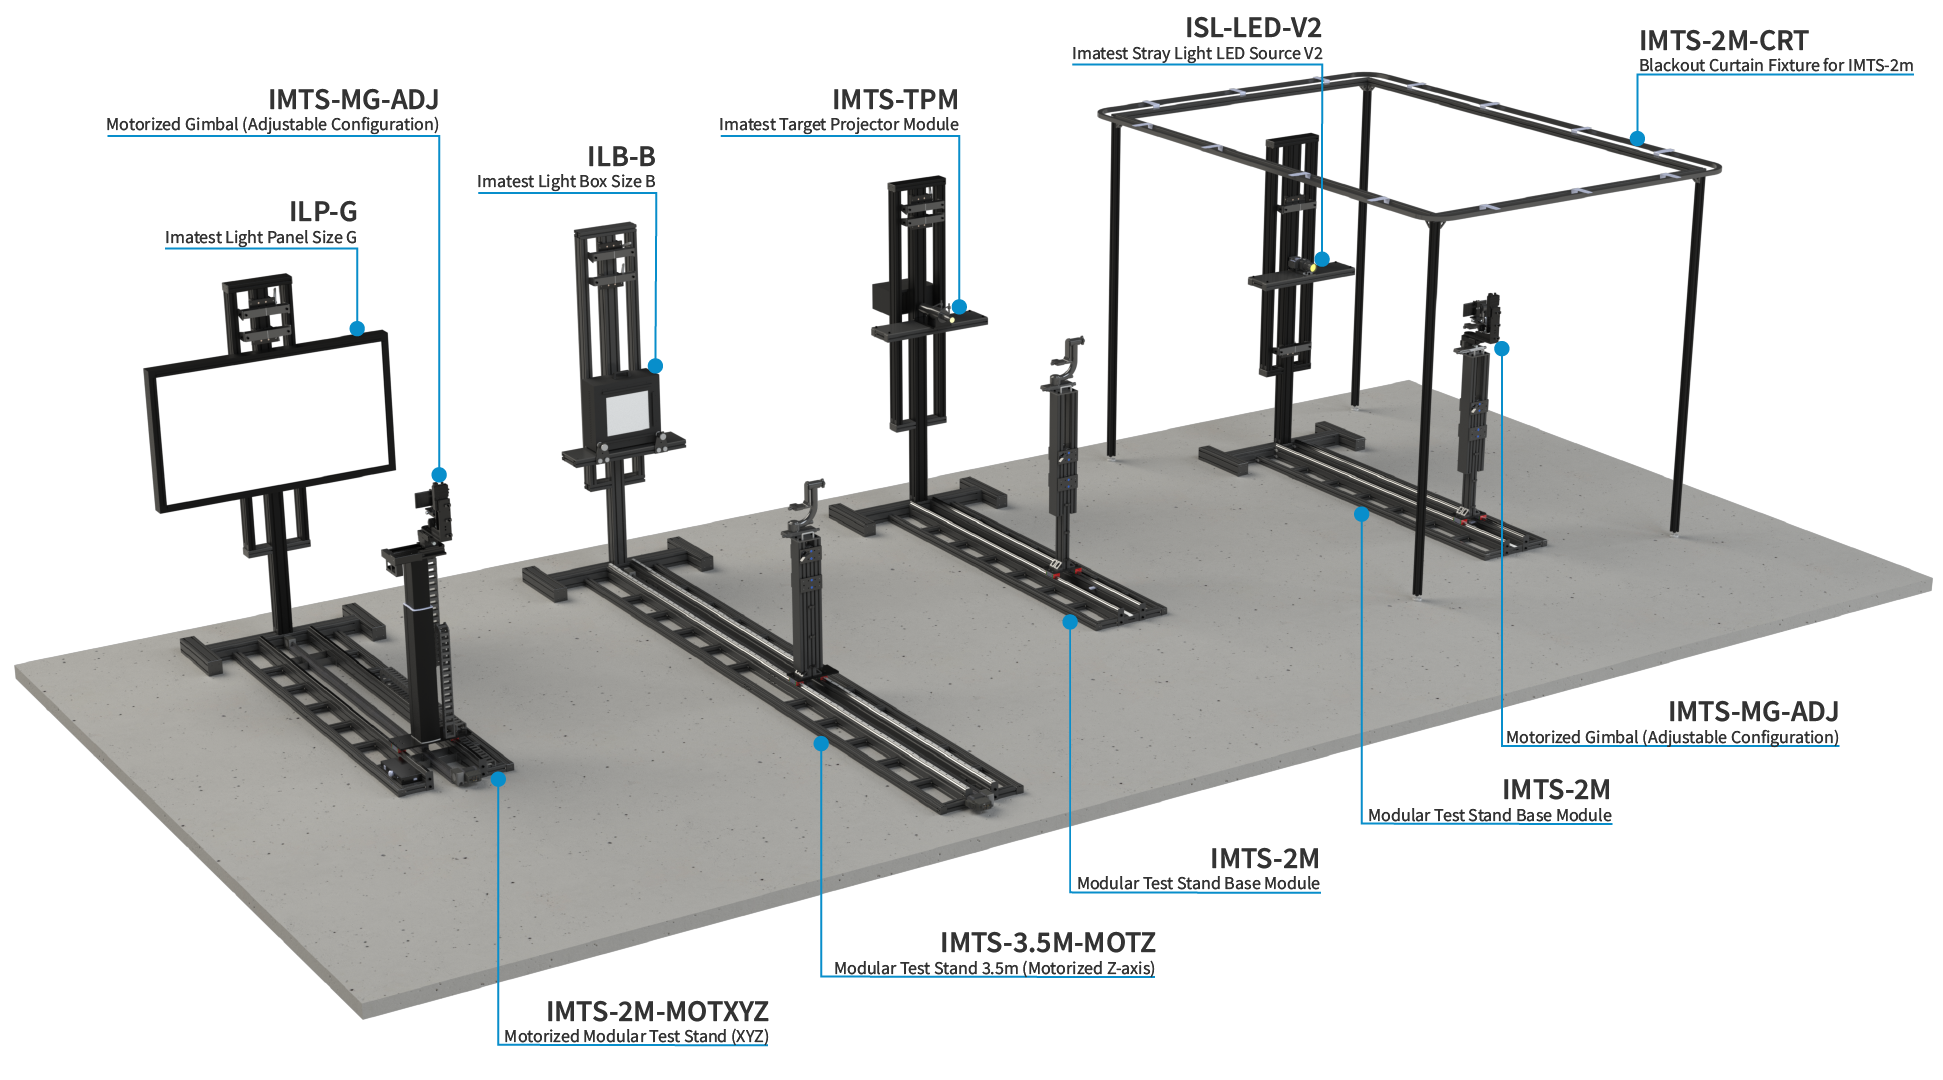
Modular Test Stand Base - 2 Meters
Light Panel Size G
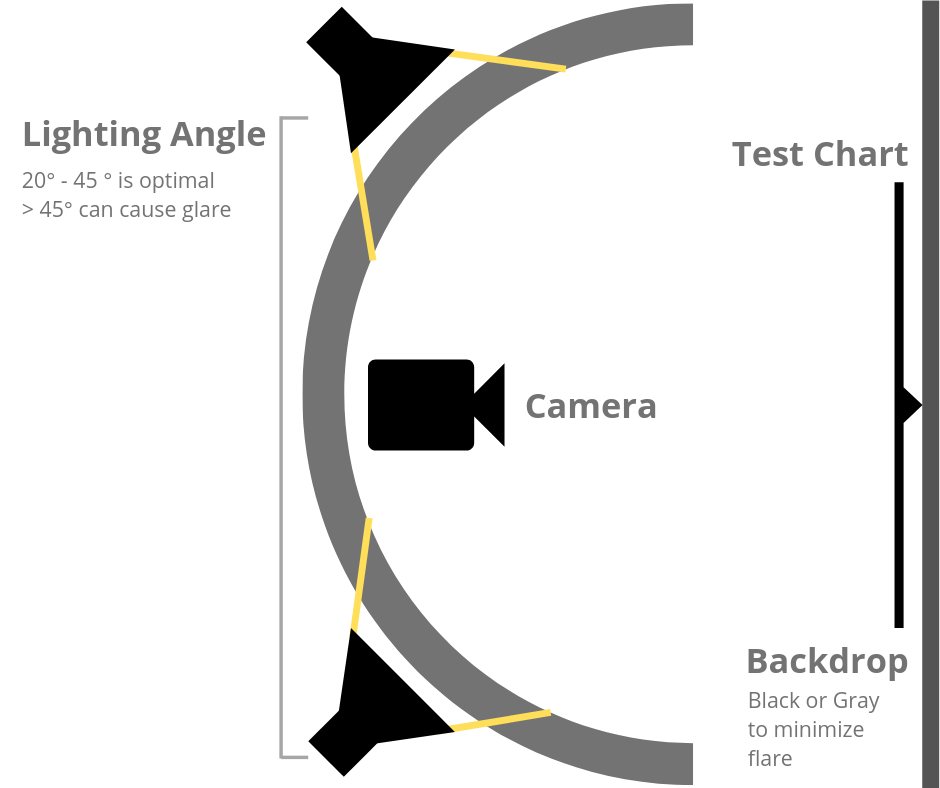
Figure 2. Test lab lighting setup
Lighting
Arrange lighting equipment for even, glare-free illumination. Lighting angles should be between 35° and 45° (Figure 2). Avoid placing any lighting behind the lens or at angles greater than 45° because doing so can cause glare and cast shadows on the test chart. Angles less than 20° can cause issues with texture and lighting uniformity. It is beneficial to have light modifiers to reduce flare light. Orienting your reflective light fixtures vertically allows for even illumination by keeping light levels consistent from the bottom to the top of the test chart. For detailed lighting arrange information, see here.
Addressing Glare
Matte charts are ideally suited for avoiding glare under most test scenarios. Glare in the outer patches of a test chart can ruin measurements and hard to avoid in semigloss charts. If you use semigloss charts, reduce glare by decreasing the angle between the lights and the chart, but verify your illumination levels remain consistent. If you’re not sure whether testing needs can be met with a matte chart or need help troubleshooting glare, contact Imatest.
Lighting Uniformity Requirements
Figure 3. Light Measure Animation. Click image to view.
Lighting uniformity is strongly affected by the distance and orientation of the light source. To measure uniformity, think of the chart like a grid, and check the illuminance level in each grid square. Start by checking the center square, then each corner and side. You may also check the illuminance levels at each key feature of the chart, such as the slanted-edge squares in the eSFR ISO test chart (Figure 3). You should have no more than 20% variance in uniformity over the entire chart for SFR/MTF and distortion measurements, where small portions of the target are analyzed and exposure is not critical. Uniformity with only ±5% variance or better is required for accurate tonal and color measurements (Stepchart, Colorcheck, and Multicharts).
Chart Mounting
Figure 1. Clear Acrylic Mounting for Transmissive Testing
Always wear clean, white cotton gloves when handling a test chart to prevent damage and blemishes. Store your chart in a low-heat, low-humidity environment away from direct sunlight. To ensure accurate and repeatable results, use a professionally mounted chart as well as a mounting system that enables precise alignment of your chart and lens (Figure 1). It is strongly recommended that charts be mounted on a smooth flat surface, like an acrylic board, to ensure no blemishes, bends, or bubbles occur that negatively impact image quality measurements. Imatest offers the option to professionally mount our test charts on acrylic or ePanel. See our Chart Mounting Solutions page for more.
Camera to Target Alignment
Check that your chart and camera system are level relative to one another. The chart need not be level with the ground if it is level with the device. If your environment allows, it is acceptable to test your device pointed down with the chart on a floor or table; e.g., with a microscope.
Software
If you are interested in Imatest software, click here for installation instructions. For more information about Imatest software, see our licensing page. Once Imatest is installed, instructions for getting started can be found here.
Direct Image Acquisition
Imatest supports direct acquisition from a wide range of frame grabbers and cameras as well as industry standard interfaces like CameraLink, GigE Vision, and USB through DirectShow (Windows) or QuickTime (OS X). Direct image acquisition cuts out several steps in the image quality testing process. Click here to learn more.