With Imatest 22.2, a user can evaluate auto-exposure on an appropriate video file using the Color/Tone feature.
(In Imatest 4.4+ the ability to evaluate auto-exposure (AE) as a measure of OECF with respect to time was added. This can still be performed by using the Stepchart module ).
| Related pages | Auto Exposure in Color/Tone |
Autofocus Speed in SFR |
Auto White balance in Color/Tone |
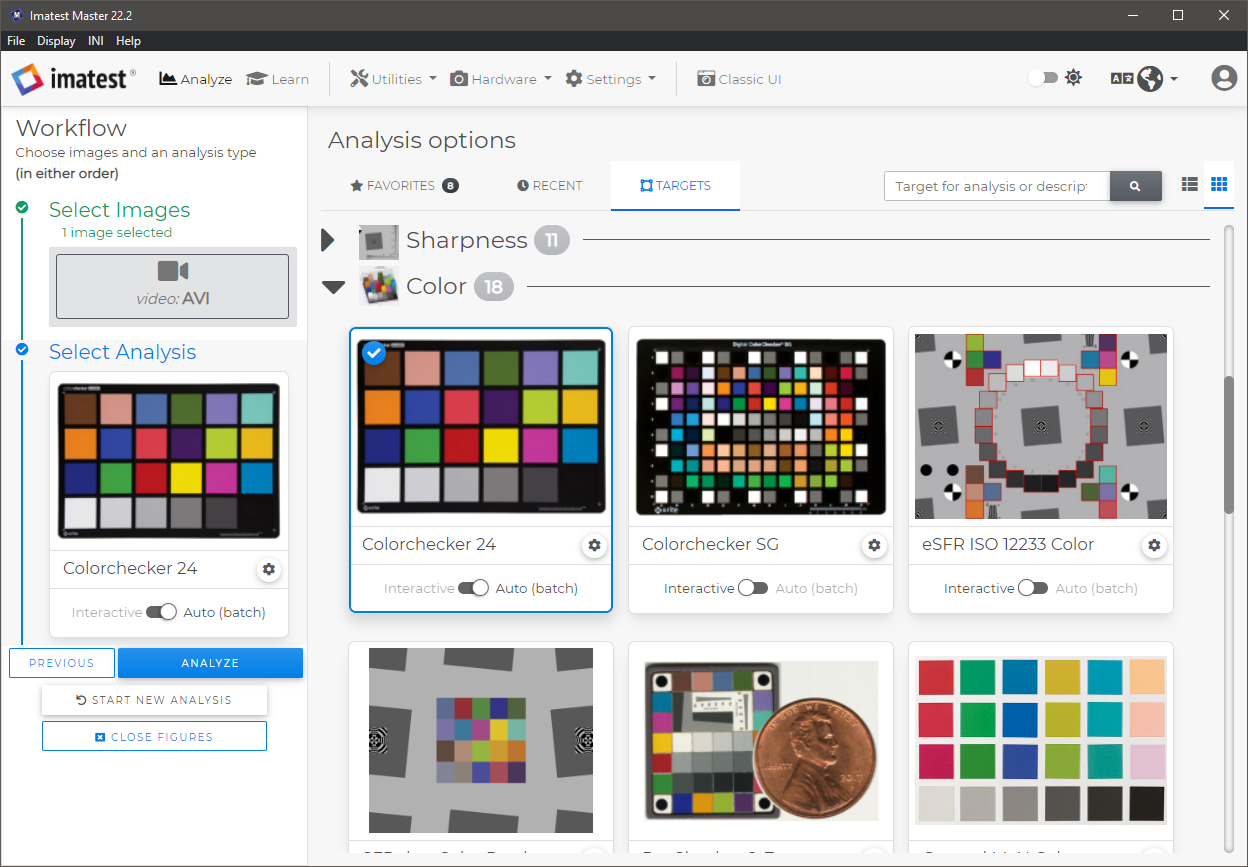
File Selection
- Select a Video File
-
Select the appropriate Target (the chart that was used for the video). In this example, we have used Colorchecker 24, which uses Color/Tone Analysis.
-
Be sure to select Auto(batch) mode.
- Click Analyze to Start the Analysis.
Frame Selection
Select the Plot metric with respect to time: Mean normalized pixel level option and select a range of frames that covers from out-of-focus to in-focus for at least 1-2 seconds.
Any shorter and you risk not having enough frames to ensure the AE system has settled completely.
For more details on supported video formats, see Image file formats and acquisition devices
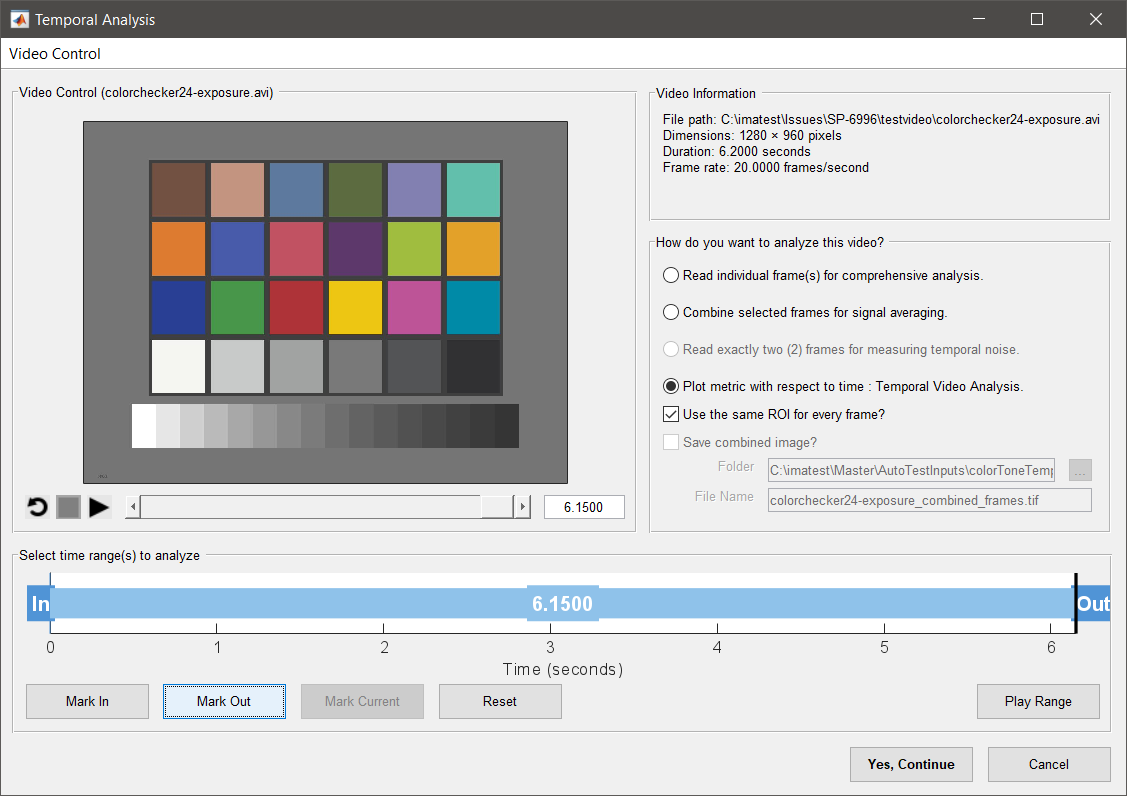
Video Selection window
Region Selection
Select the Region to be analyzed.
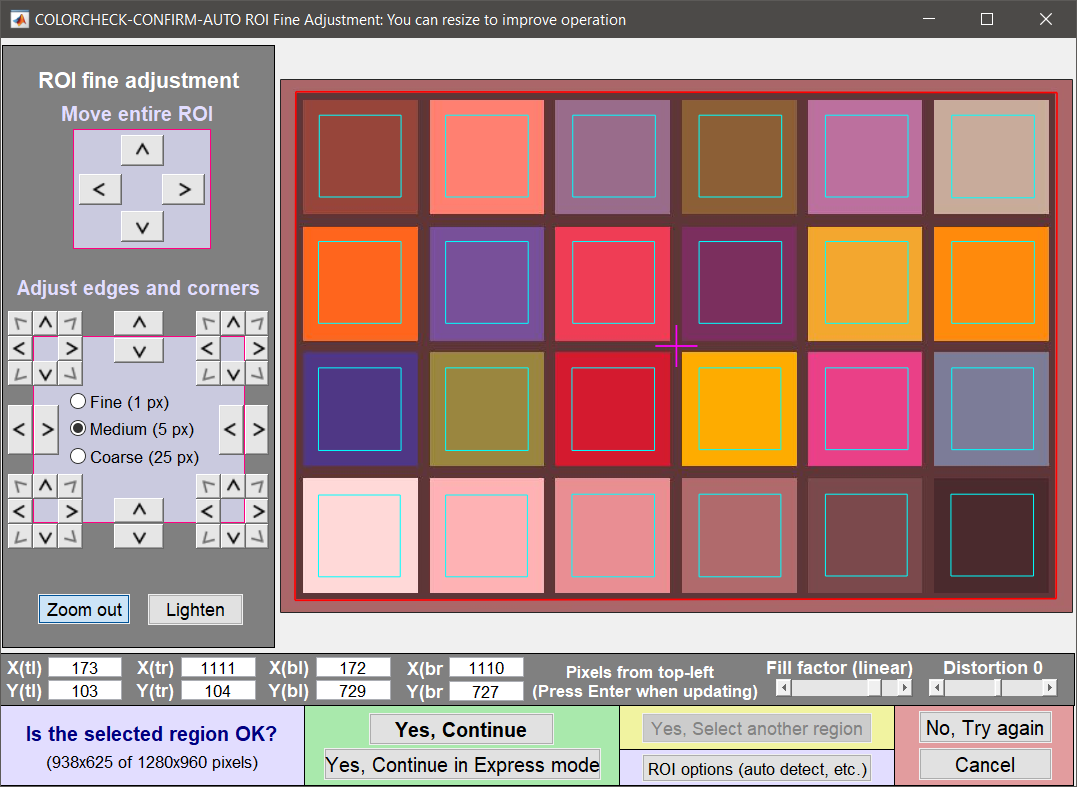
Region Selection window
Note that when selecting regions, the first frame in the sequence is used since that frame should be completely in-focus, making region selection easier.
Color/Tone Auto Settings
There are 4 new Temporal Video Analysis checkboxes near the bottom of the Settings window.
For auto exposure (AE) Analysis, choices are any or all of:
- Temporal Video Analysis: Mean Normalized Pixel Level
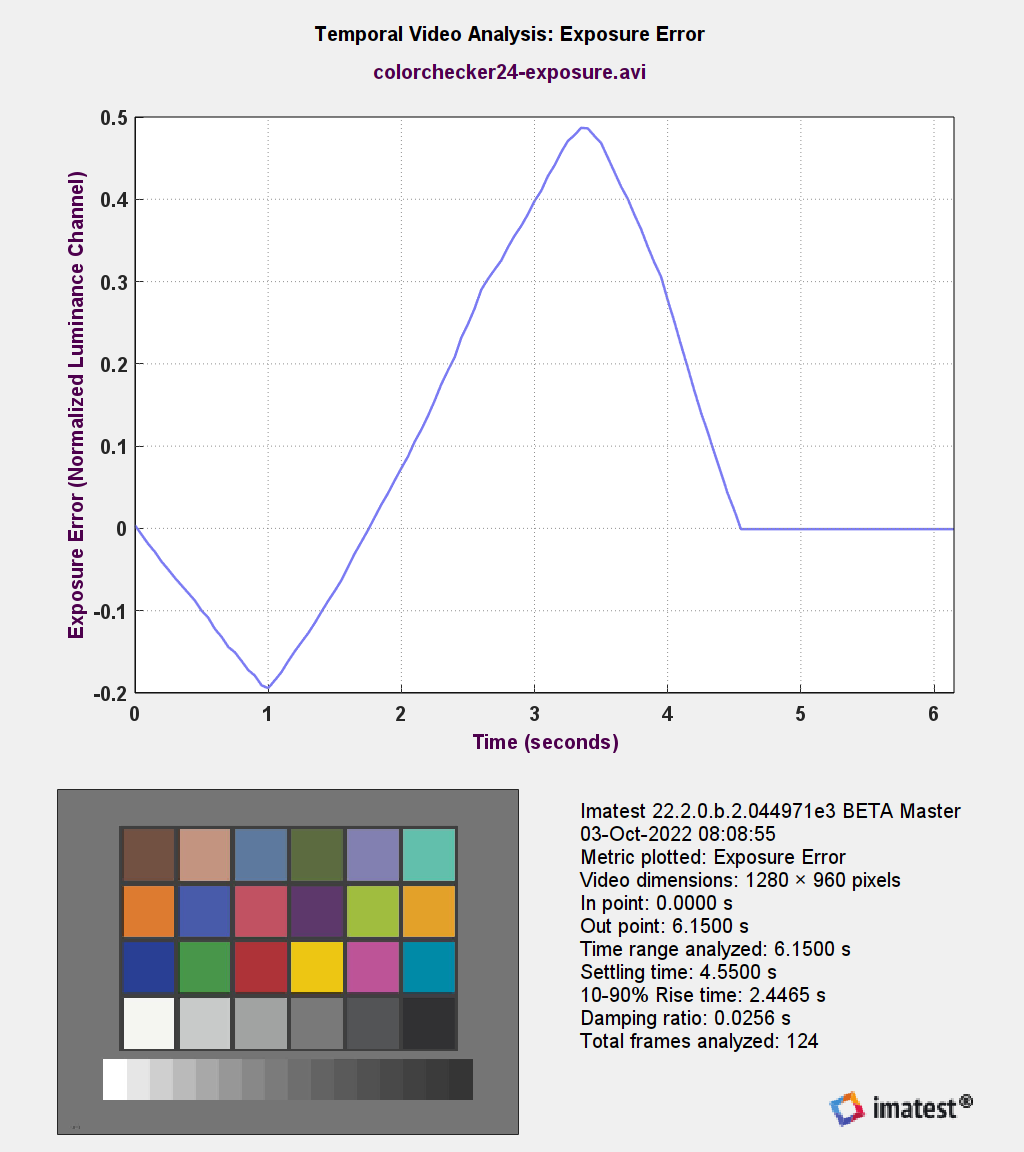
- Temporal Video Analysis: Exposure Error
- Temporal Video Analysis: CPIQ Exposure Quality Loss
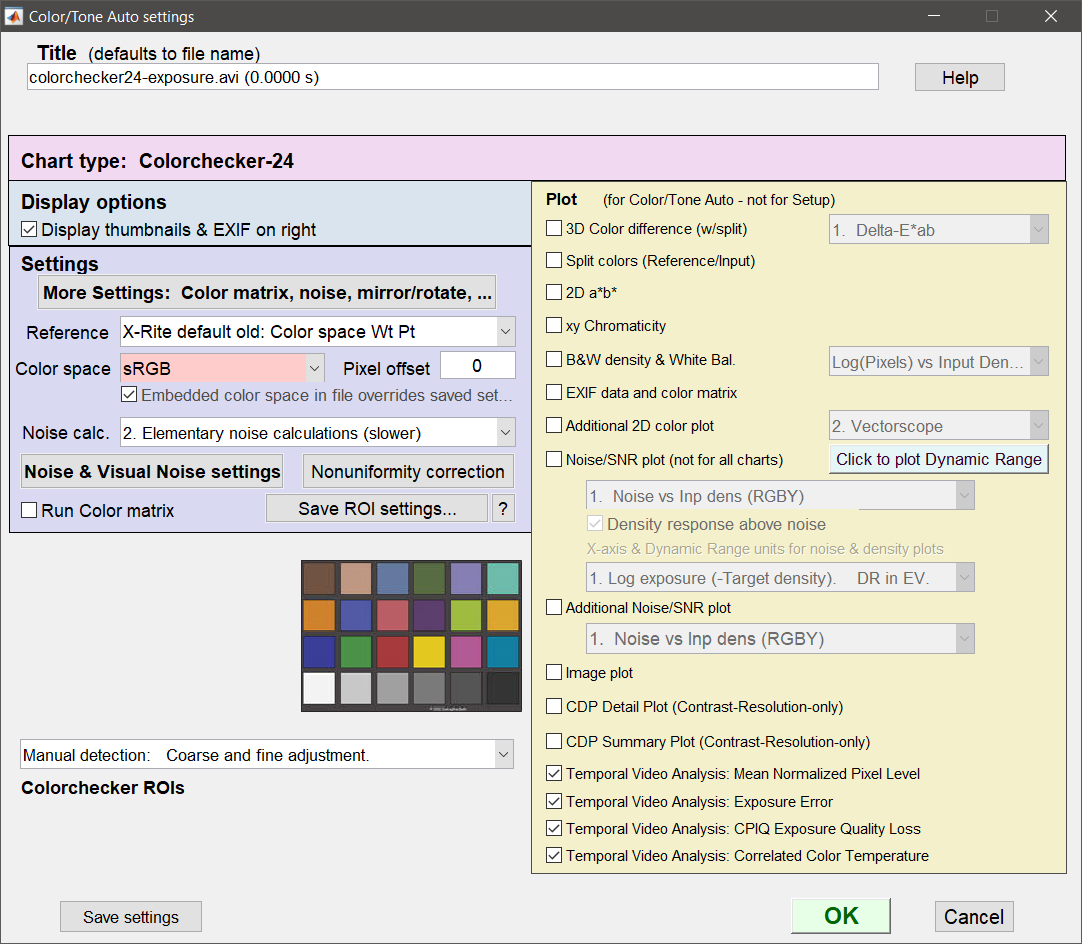
The 4th Temporal Video Analysis option (Correlated Color Temperature) allows the analysis of Auto White Balance.
Save Options
Checkboxes on the Save Results page allow Saving of any or all of the plots, as well as JSON and/or CSV reports.
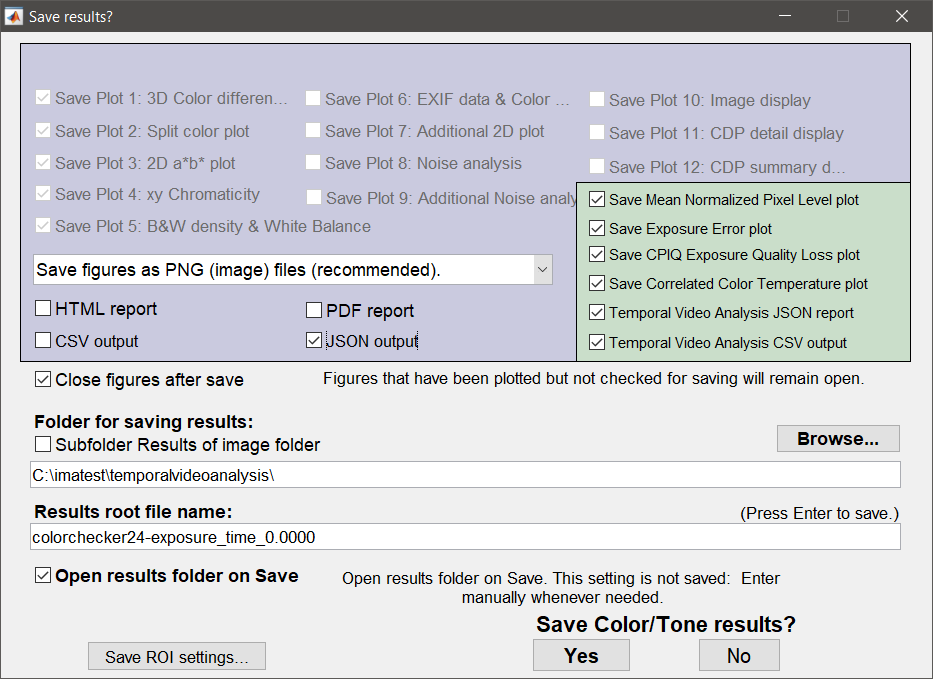
Outputs
The final output figure will be displayed at the end of the run and saved to the output save directory if selected.
If no plot options are selected, nothing will be displayed. CSV and JSON outputs will always be saved to the output save directory.
![]()
Auto exposure – Mean Normalized Pixel Level Output
The Mean Normalized Pixel Level plot will contain the mean pixel level with respect to time for each patch of the measured chart.
The time axis (x-axis) will be in units of seconds and will be in units of absolute time from the video file.
The figure will also contain some details about the run including ROI size, in and out points in the video file, total time range, settling time, 10-90% rise time, and total frames analyzed.
Settling time and rise time are calculated on the average signal from all gray patches of the chart.

Results
The 10-90% rise time (or 90-10% fall time) is the duration in seconds for the metric to vary between 10% and 90% of its max value. The first frame of this phase is known as the scene change onset. Settling time is the time in seconds between scene change onset and metric convergence. Convergence is defined as the first frame of the first window which all metric values fall within ± 5%¹ of the mean(L*) across that window. The window size is equal to 1/3 of a second (num_frames = 1/3 * video_fps), bounded by a minimum value of 10 frames and maximum value of 50 frames.
[1] The settling threshold can be adjusted via the [section] temporal_video_settling_threshold INI key. The default is 0.05 (5%).
JSON
The JSON output file will contain the following structure:
(this assumes all boxes were checked)
ImatestResults:
- TemporalVideoAnalysis:
- Video: VideoName
- VideoDimensions:
- Width: Video width in pixels
- Height: Video height in pixels
- SettlingTimeThreshold_pct: An advanced setting accessible only through
[section] temporal_video_settling_thresholdINI key. This setting sets the criteria for determining if and when a metric has settled. The default is 0.05 (5%) which the remaining documentation references. - InPoint: The selected in-point for the video in seconds
- OutPoint: The selected out-point for the video in seconds
- TotalTime: The total time evaluated (equivalent to OutPoint – InPoint)
- TotalFrames: The total number of frames analyzed. Depending on whether or not the video is variable frame-rate, this may not be equivalent to TotalTime*fram-rate.
- MeanNormalizedPixelLevel:
- Metric: Mean Normalized Pixel Level
- Units:
- SettlingTime: The time taken for the specified metric to settle to +/- 5% of the mean in seconds
- RiseTime: The time taken to go from 10% to 90% of the starting mean to the settled mean in seconds
- DampingRatio: The damping ratio of the measured state change
- Time: An array of measured time values in seconds
- Data: The measured value for each point in time. In the units specified in Unit.
- ExposureError:
- Metric: Exposure Error
- Units: f-stops
- SettlingTime: The time taken for the specified metric to settle to +/- 5% of the mean in seconds
- RiseTime: The time taken to go from 10% to 90% of the starting mean to the settled mean in seconds
- DampingRatio: The damping ratio of the measured state change
- Time: An array of measured time values in seconds
- Data: The measured value for each point in time. In the units specified in Unit.
- CPIQExposureQualityLoss:
- Metric: CPIQExposureQualityLoss
- Units: JND
- SettlingTime: The time taken for the specified metric to settle to +/- 5% of the mean in seconds
- RiseTime: The time taken to go from 10% to 90% of the starting mean to the settled mean in seconds
- DampingRatio: The damping ratio of the measured state change
- Time: An array of measured time values in seconds
- Data: The measured value for each point in time. In the units specified in Unit.