Gamutvision main page – Gamutvision Table of Contents/Site map – Using Gamutvision – Using Gamutvision 2: Displays
Introduction – BPC off – BPC on – Linear results & formula – Details
Introduction
Black point compensation (BPC) can be a source of bewilderment for digital printmakers. There is plenty of conflicting advice on whether or not to check the BPC box when making prints from Photoshop or other programs. This page contains a clear explanation of BPC.
BPC must be explained visually; verbal descriptions don’t cut it. Available descriptions have improved since Gamutvision was first released, but they’re far from perfect. The ICC white paper on Black Point Compensation is quite long and very detailed.
|
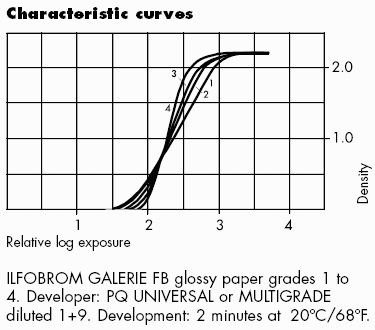
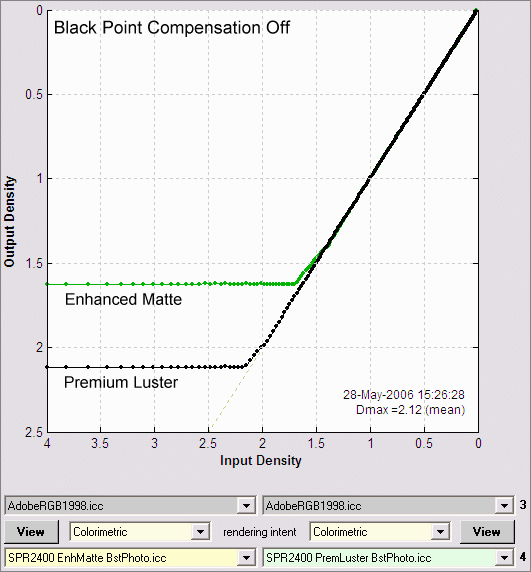
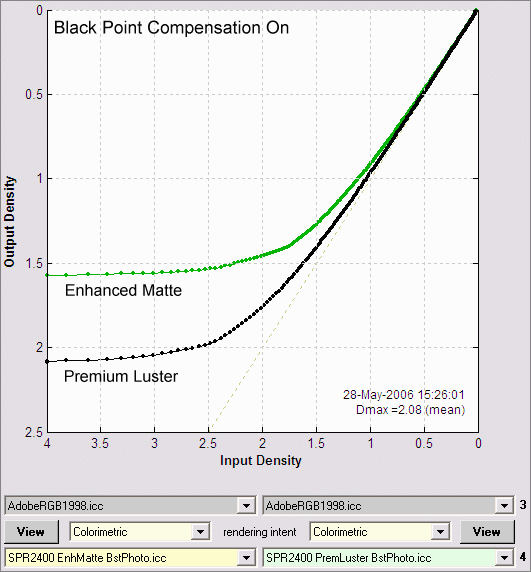
The figures below contain Gamutvision™ results without and with BPC for the Epson R2400 printer with Enhanced Matte and Premium Luster papers. All results are derived from Epson-supplied ICC profiles, using Gamutvision’s B&W density response display, which is the digital counterpart (with axes reversed) of characteristic curves for photographic paper, illustrated on the right for Ilfobrom Galerie FB glossy paper. These curves are displayed logarithmically. Density is defined as -log10(reflected light/incident light), proportional to -log10(luminance). Increasing density by 1 decreases brightness by a factor of 10; doubling or halving exposure (or brightness) corresponds to a density change of 0.301. The maximum printable density (Dmax) for the Ilford Galerie FB paper is an outstanding 2.2 (a very deep black). |
 |
BPC (in Gamutvision as well as Photoshop and other editors) applies only to Colorimetric rendering intents. BPC is always on for Perceptual intent, regardless of whether the box is checked. Details below. In Gamutvision, BPC is set with a dropdown menu which has four settings: (Off, 1>2 (Left data flow), 3>4 (Right data flow), and Both (On).
Black point compensation off
Print density is proportional to file density for file densities less than the maximum printable density (Dmax). (Dmax = 1.63 for Enhanced Matte paper; Dmax = 2.12 for Premium Luster paper.) Pixels with lower values (representing higher densities) print at paper black, i.e., they are clipped (chopped off); no detail is visible. File and print densities are explained below.
Black Point Compensation on
Print density rolls off smoothly (is rounded) in the region around density = Dmax. Tonal detail is still present where file density is greater than Dmax. Some tones are lightened, but print density approaches Dmax at the lowest pixel levels.
Summary: With BPC off, response is linear with the lowest pixel levels clipped (chopped off) at Dmax; with BPC on, response is rounded, i.e., it has a “toe” region around Dmax where some detail is present. Tones in the “toe” are lightened slightly, but tones for the lowest pixel levels approach Dmax.
| In this author’s opinion, the best match between the monitor image and the print (for fine art photography) takes place when BPC is turned on. My default print setting is Relative Colorimetric rendering intent with Black point compensation on. BPC should probably be turned off for scientific or technical imagery. |
Linear results & formula
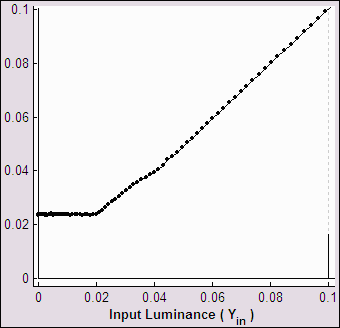
When you look at the linear results: Output vs. Input luminance, the LittleCMS BPC algorithm becomes even clearer.
 BPC off BPC off |
 BPC on BPC on |
|
Output vs. Input Luminance (linear display)
|
|
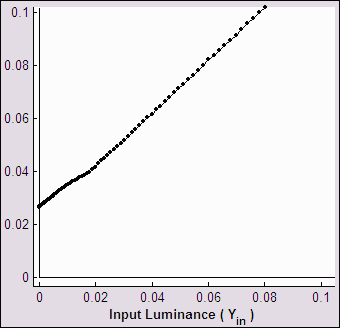
These plots contain exactly the same data plotted above for Epson Enhanced Matte (BstPhoto). The only difference is that they are linear: they plot luminance rather than density (-log10(luminance)). A minimum luminance of 0.024 (relative to a maximum of 1.0), shown in the left plot (BPC off), is equivalent to a maximum density of 1.62.
With BPC off, Output luminance tracks Input luminance down to the medium’s minimum luminance (Lmin = 10-Dmax ); it is constant (equal to Lmin) for lower values of input luminance. With BPC on, Output tracks Input linearly all the way down. The equations (for Input and Output luminance normalized to 1) are,
| BPC off | Output luminance = Input luminance ; Lmin < Input luminance ≤ 1 Output luminance = Lmin ; Input luminance ≤ Lmin |
| BPC on | Output luminance = Lmin + (1-Lmin) × Input luminance |
Details
- BPC is always on for perceptual rendering intent, i.e., the checkbox setting has no effect.
- BPC can be turned on or off for (Relative) Colorimetric and Saturation rendering intents.
- BPC is always off for Absolute (Colorimetric) rendering intent. [Unresolved issue: I’ve been told that BPC should work with Colorimetric intents, i.e., Relative and Absolute. Perhaps Absolute and Saturation have been swapped somehow.]
- Input density is derived from pixel levels in the image file. For a file with bit depth of 8 (levels from 0 to 255), luminance = (pixel level/255)gamma, where gamma is specified by the file’s color space. For example, Adobe RGB (1998) has gamma = 2.2. Since density is proportional to -log10(luminance),
input density = –gamma log10(pixel level/255). - Output density is derived from the printer profiles (in the files at the bottom of the figures). It is calculated when Gamutvision’s B&W density response display is selected.
- In a printer that could reproduce infinitely deep black tones, output density would track input density all the way down to zero. But real-world printers cannot print any darker than a maximum density, which is called Dmax. Dmax is a function of the paper surface and the type and amount of ink. Glossy or semigloss papers tend to have higher values of Dmax (2 or higher) than matte (fine art) papers (typically around 1.6-1.7). Black point compensation specifies the printers behavior around Dmax.