Differences with in-camera JPEGs – Monochrome images – Bayer frequency units
DNG files – Rawview utility – Generalized Read Raw (for binary raw files)
Decompanding – Estimating image width & height – Creating Synthetic raw images
The unprocessed digital output of an image sensor is called RAW image data. In this document, we sometimes refer to raw files from commercial cameras or development systems as Camera raw to distinguish them from Bayer raw files, which are standard monochrome image files that contain undemosaiced (Bayer) data.
Imatest modules can analyze raw files directly or after demosaicing.
| Bayer Color Filter Array (CFA) The pixels in most digital image sensors are covered with the Bayer CFA, which makes each pixel sensitive to a single primary color, Red, Green, or Blue. The order of the colors is RGRGRG…, GBGBGB…, etc., in alternating rows. There are twice as many greens as reds or blues because the eye is most sensitive to green. The four possible pixel arrangements (Red locations) are shown on the right, where pixel locations start with Row 1 Column 1 (R1C1) at the upper left corner. There is no universal standard for mapping colors (R, G, or B) to pixel position (RmCn). The arrangement can be determined by examining a Bayer raw image file that contains recognizable colors with the Rawview utility, which can be opened from a button on the right side of the Imatest main window. |
|
| RCCC (Red-Clear-Clear-Clear) sensors In addition to the well-known Bayer CFA Imatest supports RCCC sensors, which are used in the automotive industry (where red has special significance). Like Bayer sensors, the red channel can be in any of four positions (two are shown on the right). Rawview can help determine the red position. RCCC images are not demosaiced in the traditional sense; they are converted to monochrome images. The Monochrome settings and Generalized Read Raw windows (shown below) include options to remove the red channel from the total image or select the red channel-only. The methods are described in “Interfacing Red/Clear Sensors…” from Analog Devices. |
|
||||||||||||||||||||||||||||||||||||
| RCCB (Red-Clear-Clear-Blue) sensors can be demosaiced just like Bayer CFA images. They can be analyzed in the same way in the early stages of image processing. Colors won’t resemble regular RGB color images until a strong Color Matrix is applied (to remove the red and blue components from the clear channels). |
|||||||||||||||||||||||||||||||||||||
To be usable in most applications, raw files must be demosaiced (though many Imatest modules can analyze raw files directly). Demosaicing (sometimes spelled demosaicking) a form of interpolation that fills in the missing colors for each pixel. It is the primary function of raw converter programs (which may be either built into the camera or installed on a separate computer). In demosaicing, detail in the missing colors is inferred from detail in other, neighboring colors. Algorithms can be very mathematically sophisticated. A good example (which is the basis of Matlab’s gradient-corrected linear interpolation demosaic routine) in High-Quality Linear Interpolation for Demosaicing of Bayer-Patterned Color Images by Henrique S. Malvar, Li-wei He, and Ross Cutler of Microsoft.
In addition to demosaicing, converting raw images into standard interchangeable image formats may include
- applying a gamma curve, often with an added tonal response curve (which often has a “shoulder”, i.e., a rounded region),
- white balance and color (matrix) adjustment,
- sharpening, usually in the neighborhood of contrasty features, and
- software noise reduction, typically in the absence of contrasty features.
All these steps can affect Imatest measurements. To minimize their effects (to convert raw files without sharpening, noise reduction, and tonal response curves) Imatest uses the following techniques:
- For commercial raw files, which are proprietary to camera manufacturers (e.g., CR2 for Canon and NEF for Nikon) and contain proprietary metadata that may be packed (m pixels into n bits), Imatest uses LibRraw, a freely available program for converting commercial RAW images to useful file formats with minimal processing. LibRaw can optionally apply a simple gamma curve (with no additional tonal response curve) and white balancing (based on the camera setting), but it never sharpens or applies noise reduction.
- For the output of manufacturer’s development systems, which is typically pure binary data, 1 or 2 bytes per pixel, Imatest uses Generalized Read Raw, described below. Generalized read raw can optionally apply a simple gamma curve and white balancing (based on the crude “gray world” algorithm). Output images can be color-corrected (using a matrix) in Color/Tone Interactive or Color/Tone Auto and sharpened or noise-reduced in Image Processing. An extension has to be specified that corresponds to the file format (most importantly, the number of rows, columns, and bit depth).
Raw files in Imatest
Imatest can use RAW files in two ways.
- It can demosaic raw files, producing standard 3-color RGB image files in TIFF, PPM, PNG, or JPEG format, with TIFF as the default. The advantage of using LibRaw or Generalized Read Raw is that they apply no sharpening, no noise reduction, and a straight gamma curve. LibRaw offers several choices for gamma, including 1/2.2 (for typical displays), sRGB (close to gamma = 2.2, but with a linear region in the deep shadows), and 1.0 (true linear). If raw files are available, cameras and lenses from different manufacturers can be compared on a consistent, fair basis. LibRaw should be used with caution in Colorcheck and Stepchart because is performs autoexposure (automatic white level adjustment) by default. The Auto white level button should be unchecked to get the correct levels. According to the dcraw FAQ, “No matter how dark an image is, dcraw’s auto-exposure stretches it so that one percent of its pixels appear white. The “-W” option avoids this behavior.”
- It can convert camera raw files into Bayer raw (undemosaiced) files stored in standard monochrome image file formats (TIFF, PNG, or PGM). Most Imatest Master modules can analyze Bayer raw files.Bayer Raw is valuable for measuring lateral chromatic aberration, which can be strongly distorted by the demosaicing process. It also allows the two raw green channels (Gr and Gb) to analyzed separately. Caution: LibRaw may apply some tonal processing, even though the documentation indicates it doesn’t, i.e., gamma measured by Stepchart and other modules may be quite different from the expected value of 1. (This may be due to uncorrected offsets the raw files themselves).
To use raw files in Imatest, either
- Click on an Imatest module (SFR, Stepchart, etc.) and open the file just as you would any other image file. If the file extension indicates a camera raw image file supported by LibRaw(CR2, NEF, etc.— even Phase One RAW TIF files), the dialog box shown below for setting Libraw (formerly dcraw) parameters is opened. If the file extension has been entered into Generalized Read Raw, the file will be read and decoded according to the Read Raw settings.
- Click on the LibRaw box on the right side of the Imatest main window (or click Modules, Run LibRaw) to run LibRaw as a standalone application: the output file will be saved but no Imatest module will run. The dialog box shown in the LibRaw section below is a graphic user interface (GUI) front-end to LibRaw that allows you to select several of LibRaw’s options.
Processing commercial raw files with LibRaw
|
Note: Support for LibRaw was added in Imatest 2021.1. dcraw was deprecated in 2021.2. It offers up-to-date camera support. dcraw was available as an option prior to 2021.2, but does not support post-2019 raw file formats. Prior to the addition of LibRaw, to convert raw images not supported by dcraw, you needed to first convert them to DNG format using the free Adobe DNG converter. |
The best way to be sure an image file used by Imatest faithfully resembles the raw file— that it has a straight gamma curve, no sharpening, and no noise reduction— is to read a raw file into Imatest and convert it to a standard format (TIFF, PPM, etc.) using LibRaw (or before 2021.1, Dave Coffin’s dcraw). If you select any of the standard raw formats (CR2, CR3, NEF, etc.) or if raw data is detected (e.g., Phase One TIF files) a dialog box appears. It is a front-end to LibRaw that allows you to choose between several raw conversion options. Presets are in the pink box on the right.
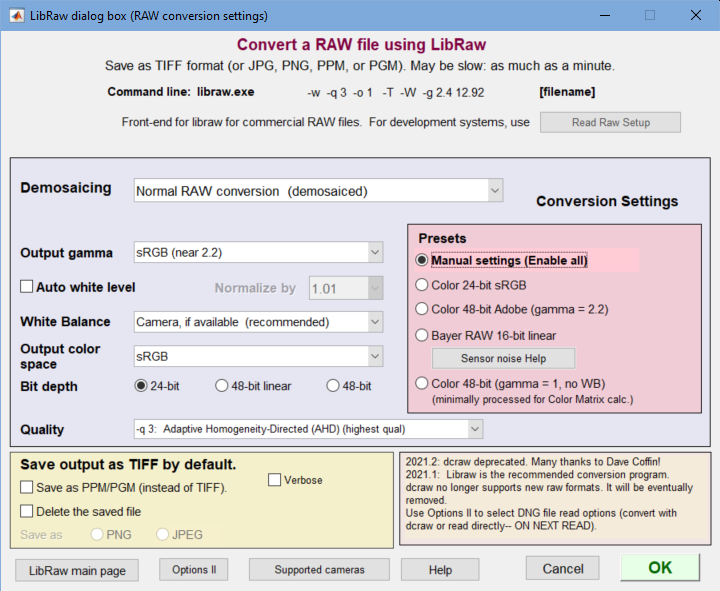 LibRaw settings window.
The Program dropdown, which is no longer needed, has been removed.
LibRaw can either (A) demosaic camera raw files with minimal processing— no sharpening, no noise reduction, and a simple gamma curve, or (B) convert them to standard 8 or 16-bit monochrome file formats (TIFF or PGM) that contain Bayer RAW (undemosaiced) data, which can be analyzed by several Imatest Master modules. This conversion has the following choices:
| Demosaicing | Normal raw conversion (demosaiced) |
| Raw 8-bit (Bayer raw; no demosaicing) | |
| Raw 16-bit (Bayer raw; no demosaicing) |
If the second or third option above (Raw 8-bit or Raw 16-bit) is selected, most the Demosaicing area (above) is grayed out and the output of LibRaw is a monochrome TIFF or PGM file that contains undemosaiced (Bayer raw) data from the image sensor.
Note: the pixel levels and gammas of undemosaiced (Bayer raw) files do not appear to be reliable as of July 2009, apparently because offsets in the raw image are not removed. Levels are too dark if Auto white level is unchecked, and the gamma is incorrect (for Canon CR2 raw files). Exposure and gamma are reliable with normal raw conversion (with demosaicing).
Support for LibRaw was added to Imatest version 2021.1, and supports a wide array of cameras. LibRaw options are still available in 2021.1, but has been deprecated in 2021.2.
If Normal raw conversion (demosaiced) has been selected, the Demosaicing box contains several options, most of which are explained in more detail in the dcraw Manpage (a comparable page on the LibRaw website has not been located). The following output color spaces are available for demosaiced output.
| Raw (not true raw pixels). Demosaiced with no color space conversion or White Balance. The camera’s color profile is needed to correctly interpret the colors. Gamma = 0.45. |
| sRGB, Adobe RGB (1998), Wide Gamut RGB, ProPhoto RGB, and XYZ. |
Profile tags are embedded in the output file for the four standard color spaces. Several demosaicing quality levels (using different algorithms) are available (and worth exploring). See the dcraw Manpage for details. Auto white level is the default. It can be turned off for tonal measurements.
LibRaw converts raw files into TIFF files by default, with the obscure PPM format available as an option. If check the box to delete the converted (TIFF) file, you may save the image in one of two compressed formats: PNG (lossless compression; takes longer) or JPEG (lossy compression; maximum quality; 24-bit only).
A list of supported cameras appears on the LibRaw site.
|
Differences between in-camera JPEG and LibRaw-converted files The two file types typically have a different appearance because
Information on the tonal response curve, sharpening and noise reduction is contained in (EXIF) metadata in the raw file. This information is ignored by LibRaw, but it may be used in some programs, like Irfanview or Photoshop, that can read raw files. |
Monochrome/Bayer Raw (or RCCC) file selection
When a monochrome file is opened by an Imatest Master module that supports Bayer RAW analysis, the dialog box shown below appears. (It won’t appear if Do not display this window… has been checked. It can be restored by clicking Settings, Monochrome read dialog… in the Imatest main window.)
The four buttons on the left cause immediate action (the window closes and processing continues): , , and . , and .
should be selected for ordinary monochrome image files that do not contain Bayer RAW or RCCC data.
For Bayer raw and RCCC files the color interpretation depends on the Pixel color mapping selection (Red in R1C1 for Canon; Red in R1C2 for Panasonic, etc.) The correct setting for Bayer raw images can be found by running the Rawview utility on an image with recognizable colors. Bit shift may be useful for 16-bit images that are often dark without a shift.
processes the image, which consists of four channels (Red, Green (Red row), Blue, and Green (Blue row)— abbreviated R, G(r), B, G(b)) without demosaicing. The primary channel to display (and in some cases analyze) is selected in the Primary channel to analyze dropdown menu. This setting may be overridden in individual modules (it’s not critical).
either demosaics the image (appropriate for Bayer sensors) or processes it as RCCC. The demosaicing or RCCC processing algorithm must be selected in the dropdown menu to the right of the button. Options are shown below.
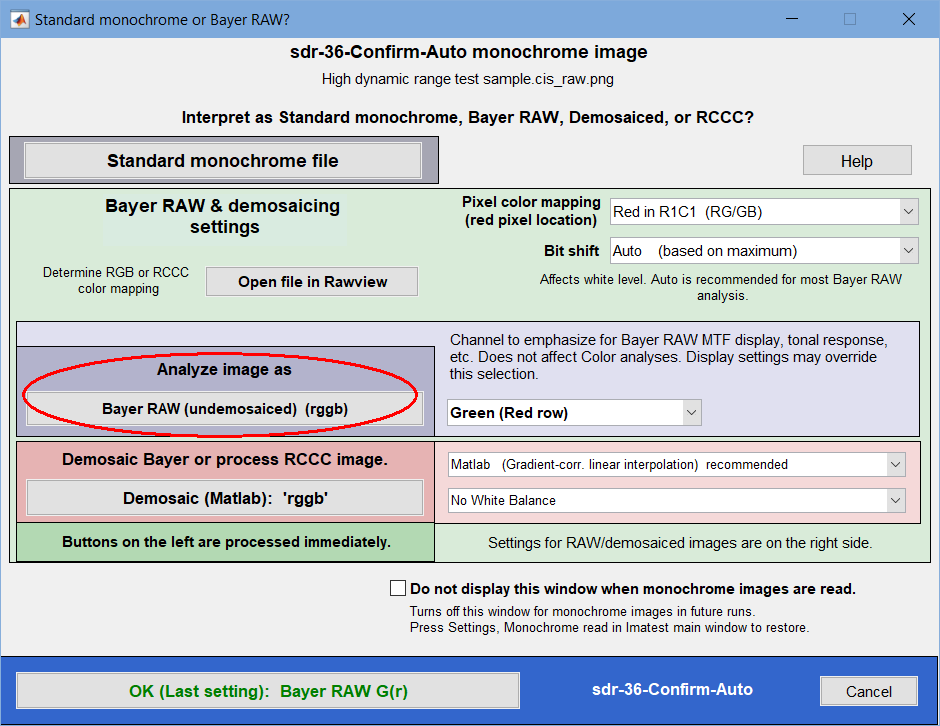 This window appears whenever a monochrome file is opened.
The Demosaic drop-down menu has the following options.
| Matlab (Gradient-corr. linear interpolation) recommended | For Bayer sensors. The output is a color image. Uses Matlab’s moderately high quality demosaicing algorithm, derived from High-Quality Linear Interpolation for Demosaicing of Bayer-Patterned Color Images by Malvar, He, and Cutler. |
| Bilinear (simple, low quality, less sharp; not recommended) |
For Bayer sensors. The output is a color image. This choice is generally not recommended. |
| RCCC sensor: Red channel removal (simple; full resolution) | Output is a full-resolution monochrome image for the clear pixels. Red channel is removed by interpolation using the 4-pixel averaging kernel in Fig. 4 of the Analog Devices white paper. |
| RCCC sensor: Red channel-only (simple; half (linear) res) |
Output is a monochrome image for the red channel-only, with half the linear resolution of the input image. |
| RCCC sensor: Red row removal (changes aspect ratio) |
Output is a monochrome image for the clear pixels with half the original number of rows. |
| RCCC sensor: Red column removal (changes aspect ratio) |
Output is a monochrome image for the clear pixels with half the original number of columns. |
| RCCC sensor: Red removal with correction term; sharper | Uses processing described in “Interfacing Red/Clear Sensors…” from Analog Devices. The output is a monochrome image. |
White balance is available for the two demosaicing options. It does not apply to RCCC.
Recognizing Bayer Raw patterns
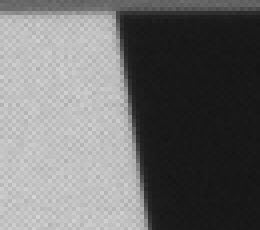
Bayer raw images are typically monochrome files (though they can be color if they are acquired using screen capture— Alt-PrtSc). They sometimes appear unexpectedly in development/prototyping systems. You can avoid serious headaches if you recognize them. They are characterized by square patterns similar to those shown on the right.
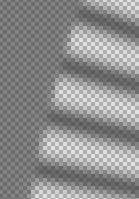
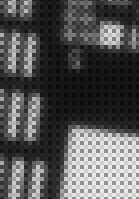
Bayer raw characteristic patterns
If a Bayer raw color has been selected, one of four image planes is selected, depending on Pixel color mapping and the button pressed (, , etc.). (There is no universal standard mapping an image plane with a color.) Four planes that could be analyzed for the button are shown below. Note that the height and width in pixels of the image in each plane is half that of the image as a whole and the spacing between pixels is twice that of the sensor pixel spacing.
↓
|
↓
|
↓
|
↓
|
(There is no universal standard for mapping colors to image plane.)
Bayer Frequency Units
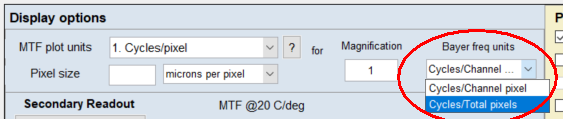
When analyzing the MTF of Bayer raw (undemosaiced) images in SFR or any of the Rescharts MTF modules (slanted-edge and others), the More settings window provides a setting called “Bayer frequency units”, located near “MTF plot units”. This setting has two options: “Cycles per total pixels” and “Cycles per channel pixels”:
-
Cycles/Total pixels— Resulting spatial frequencies are scaled according to the number of pixels in the full size image. This option will provide a natural scaling of spatial frequencies with results comparable to those from a demosaiced image. This is the default setting.
-
Cycles/Channel pixel— Resulting spatial frequencies are scaled according to the size of the subsampled single-channel image which has half the height and width of the full image (one fourth the number of pixels). Consequentially, Nyquist frequency will be halved when using this option. This option is only available for “MTF plot units” (spatial frequency units) that relate to image size (such as image height and crop height). For all other spatial frequency units, the “Bayer frequency units” setting is disabled and defaults to the “Cycles per total pixel” option.
Read more on this knowledge base post: SFR results from Bayer raw images
Direct DNG (Adobe Digital Negative) read
|
Recommended for reading raw files for image sensor noise or veiling glare (flare) measurements. We also recommend DNG for newer commercial raw formats not supported by LibRaw. |
Imatest can directly read DNG (Adobe Digital Negative) files.
Although DNG format offers little advantage when files are demosaiced, it has a significant advantage for measuring
- image sensor dynamic range, which requires linear undemosaiced (Bayer) raw file data with pixel levels ranging from 0 for pure black to the maximum for the bit format (typically 65535 for 16-bit depth),
- veiling glare, where any pixel level offset (pedestal) can throw off the measurement, and
- commercial raw file formats not supported by LibRaw.
The problem is that different cameras have different black level offsets (minimum pixel values) and white (saturation) levels, and these values are hard to determine because manufacturers record them with different EXIF tags (if at all). These values are usually applied to LibRaw processing when images are demosaiced, but are usually ignored when images are not demosaiced (and not saved in the EXIF data), i.e., LibRaw is not robust when offsets are present. They need to be applied to obtain a valid sensor dynamic range calculation. This is done automatically for raw files that have been converted to DNG, which is a special type of TIFF file that uses standard tags for linearization and for black and white level correction. See Processing Raw Images in MATLAB for an overview.
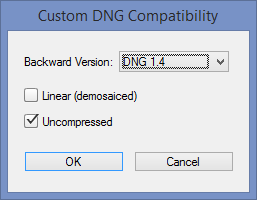 Any commercial raw file (CR2, RW2, NEF, etc.) can be converted to DNG format using Adobe’s free DNG Converter . Download here and follow the instructions. Adobe Digital Negative Converter runs in a GUI window. To use it for undemosaiced files, open it and click Change preferences to open the Preference window, then select Custom… in the Compatibility dropdown window to open the Custom DNG Compatibility window. Linear (demosaiced) should be unchecked and Uncompressed should be checked, as shown on the right.
Operation of the DNG converter is simple and straightforward. Note that all files in a folder will be converted, so if you want only a limited number of files to be converted, you’ll need to move them to a separate folder.
 To take advantage of this capability, the setting shown on the right, 3. Read DNG files directly then linearize and correct for black level offset, must be selected in the Options II window, which can be opened from a button on the lower-right of the Imatest main window or in the Settings dropdown menu of the Imatest main or Color/Tone Interactive window. When this setting is selected, DNG files read into Imatest have pixel level = 0 for pure black and have a maximum pixel level of 2bit depth-1: (65535 for bit depth = 16), making them well-suited for measuring sensor dynamic range.
Rawview utility
The Rawview utility allows you to determine the color arrangement of Bayer raw files (Red in R1C1, R1C2, R2C1, or R2C2) by trying each and selecting the one that looks best.
Rawview will not work directly with binary raw or manufacturer’s raw files.
These files should be converted into standard image file formats (PNG, JPEG, etc.),
typically without demosaicing, using Read Raw or LibRaw.
The image can be saved as an RGB file if needed. It can be opened by pressing the button in the Utility tab on the right of the Imatest main window. When Rawview is first opened, instructions similar to those shown below appear. (They are likely to be more up-to-date.)
|
Welcome to Rawview: Preview Bayer Raw files. You can find the relationship between colors and pixel locations. The input file should be a monochrome file (m x n x 1 pixels) that contains Bayer raw data. Start by pressing “Read (Bayer) Raw image file.” Alternate Green channels are displayed. Two of the four settings will show vertical banding. NOTE: Rawview will not work directly with binary raw or manufacturer’s raw files. |
After the image file has been read, the Rawview window looks like this:
 The Rawview window (no zoom)
The zoom function is always active: the image can be zoomed in to better view key details. The button is enabled whenever the Red in RmCn selection is changed. It sets the default for opening Bayer raw files in Imatest modules, affecting some displays.
Note that Rawview performs no White Balance, so the balance you see represents the color balance in the sensor, which may be of interest. It is rarely neutral.
| To determine which position (RmCn) contains the Red channel, click on each of the RmCn-only settings (example: R1C1-only (for RCCC)) in the dropdown menu on the lower-left (Red in R1C2 is displayed above). The position with the Red channel will look different— darker than the others. This position can be used in the Monochrome (Bayer Raw) and the Generalized Read Raw settings windows. |
Two options are available for saving images as an RGB files: saves the image as a low resolution RGB file using the R, (one of the) G, and B channels without proper demosaicing. The vertical and horizontal resolution is half that of the original file (total pixel count is 1/4 of the original). uses Matlab’s standard gradient-corrected linear interpolation demosaicing algorithm to save the image in a full resolution RGB file.
Rawview dropdown menus include display options and Save commands.
File
- Read Bayer Raw file Read the Bayer raw file (must be in a standard image file format: TIFF, etc.)
- Save Screen Save the contents of the screen. Optionally display it if the Display screen checkbox is checked. You need to set the viewer before the first time you display the screen this way. Irfanview is an excellent free viewer.
- Save image as RGB file Save the image as an RGB file, which has half the pixel dimensions (resolution) on the original file. This does not involve a demosaicing algorithm. The contents of the R, selected G (G(R) or G(B)), and B channels are identical to the undemosaiced channels.
Settings
- Adjust 16-bit images Brighten 16-bit images (which are linear or nearly so, i.e. gamma near 1.0) if needed to enhance display.
- Brighter 16-bit images Brighten 16-bit images further for additional display enhancement.
Help
- Online Help opens this page in your default web browser.
Generalized Read Raw
Read Raw lets you read and decode binary raw files created in engineering development systems, which are not supported by LibRaw. It has a great many options. For example, you can demosaic a file or leave it undemosaiced in order to measure MTF of any of the four channels (R, GR, B, GB) of undemosaiced (Bayer raw) files. Options are listed below.
Generalized Read Raw is primarily for binary files taken directly from manufacturer’s development systems. For the proprietary RAW formats from commercial cameras, which contain metadata and packed data, LibRaw should be used.
To read Generalized Raw files you must specify a file extension (up to 16 can be registered) and associate read settings with that extension. This can be done in the following steps.
Click the button in the Utility tab on the right of the Imatest main window or click Utility, Read Raw. The following dialog box opens. Entries should be based on manufacturer’s data sheets where possible, but some trial-and-error is often required. If you know the image width and height (in pixels) setup is usually very fast. If you make an incorrect choice, a plot will be displayed (below) to help determine the correct width and height values.
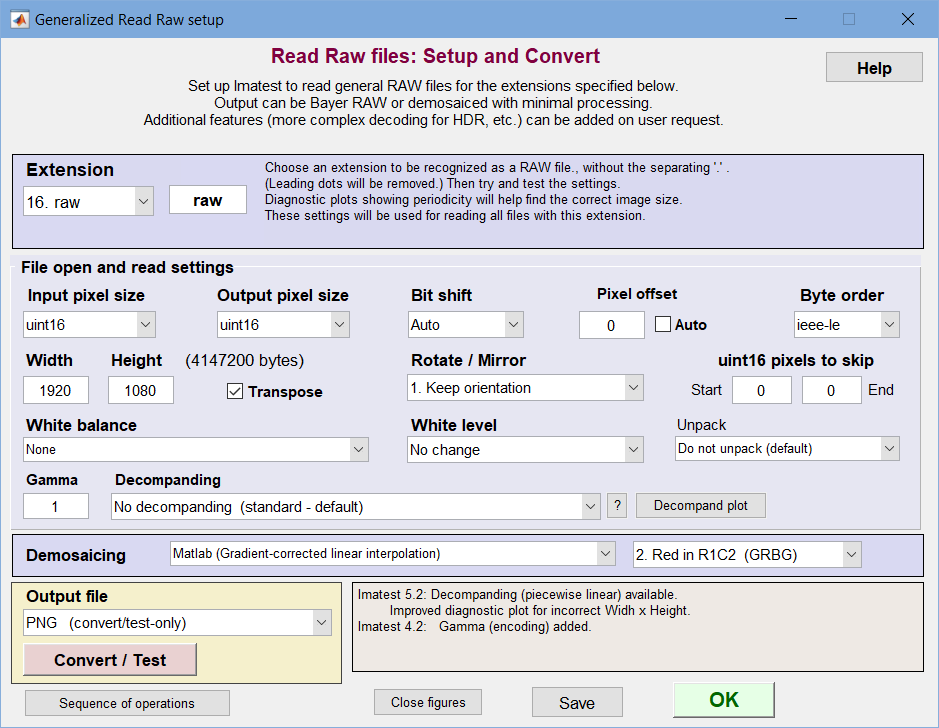 Read Raw setup window
- File extension— Select one of the 16 extensions in the dropdown menu on the upper-left to edit. To recognize a new extension, enter the extension (3 or more alphanumeric characters) in the box to the right of the dropdown menu, and hit Enter. If possible, it should be one of the extensions not recognized by LibRaw. The settings for this extension will be saved when you click OK or Convert/Test (which tests extension settings by reading and displaying a file).
As of October 2009, the following extensions (in rawphoto.c, linked from www.dechifro.org/dcraw/) are recognized by LibRaw/dcraw: 3fr, arw, bay, bmq, cine, cr2, crw, cs1, dc2, dcr, dng, erf, fff, hdr, ia, jpg, k25, kc2, kdc, mdc, mef, mos, mrw, nef, nrw, orf, pef, pxn, qtk, raf, raw, rdc, rw2, sr2, srf, sti, tif, and x3f.
- Input pixel size— How pixels are stored in the file. Choices are uint8, uint16, and uint32 (unsigned 8, 16, and 32-bit formats, for 1, 2, or 4 bytes per pixel). Packed formats (for example where 2 12-bit pixels stored in 3 bytes) are handled in the Unpack dropdown menu.
- Output pixel size— How pixels are stored in Imatest. Choices are uint8, uint16, or uint32 (for HDR files).
- Bit shift— The number of bits to shift so the lightest pixels aren’t too dark or saturated: Auto or 0, ±2, ±4, ±6, or ±8 are the choices for uint8 or uint16 output. Uses the very fast Matlab bitshift function. Often needed to get correct levels for analysis. Negative numbers darken the image. Auto is recommended unless absolute levels are required.
| Warning: be cautious in applying bit shift, and especially Auto bit shift, to measurements that require absolute levels, particularly with 16-bit output files where the original sensor has 10-14 bits of data (resulting in padded files). Such measurements include hot/dead pixels (in Uniformity and Blemish Detect), which will be shifted along with the image, Color Correction Matrix (in Color/Tone Interactive), etc. |
Auto bit shift works by finding the maximum pixel value m in the image excluding the two outer rows and columns (closest to the edge of the image), comparing the maximum to the maximum level for the output pixel size (255 for uint8, 65535 for unit16, etc.) then shifting the pixel levels so the maximum pixel value is between half the maximum and the maximum for the output pixel size. For example, if the maximum pixel level m for a uint16 image is 9120, the bits will be shifted by 2 pixels (equivalent to multiplication by 4) to make the maximum 36480.
- Pixel offset— An integer number to subtract from the pixel levels. Used when there is a black level offset or “pedestal”. Test carefully, especially if Bit shift is applied (it is applied before Bit shift). Note that the pedestal subtraction is applied after the decompanding (addressed in the Decompanding section). If pedestal subtraction is desired prior to decompanding then it must be set in the JSON decompanding file instead.
Auto offset will be deprecated in 2021.1. Auto offset finds the minimum pixel level (which is a function of pedestal, image content, and veiling glare) and subtracts it from the image. This ruins veiling glare measurements. We strongly discourage selecting Auto offset. An appropriate manual pixel offset is far more consistent.
- Byte ordering—I EEE Little or Big-Endian. Affects results when Input pixel size is uint16. See wikipedia.org/wiki/Endian.
- Width— Image width in pixels. Can usually be obtained from manufacturer’s data sheets. If you enter an incorrect number for width and height (if Width x Height × bytes per pixel ≠ file size in bytes), an additional plot is displayed (see below) to help you estimate the width.
- Height— Image height in pixels.
- Transpose— Switches rows and columns. Usually checked.
- Rotate/Mirror— Allows the image to be rotated by multiples of 90 degrees and/or mirrored.
- Pixels to skip— The number of pixels to skip at the start and end of the file.
- White balance— None or Simple White Balance (gray world; darken or lighten). Simple WB sets the gain on the four channels so their mean is identical (the lowest of the four means if “darken” is selected; the lightest if “lighten” is selected). It’s not a sophisticated algorithm— it only works for mostly gray test charts (some color is tolerated as long as the average is close to neutral gray). WB allows you to interpret the image as a standard monochrome file (rather than a Bayer RAW channel with only 1/4 the pixels) that can be analyzed for MTF with any of the sharpness modules (SFR, SFRplus, Log F-Contrast, Star Chart). An undeomsaiced slanted edge without and with WB is shown below. In this case, white balance was not far off to begin with. For full color correction, we recommend calculating a Color Correction Matrix (CCM) using the decoded image.
 |
 |
|---|---|
| SFR edges: without and with White Balance | |
- White level— No change or Auto: 99% of saturation. The Auto: 99% setting sets the highest pixel to 99% of the saturation level (252 for 8-bit files; 64880 for 16-bit files). This usually lightens the images, especially if Bit shift is not set to the optimum value.
- Unpack— Settings for unpacking specialized packed files (MIPI, Android). Updated on user request.
- Gamma— Apply gamma encoding to the image. Gamma = 1 is standard: it maintains the gamma (around 1) of the raw image. 0.4545 (1/2.2) (or 0.5) is close to standard color spaces.
- Decompanding— Provides the user with the option to apply decompanding on a raw image using the drop-down menu. To apply decompanding, the user must input their sensor’s companding data using a JSON file. Shown below is an example of a 16-bit to 12-bit companding for the AR0331 sensor. Clicking on the ? button to the right of the drop-down menu opens a window with brief instructions.
|
Imatest decompanding is based on manufacturer’s specifications. See, for example: https://www.onsemi.com/pub/Collateral/AR0331-D.PDF, Figure 19 and Table 9, pages 20-21. Decompanding is performed in piecewise-linear segments (different algorithms can be added). You will need a decompanding file based on entries in the Companding table (Table 9 in the above link) or “knee points” provided by the customer. Input is in JSON format, which has rigid syntax. See below for an example, using the input/output code ranges taken from the Table 9 in the above link. Fields with peach backgrounds are optional and treated as comments. You are free to add additional comment lines. They will be ignored, as long as they are not considered user data. Decompanding file based on the companding table in the above link {
"dcData": {
"decompanding_data_source": "https://www.onsemi.com/pub/Collateral/AR0331-D.PDF",
"decompanding_data_details": "Fig. 19 and Table 9, pp. 20-21",
"user_comment": "",
"decompand_type": "piecewise linear",
"input_code_range_low": [0, 1024, 4096, 32768],
"input_code_range_high": [1023, 4095, 32767, 65535],
"output_code_range_low": [0, 1024, 2560, 3456],
"output_code_range_high": [1023, 2559, 3455, 3967],
"pedestal": 0
}
}
Customers often send us “knee points” for decompanding. We have found that these are simpler to use and less error-prone than the input/output code ranges (see above). A decompanding file based on “knee points is shown in the example below. Note that a bit shift (-4 bits; equivalent to dividing by 16) has been applied before decompanding. Decompanding file based on the customer-supplied “knee points” {
"dcData": {
"decompanding_data_source": "Customer-supplied data",
"decompanding_data_details": "Input is uncompanded; output is companded",
"user_comment": "",
"decompand_type": "piecewise linear",
"bitshift_first": -4,
"kneePoints_input": [0, 2048, 65536, 1048576],
"kneePoints_companded": [0, 2048, 3040, 4001],
"pedestal": 16
}
}
INI decompanding file We have added an alternate INI input format, which is quite robust and easy to get right. To read with the INI format, the decompanding file extension must be INI. Here is an example of the INI formatted for the same data as the above box. [dcData] decompanding_data_source = Customer-supplied data decompanding_data_details = Input is uncompanded; output is companded user_comment = decompand_type = piecewise linear bitshift_first = -4 kneePoints_input = 0 2048 65536 1048576 kneePoints_companded = 0 2048 3040 4001 pedestal = 16 We recommend the resource folder for storing this file (though any convenient folder will work). To locate it on your computer, click the INI file drop-down menu in the Imatest main window, press Manage settings, and click Open Resources folder at the bottom.
Note: The ReadRaw Output Pixel Size should be set for the decompanded image size. E.g., if you are decompanding a 16 bit image into a 20 bit image, select 32 bit as the Output Pixel Size. If the Output Pixel Size is less than the decompanded size, then imatest will bitshift the data down to the Output Pixel Size. |
The JSON format data above are based on entries in Table 9 of the AR0331 link. The JSON format data above are based on entries in Table 9 of the AR0331. The “input_code_range_…” refers to the image sensor data and the “output_code_range_…” refers to the companding data in the JSON file. For more information, refer to tables 9 and 10 in the AR0331 documentation. The Decompand plot button produces a plot of the decompanding file, useful to check on the JSON settings, which have a rather inflexible format. Either Decompanding or Companding can be selected (Decompanding is shown below). There is a small image in the center of the plot showing the approximate shapes of the two curves— important for avoiding errors caused by confusing input and output data.
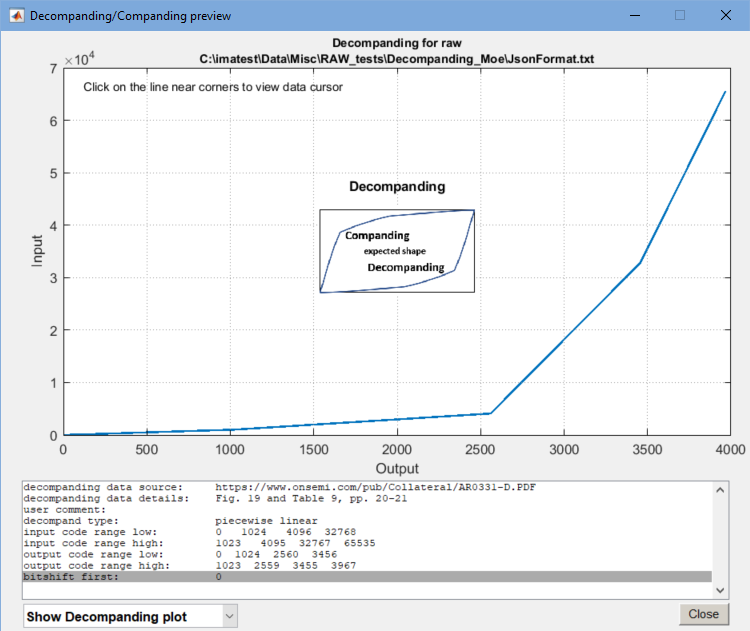
Decompanding plot preview, showing contents of the JSON file
- Demosaicing—Choose between None (monochrome output), a demosaicing routine (for Bayer images; color output), or RCCC processing (monochrome output). Selections are similar to the Monochrome window (above; repeated here).
| None (Bayer raw output) | Monochrome output: same as input. |
| Matlab (Gradient-corrected linear interpolation) | Color output: High quality demosaicing, Uses the Matlab demosaic function. Recommended for Bayer raw files. |
| Bilinear (simple, low quality; not as sharp) | Color output: Low quality; poor sharpness. (Was a special customer request.) Not recommended. |
| RCCC sensor: Red channel removal (simple; full resolution) |
Monochrome output with red channel removed by interpolation. See “Interfacing Red/Clear Sensors…” from Analog Devices. It is OK to select “None”, and perform the RCCC processing later in the Monochrome/Bayer Raw window. If the red channel location is not known, select “None”, and use Rawview to find the location. |
| RCCC sensor: Red channel-only (simple; half (linear) res) | Monochrome output: red channel-only.Output has half the linear resolution (1/4 the pixels) of the input. |
| RCCC sensor: Red row removal (changes aspect ratio) |
Output is a monochrome image for the clear pixels with half the original number of rows. |
| RCCC sensor: Red column removal (changes aspect ratio) |
Output is a monochrome image for the clear pixels with half the original number of columns. |
- Bayer arrangement (location of red channel).
- Output file Save the file. None (do not save; read-only), PNG, JPEG, TIFF or HDR (Radiance) file. Undemosaiced files can be opened with Rawview.
- Convert/Test Saves the settings, then reads and displays a raw image file or batch of files (example on right). If the actual size of the file read is not equal to the Pixel Width x Height, the image will be displayed with the same Width and an adjusted height and two diagnostic images (shown below; for estimating the correct width) are displayed. The text below the plot displays the specified Width, Height, and W x H and the actual number of pixels returned (which will equal W x H if the correct values have been chosen). Available output formats include PNG, JPEG, TIFF, and HDR
- Save Saves the settings without closing the Read Raw window. Use this for testing Read Raw by directly reading images into Imatest modules.
- OK Saves the settings and closes the Read Raw setup window.
- Help (on the upper-right) opens this web page.
-
Sequence of operations opens a window that displays the normal sequence of operations (shown below). Useful for answering frequent questions. Note that all of the operations are optional: they are only performed if specified. It’s surprising how many operations are performed on the Bayer image before demosaicing.
|
Estimating image width and height
If the number of pixels read from the file, excluding the skipped pixels at the beginning or end of the file, is unequal to the specified image Width x Height, a diagnostic plot displays estimated file periodicities (the largest periodicity is normally equal to the pixel width of the image) as well as several guesses for the image dimensions. The image below was obtained by a deliberately entering an incorrect value for Width.
The periodicity is derived by calculating the Fourier transform of the one-dimensional image data, finding the absolute value (i.e., removing the phase), then taking the inverse Fourier transform. The location of the largest peak (above 0) is the most likely periodicity. In this case it’s 4096, shown on the upper right. Since this estimate may not work for all images, additional possible widths (periodicities) are displayed.
 Read Raw diagnostics plot showing most likely periodicity and image size guesses
The guesses for pixel width * height are useful if the numbers are integers (no fractional parts). In this case the first guess (4096 * 3072, based on dividing the total pixels by the most likely periodicity) turned out to be correct, and the same dimensions appeared for the 4:3 aspect ratio. The other aspect ratios were clearly incorrect. The information in this plot can be used to improve the Width and Height entries in the Read Raw setup window.
Creating Synthetic Raw images
There are occasions where raw images are needed to analyze the performance of signal processing algorithms, but real raw images (from cameras) may not be available. For such situations, images used in Rescharts, Color/Tone Interactive, Uniformity-Interactive, and Image Processing can be saved as pseudo-raw images.
Where high quality images are needed, we recommend running the Test Charts module and saving the chart image. Test Charts produces two types of image file: bitmap charts, which can be loaded directly into any of the modules listed above, and SVG (Scalable Vector Graphics) files, which can be opened and edited in Inkscape (an outstanding free open-source program) and exported as bitmap (PNG) files. Both types of image can be edited, for example to change a black & white image to black and red or blue (worse cases for Bayer demosaicing). We frequently recommend the Image Processing module, which can read any file image and degrade the image (adding noise, blur, etc.) then enhance the image (using tone mapping, bilateral filter, Unsharp Mask, etc.).
To save a “pseudo-raw” file, click on the File dropdown menu on any of these modules, then click on Save pseudo-raw/remosaiced image. This opens the Save (re)mosaiced image dialog box.
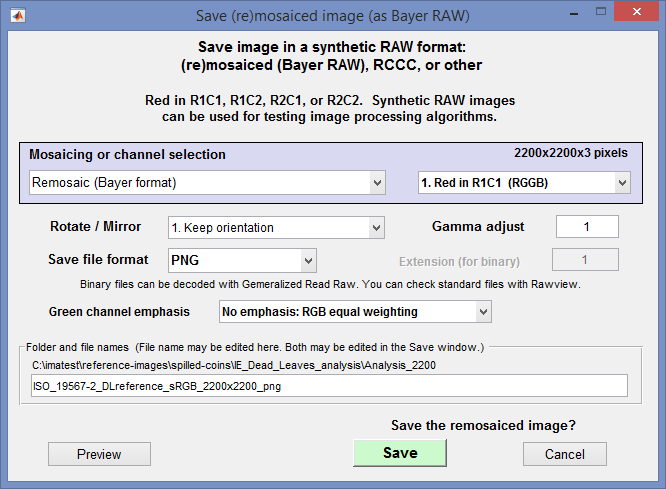 Save (re)mosaiced image (as Bayer raw) dialog box
This window offers numerous processing and save options.
- Mosaicing or channel selection determines the basic operation. Choices are
None (Normal color file output)
Remosaic (Bayer format) (default— standard Bayer mosaicing.)
RCCC (Red-Clear-Clear-Clear): R bright
RCCC (Red-Clear-Clear-Clear): R = C/3
Monochrome (Y = luminance)
Monochrome (mean: equal weights)
Red
Green
Blue
- Red channel location This applies to Bayer-mosaiced and RCCC images.
1. Red in R1C1 (RGGB)
2. Red in R1C2 (GRBG)
3. Red in R2C1 (GBRG)
4. Red in R2C2 (BGGR)
- Rotate/mirror
1. Keep orientation (default)
2-4. Rotate CCW 90, 180, 270 degs
5. Mirror (no rotate)
6-8. Mirror, Rotate CCW 90, 180, 270
- Gamma adjust (multiplier) (defaults to 1) This is used to more-or-less restore linear tonal response to pseudo-raw images derived from gamma-encoded images. For a typical color space file, with encoding gamma near 0.5, gamma = 2 is appropriate. Even better: use the inverse of encoding gamma measured from a grayscale chart.
- Save file format selects format for saving the file. Four standard image file formats can be selected: PNG (default), JPG, TIF, and BMP. PNG is frequently a good choice because it’s losslessly-compressed, and smaller than TIF or BMP files. JPG produces compact file sizes (but JPEG is not generally recommended because lossy JPEG compression can affect isolation between channels). Standard image files can be examined with Rawview.
Two binary formats can be selected: 8 and 16-bit. These can be decoded with Generalized Read Raw. - Extension (for binary) is only enabled when one of the binary formats (above) is selected. Select a name for the extension (often RAW, but a unique extension is recommended).
- Green channel emphasis makes the saved file look more like typical raw files, where the green channel tends to have more energy than the other channels. Selections are
No emphasis: RGB equal weighting (default)
Green (Blue/2, Red/2)
Green (Blue/3, Red/3)
Green (Blue/2, Red/4)
Green (Blue/4, Red/2)
Preview opens a preview image, typically displayed as a mosaiced (Bayer-raw) monochrome image. Save the image and use Rawview to see what the demosaiced image will look like.
References
Processing RAW Images in MATLAB by Rob Sumner (Department of Electrical Engineering, UC Santa Cruz) A nice introduction to RAW files and how they are processed.