This page is a reference for the INI files used to store Imatest settings, particularly imatest-v2.ini, which is the basis of ini files used to control Imatest IT. It focuses on INI file settings that are used by several modules and are of interest to users of Imatest IT and the Functional Interface.
INI file structure – Extracting an INI file for IT – Running from a Custom File – INI File Monitor – [api] (for Imatest IT)
[LibRaw] – [rdraw] (Generalized Read Raw) – Secondary Readouts – Miscellaneous
To keep this document to a reasonable length, the INI references for Imatest IT modules are stored in their own files:imatest-v2.ini, the other INI files used by Imatest, and utilities for manipulating Imatest INI files are described in detail in Saved Settings. Only the key points will be covered here.
We strongly recommend that Imatest IT users have a copy of Imatest Master (or other GUI-based Imatest edition) to facilitate creation and testing of the INI files used to control IT modules.
Table of contents
Imatest settings are stored in INI files, which conform to an informal (but widely-used) standard.
INI FILES are text files structured so that
Value may be a number, an array of numbers, or a character string. INI files are readable, but the meaning is not always obvious. See the Imatest INI Reference for more details. |
[section] name1 = value1 name2 = value2 ; This is a comment. … [next_section] … |
|
|
EXAMPLE dispwelcome = 1 means display the Welcome screen when Imatest is started.edfile is location of the image editor, used to display saved screens in interactive modules (Rescharts, etc.)
Path Escaping In order to comply with Imatest 4.2 INI file changes, all backslashes \\ are replaced by double-backslashes |
[imatest] dispwelcome = 1 exiftool = 2 expandplt = Min fontsize = 10 readexif = 1 shrink_largef = 1 edfile = C:\\Program Files (x86)\\IrfanView\\i_view32.exe [sfr] filecomb = 0 folder = C:\\Imatest\\Data\\SFR save_dir = C:\\Imatest\\Data\\SFR\\Results … |
|
Extracting an INI file from imatest-v2.ini for Imatest IT
To prepare an INI file for use with Imatest IT, you typically run a module under identical conditions to what you expect for running Imatest IT. This process is explained in the Imatest IT Instruction pages.
The default Imatest Master INI file, imatest-v2.ini, contains settings for all runs performed by Master— typically far more than needed to run Imatest IT modules. You can extract the important settings by using a utility accessible from the main Imatest window. In the Settings dropdown menu, press IT & Pass/Fail settings to open the Imatest IT & Pass/Fail Settings window.
You can use the Save ini file for button to save an ini file with only the needed sections.

You can create a file to control up to four modules by selecting the module in each of the boxes on the left, then pressing Save ini file for. The ini section(s) for the module ([sfr] and [sfrreg] in the above example) is included, along with [imatest], [api], [dcraw] (for LibRaw), [rdraw], and [sqf] and [visnoise], where appropriate.
Running Imatest from a custom ini file (for testing)
It is often useful to test INI files in Imatest Master (or IS, etc.) by substituting a custom INI file for imatest-v2.ini. To do so, press Select INI file in the INI File Settings dropdown menu.

The INI file selection window, for selecting an alternate ini file for running Imatest
- Imatest always starts in the default imatest-v2.ini. To change to another INI file you must open the INI File Selection window (from the INI File Settings dropdown menu or from ).
- Since running Imatest can change the contents of the INI file, we recommend working from a copy of a file used in Imatest IT (not the file you intend to keep).
- Only the main Imatest control file (normally imatest-v2.ini) is affected.
INI File Monitor

INI File Monitor
The INI File Monitor lets you to open INI File reference web pages that enable you to do one of the following:
- Examine INI file settings (including current and default values) used in the most recent run.
- Examine a full set of INI file settings used for most Imatest modules.
It is useful if you want to know what a specific setting does because not all are self-explanatory.
To run the INI File Monitor, click the INI File drop-down menu in the Imatest main window. Then click INI File Monitor, which opens the window shown on the right.
The Monitor is designed to stay open in the background while other modules run and to capture INI file settings from most analysis modules. You can display these modules by clicking one of the buttons with a Magenta background in the Monitor.
The Open the INI File Reference with current data module, shown below, is particularly useful because it contains both current and default INI values. It highlights current values in Magenta if different from the default values.
The Monitor can also capture INI file settings for a large set of Imatest modules without running any modules. The result, which doesn’t include current INI values, is viewed by clicking Create and open the INI File Reference for most modules.
Clicking one of the three buttons in the Monitor opens an INI reference, stored as an HTML table In the Imatest Resources folder, in the system default web browser window. Note that INI settings for individual modules are captured only when the module window is opened. If you make changes, you’ll need to close and reopen the module. A good example is obtained by opening SFRplus Setup, then clicking on Open the INI File Reference with current data. (See below for a portion of the table that appears in a browser window.)
|
INI file settings and recent data for sfrplus For more information on how to use INI files in Imatest IT, we recommend the Imatest INI File Reference. See also Saved settings – Imatest.ini and INI files for use with Imatest IT For Imatest IT, many of the entries in the table don’t need to be entered because they don’t affect Imatest IT results: they control interactive figure displays or figure output formats (figures are often not used in Imatest IT). Some have extra (unused) values to facilitate future expansion. To extract an INI control file for Imatest IT from the default Imatest Master INI file (imatest-v2.ini), we recommend the procedure described in Extracting an INI file from imatest-v2.ini for Imatest IT. This document was created by running sfrplus in Imatest 5.2.0. ALPHA on 10-Jun-2019 13:02:18.
|
||||||||||||||||||||||||||||||||||||||||||||||||||||||||||||||||||||||||||||||||||||||||||||||||||||||||||||||||||||||||||||||||||
Sections that affect many modules
| (-IT) | Not used in Imatest IT |
| (gr) | Affects graphics (figures). May not be of interest for Imatest IT, where graphics is often suppressed. |
| (index) | Setting is equal to the index of the popup menu. You’ll need to open the Settings window to see these: Never used for important IT settings. |
| (index-1) | Setting is equal to the index of the popup menu – 1 (0 – (index-1)). Keeps backwards compatibility for some settings that were originally 0 (off) or 1 (on), but had options added. |
Imatest Master and other GUI-based editions have a set of utilities for editing and manipulating INI files. You can store them in a named file, load them into imatest-v2.ini, import into an ini file (changing only values included in the import file), copy the contents to the clipboard, edit them, or scan them for errors. Click on the button for more detail.
[api] Parameters that affect Imatest IT (DLL and EXE; all modules)
[api] is set in Imatest Master by clicking Settings, IT settings from the Imatest main window to open the Imatest IT settings window. Note that API is the former name of Imatest IT. Settings affect Imatest IT/EXE and IT/DLL. These settings are described in http://www.imatest.com/docs/it_dll_instructions/#ini.
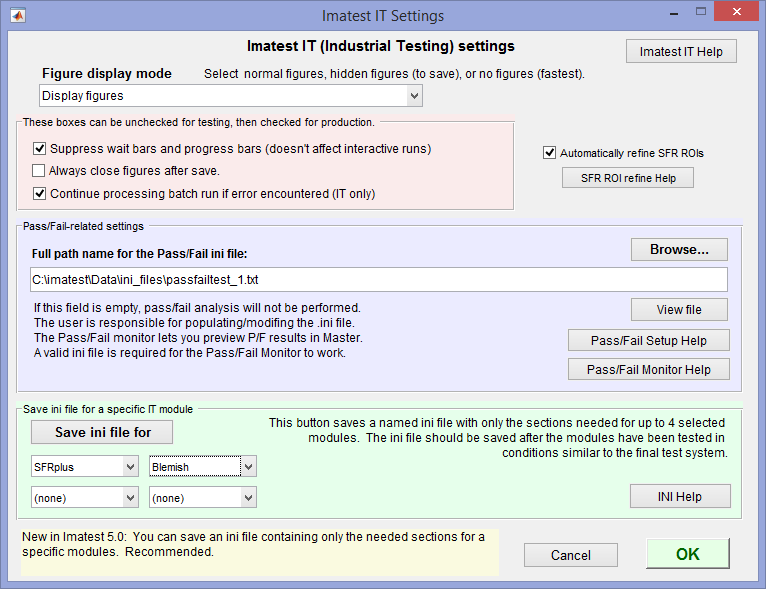 Imatest IT settings window (opened from the Settings dropdown menu)
The Save ini file for button is recommended for saving the ini file that controls Imatest IT.
| Parameter | Settings window | Typical values (default if in [brackets]) |
Description | Notes |
| nomsg | Never display progress bars… checkbox | 0 or 1 [0] | Select 1 to suppress all warning messages | |
| savedel | Always close figures after save checkbox | 0 or 1 [0] | Select 1 to always close figures after saving them. | Somewhat misnamed |
| sfrrefine | Automatically refine ROIs in SFR… checkbox | 0 or 1 [0] | Select 1 for automatic region refine for SFR module. | |
| disable_figs | Suppress all figures checkbox | 0 or 1 [0] | Select 1 to disable all figures. | |
| continue_on_error | Continue processing batch runs if error encountered (IT only) | 0 or 1 [0] | Select 1 to continue processing batch runs if an error is encountered. | |
| passFail | Pass/fail ini file | full path name to file that contains Pass/Fail criteria | The contents of this file (in ini format) is described in http://www.imatest.com/docs/it-passfail/. | |
| fig_display_mode | Figure display mode drop-down menu | 1, 2, 3 [1] | Select 1 to display all figures, 2 to create hidden figures, or 3 to disable all figures. | This setting extends disable_figs, which can still be used |
[dcraw] Decode commercial raw files with LibRaw
(dcraw, a legacy program which performs the same function, has been deprecated, but the [dcraw] section name has been kept for backwards-compatibility.)
The LibRaw dialog box is a GUI front-end for the LibRaw program, described in detail here. It is used for converting commercial raw files (CR2, NEF, ARW, etc.) with minimal signal processing (i.e., no sharpening or noise reduction). LibRaw operates from a command line whose parameters are described in the dcraw manpage (reference— we have not located a comparable reference on the LibRaw website).
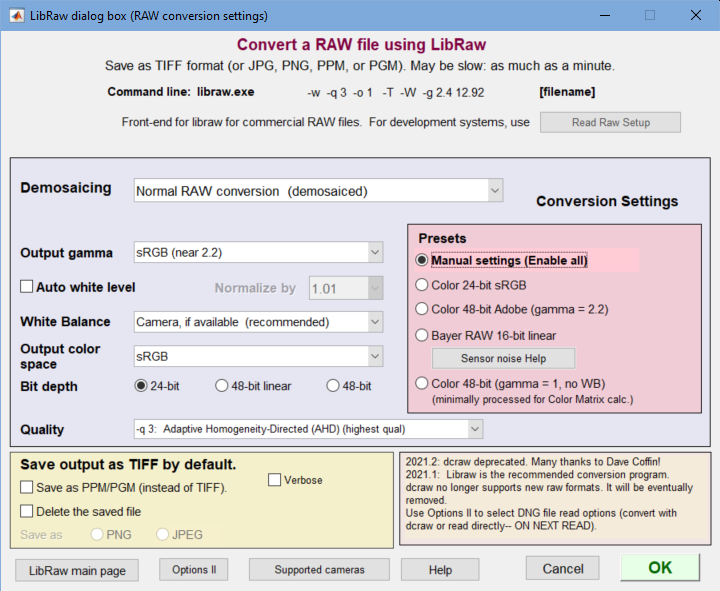 LibRaw settings window The Program dropdown (no longer needed) has been removed.
| Parameter | Settings window | Typical values (default if in [brackets]) |
Description | Notes |
| bayercols | (Pixel color mapping popup menu in the Monochrome image settings window) | 1-5 [1] | Mapping between pixel and color in Bayer raw images: 1: unknown; 2-5: Red in R1C1, R2C2, R2C1, R2C2. | |
| bdep | — | -4 | String for command line corresponding to bit depth. ‘ ‘: 8-bit; ‘ -4’: 16-bit linear; ‘ -6 ‘: 16-bit. See manpage. | |
| brawShift | (Bit shift popup menu in the Monochrome image settings window) | 1-6 [1] (index) | Bit shift: 1 for auto; 2-6: 0,2,4,6,8 bits, respectively. | |
| colorspace | Output color space index | 0-5 [1] | Index (0-5) corresponding to the color space: -o option described in the manpage. | |
| csps | — (from colorspace) | ‘ -o 1 ‘ | Saved string corresponding to colorspace. ‘ -o –n ‘ if demosaicing is selected; ‘ -D ‘ or ‘ -D 6 ‘ otherwise. | (for dcraw command line) |
| dcgamma | Output gamma dropdown | 1-5 [2] | Index: 1 = Default (BT.709 (-g 2.222 4.5)); 2 = 1.0 (Linear); 3 = 1.8 (Apple, etc.); 4 = 2.2; 5 = sRGB (near 2.2) | |
| delfile | Delete the saved file (checkbox) | [0] 0 or 1 | If checked, delete the saved file after it has been read for analysis. | |
| folder | Last folder name for LibRaw read | |||
| imgpath | ||||
| lastfiles | ||||
| libraw | Program (dropdown menu) | 1-3 [3] | (has been removed since dcraw is no longer used) | |
| nwb | White balance | 1-3 [1] | Index: 1 = cemera; 2 = “gray world”; 3 = none | |
| ppm | Save as PPM… checkbox | 0 or 1 [0] | 0 = save file as TIFF; 1 = save file as PPM. | |
| preset | Preset (radio buttons) | 4 | 1 = Color 24-bit sRGB; 2 = Color 48-bit Adobe; 3 = Bayer 48-bit linear; 4 = Manual settings (Enable all) | |
| qual | Quality (qual is the index-1) | 0-4 [0] | qual-1 = n is converted to the command line string ‘ -q n ‘ for qual > 0. Default is blank string for qual = 0. See manpage Interpolation Options. | |
| rawconv | Demosaicing | 1-3 [1] | Demosaicing index: 1 = Normal RAW conversion; 2 = 8-bit no demosaicing; 3 = 16-bit no demosaicing. | |
| rawraw | (Set in Read Raw) | ‘raw’ or other | If ‘raw’, process file extension .raw with libraw. Otherwise process it with ReadRaw. | |
| rmcn | 0-4 | location of red pixel in Bayer (undemosaiced) images: 0=unknown, 1: red in R1C1, 2: red in R1C2, etc. | ||
| save | ‘ ‘ [blank] | ‘ ‘ | ||
| wb | — (from nwb) | [‘ -w ‘] | String corresponding to nwb (White balance index): 1 = ‘ -w ‘ (camera); 2 = ‘ -a ‘ (average); 3 = ” (none). See manpage. | |
| whitelvl | Auto white level (checkbox) | 0 (off) or 1 [1] | Auto white level if 1. | |
| whitenorm | Normalize (white level) by (index) | 1-7 [2] | Normalize to {1.0,1.01,1.05,1.10,1.25,1.50,2.0}, based on whitenorm. |
[dcraw]
bayercols = 5
bdep = -4
brawShift = 1
colorspace = 1
csps = -o 1
dcgamma = 2
delfile = 0
folder = C:ImatestSFRplus
gamma = 1
imgpath = C:ImatestDataColorcheckMiscRawNoise
lastfiles = “sfrplus.raw”
libraw = 3
nwb = 1
ppm = 0
qual = 0
rawconv = 1
rawraw = crw
rmcn = 4
save =
wb = -w
whitelvl = 0
whitenorm = 2
[rdraw] Generalized Read Raw
[rdraw] affects all Imatest modules when binary raw image files from manufacturer’s development systems are read in (either directly or from stored files). The settings GUI is described in RAW Files. Settings are based on the file extension (shown in boldface below). Since settings for up to 16 file extensions are saved, most variables have 16 entries, indicated by *16. For these settings the nth values correspond to one another.| [rdraw] Affects all Imatest modules including IT/EXE and IT/DLL when raw files from manufacturer’s development systems are read in. Settings are described in . Settings are based on the file extension. Since settings for up to 8 file extensions are saved, many variables have 8 entries, indicated by *16. | |||
| Parameter | Typical values (default if in [brackets]) |
Description | Notes |
| bitshift | 1-10 (index *16) | Index of bit shift: 1 = auto; 2-10 = 0, -2, -4, -6, -8, 2, 4, 6, 8, respectively. Used as GUI index; not used for actual bit shift calculation. Example: use bitshift = 9 to shift the value by 6 bits. (This value has been used when 10 bits of precision are stored in 16 bits.) | -IT |
| bitshift_num | -8 to 8 (-99 for auto) (*16) | Actual number of bits to shift (-99 indicates auto). Used for actual bit shift. | |
| decompandFile | [file name] or _nul_ | File name (complete path name) for decompanding file. _nul_ if none. Described in RAW Files – Decompanding. | |
| demoz | 1 or 2 (*16) | 1 to demosaic the image using Matlab’s simple routing. 2 keeps image in Bayer raw format. |
|
| endian | 1 or 2 (*16) | Endian (byte order) setting index (does not apply to uint8 (one byte) input). Used as GUI index. | -IT |
| endian_str | ieee_le or ieee_be (*16) | Endian (byte order) string. Used for opening file to read. See http://en.wikipedia.org/wiki/Endianness | |
| extension | raw, rw1, … (*16) | The file extension (up to 4 characters) that specifies how the file is decoded. Up to eight extensions are stored. The nth value of a parameter (bitshift_num, height, etc.) corresponds to the nth extension. Since RAW is commonly used for all sorts of formats, it is often advisable to change the extension name to something more identifiable. | |
| height | number (pixels) | Height of image in pixels | |
| inpix_size | 1, 2, or 3 (*16) | Input pixel size: 1 for uint8 (8-bits), 2 for uint16 (16-bits), 3 for uint32 | |
| nexten | 1-8 | The extension displayed in the GUI. | -IT |
| nskip | integer [0] (*16) | the number of bytes to skip at the beginning of the file | |
| nskipend | integer [0] (*16) | the number of bytes to skip at the end of the file | |
| nunpack | integer | (unused) May be used in the future for unpacking bits. | |
| offset | 0 | Offset in pixels: subtract from pixel level. We have seen some sensors with a 64-bit offset. | |
| outpix_size | 1 or 2 (*16) | Output pixel size: 1 for uint8 (8-bits) or 2 for uint16 (16-bits) | |
| precision | string | String of format uintm=>uintn where m and n are 8 or 16. | |
| rawraw (in [dcraw] |
raw or other | If set to “raw”, file extension “raw” (an obscure Leica format) is processed with LibRaw. We recommend setting it to another string, like “CR2”. | |
| rmcn | 1-4 (index *16) | Location of the red pixel in Bayer RAW images. 1 = Red in R1C1; 2 = Red in R1C2; 3 = Red in R2C1; 4 = Red in R2C2. These correspond to ‘rggb’, ‘grbg’, ‘gbrg’, and ‘bggr’ in the Matlab demosaic routine. | |
| rotateimg | 1-8 (index *16) | Rotate converted image: 1-4 = 0°, 90°, 180°, 270° CCW (no mirror); 5-8 = 0°, 90°, 180°, 270° CCW (mirrored). | |
| savefmt | 1-7 (index) | Format and conditions for saving converted RAW file: 1 = None (never save); 2 = PNG (always save); 3 = JPEG (always save); 4 = PNG (convert/test-only); 5 = JPEG (convert/test-only), 6 = TIFF (always save); 7 = TIFF (convert/test-only). 1, 4, 5, 7 can be used where there is no need to save the converted file (in IT, for example). | |
| testfolder | folder name | Last folder used to test Generalized Read Raw | -IT |
| transpose | 1 [1] (*16) | Transpose rows and columns. In practice, always on [1] | |
| whitebal | 1-3 (index) (*16) | White Balance. 1 = none; 2 = Simple gray world— darken; 2 = Simple gray world— lighten | |
| whitelvl | 1,2 (*16) | White level. 1 = No change; 2 = Auto: 99% of saturation. | |
| width | number (pixels) (*16) | Width of image in pixels | |
Note: There are 16 fields on each line in Imatest 5.1+.
[rdraw]
bitshift = 1 1 1 1 1 1 1 1
bitshift_num = -99 -99 -99 -99 -99 -99 -99 -99
decompandFile = _nul_ _nul_ C:\\imatest\\GUIProducts\\Trunk\\depends\\RTDepends\\resources\\Onsemi_20-to-16bit_test-decompand_corrected.json _nul_ _nul_ _nul_ _nul_ _nul_
demoz = 2 2 1 2 2 2 1 2
endian = 2 2 2 2 2 2 1 2
endian_str = ieee-le ieee-le ieee-le ieee-le ieee-le ieee-le ieee-be ieee-le
extension = raw4 raw rpp rrr rw8 r800 rw4 rw3
height = 400 808 2448 2464 2448 800 400 808
inpix_size = 1 2 2 2 2 2 1 2
lastfiles = “Dark_15_37_7 hotpixel 584.raw” “Dark_16_4_26 hotpixel 1402.raw” “Dark_19_16_27.raw” “Dark_19_17_17.raw” “Dark_19_18_16.raw” “Dark_19_19_5.raw” “Dark_19_19_48.raw” “Dark_19_20_37.raw”
nexten = 4
nskip = 0 0 0 0 0 0 0 0
nskipend = 0 0 0 0 0 0 0 0
nunpack = 1 1 1 1 1 1 1 1
outpix_size = 1 2 2 2 2 2 1 2
precision = uint8=>uint8 uint16=>uint16 uint16=>uint16 uint16=>uint16 uint16=>uint16 uint16=>uint16 uint8=>uint8 uint16=>uint16
rawraw = raw
rmcn = 1 3 4 2 4 3 4 2
rotateimg = 1 1 1 1 1 1 1 1
savefmt = 4
testfolder = C:ImatestDocumentsCompaniesLab1262012-07-12
transpose = 1 1 1 1 1 1 1 1
whitebal = 1 1 1 1 1 1 1 1
whitelvl = 1 1 1 1 1 1 1 1
width = 400 1296 3264 3280 3264 1280 400 1296
Variables used in many modules
Secondary readout variables
Used in sharpness modules: [sfr], [sfrplus], [logf], [logfc], [random], [star], [wedge].
Secondary readouts are displayed in several MTF plots and in CSV and JSON output of sharpness modules. They are also used for pass/fail criteria.

The Secondary readout window (shown on the right) controls the secondary readout display in MTF plots. The primary readout is MTF50 (the half-contrast spatial frequency). Three secondary readouts are available with several options. The first defaults to MTF30 (the spatial frequency where MTF is 30%). The third is used only for SFRplus Lens-style MTF plots.
1. The upper radio button (MTF) for each readout selects MTFnn, the spatial frequency where MTF is nn% of its low frequency value.
nn is rdpct, rdpct2, or rdpct3 in the ini file.
2. The second radio button selects MTFnnP, the spatial frequency where MTF is nn% of its peak value: useful with strongly oversharpened edges.
3. The third radio button (MTF @ ) selects MTF @ f units, where f is a spatial frequency in units of Cycles/pixel, LP/mm, or LP/in. If you select LP/mm or LP/in, the pixel spacing should be specified in the Cycles per… line in the Plot section of the input dialog box, shown above. A reminder message is displayed if the pixel spacing has been omitted.
4. The fourth radio button (MTF Area) selects the area under the MTF curve (below the Nyquist frequency). When it is normalized to the peak MTF it tracks MTF50 for low to moderate sharpening, but, unlike MTF50, it remains constant for oversharpened images. Described in Slanted-Edge MTF measurement consistency.
| Parameter | Typical values (default if in [brackets]) |
Description | Notes |
| areanorm | [2 2] | Normalization for MTF area plots | Type of MTF Area plot for first and second secondary readout. 1: unnormalized, 2: normalized (generally preferred; similar to MTF50 when there is no frequency domain overshoot. |
| rdtype | MTF MTF__P MTF @ MTF Area (none) |
1st secondary readout name | |
| rdtype2 | same as above | 2nd secondary readout name | |
| rdtype3 | same as above; often (none) | 3rd secondary readout name | Used only for lens-style MTF plots |
| rdpct | 10-80 [30] | 1st readout percentage | Percentage nn for MTFnn or MTFnnPSame as aboveSame as aboveExample: for rdtype = MTF__P, rdpct = 20, rdunit = 4, Secondary readout 1 would be MTF20 (C/P) |
| rdpct2 | ” | 2nd readout percentage | |
| rdpct3 | ” | 3rd readout percentage | |
| rdnum | numeric | Number for MTF @ 1st readout |
The number depends on the units in rdunit (below).Example: for rdtype = MTF @, rdnum = .25, rdunit = C/P, Secondary readout would be MTF @ .25 C/P |
| rdnum2 | ” | Number for MTF @ 2nd readout |
|
| rdnum3 | ” | Number for MTF @ 3rd readout |
|
| rdunit | 1 for C/P 2 for LP/mm 3 for LP/in 4 for LW/PH (See notes.) |
Index for units: 1st readout |
Values corresponding to rdunit: {‘C/P’; ‘LP/mm’; ‘LP/in’; ‘LW/PH’; ‘LP/PH’; ‘C/mrad’; ‘C/deg’; ‘C/Obj mm’; ‘C/Obj in’} |
| rdunit2 | Save as above | ” 2nd readout | |
| rdunit3 | Save as above | ” 3rd readout |
Miscellaneous variables
These are set during image file read, cropping, or in the monochrome file or save results dialog boxes.
| Parameter | Settings window |
Typical values [default] |
Description | Notes |
| bayeraw | — (Set by several buttons in the Monochrome image settings window) | 0-5 [0] | If > 0, monochrome files contains Bayer RAW data. 1-4, indicates primary color to analyze (R, Gr, B, Gb). 5 indicates Demosaic. | |
| closefigs | Set by the Close figures after save checkbox in the Save window. | 0 or 1 [0] | 1 recommended for IT (closes windows after save). | |
| figsave | Set in Save figures as PNG or FIG dropdown menu in Save window | 1 or 2 [1 recommended] | Type of figure to save (PNG or FIG). FIG files not recommended because they require much more storage. | (gr) |
| filecomb | Set when multiple files are selected for analysis | 0 or 1 [0] | 0: Read and analyze files as a batch, 1: Combine files (signal-average) | (-IT) |
| folder | Set during image file read | (Path name) | Folder for last input image | (-IT) |
| nchan | Channel popup menu | 1-4 | Channel to analyze: 1-4: R, G, B, Y (Luminance) | |
| nht_save | Set during image read | 2448 … | Height in pixels of recent image(s). There may be several. | |
| nwid_save | Set during image read | 3264 … | Width in pixels of most recent image(s). There may be several. | |
| plot_image | Plot checkboxes in Settings window | 1 0 0 0 0 0 | ||
| roi | Set during region selection (primarily in the fine adjust window) | 1 1 3264 2448 (typical) | Region of interest (crop) in pixels. [x1 y1 x2 y2] Groups of 4, each group corresponding to a number in nht_save and nwid_save. | |
| save_answer | Save window— main answer (unused) | Yes, No | Saved setting not used. | (-IT) |
| save_dir | Set in Save window | (Folder name) | Last folder used to save results | (-IT) |
| saveCSV | Save window | 0 or 1 [-99 = ignore] | Save CSV results. Overrides save_file_list. | |
| saveJSON | Save window | 0 or 1 [-99 = ignore] | Save JSON results. Overrides save_file_list. | |
| saveXML | Save window | 0 or 1 [-99 = ignore] | Save XML results. Overrides save_file_list. | |
| save_file_list | Save window | [1 1 1 0 0 0 0 0 0 0] | List of results to save if element is set to 1: Details differ in different modules. |
|
| speedup | Speedup checkbox | 0 or 1 [1] | if set to 1, skip several calculations to speed up operation. Details differ in different modules. |