Introduction
This page briefly illustrates how to use the Imatest with Omnivision OVTAPantherM. Please note that Omnivision cameras are not supported in the macOS and Linux version of Imatest. However, Imatest supports other development systems to varying degrees. Contact us for details.
Load images directly from Omnivision sensors. This eliminates the need to capture images separately, store them, then load them individually into Imatest, dramatically improving productivity.
Download and Install Software
To download Imatest software, go to store.imatest.com/software.html
Download and open the Imatest Master self-extracting executable. This will install the Imatest Master edition and the Matlab Compiler Runtime (MCR), which is required for Imatest to run.
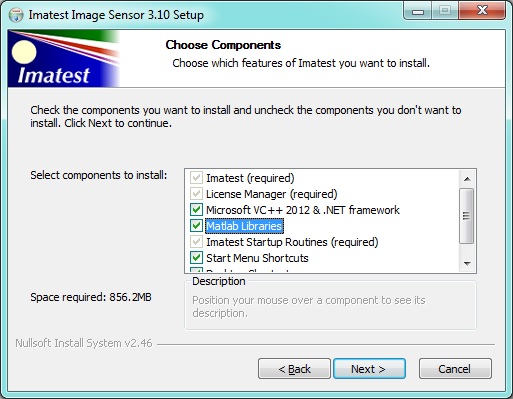
Installer “Choose Components” window with Matlab libraries selected (Slow; select only if the libraries have not been installed.)
The installer checks for the folder corresponding to the current MCR version. Matlab Libraries is checked if the folder is not found; otherwise it is unchecked. On rare occasions you may want to change this setting. Follow the remaining directions for installation. You will be able to run Imatest in evaluation mode for a limited time after you install it. If you’ve purchased it, open Imatest and press Help, License Manager (Activate). You can install Imatest on several computers, but you can only activate it on a single computer. www.imatest.com/activation/ contains instructions on activation/deactivation/moving Imatest between computers.
To download Omnivision software, please contact Omnivision Technical Support (http://ovt.com/support/tech.php) and request a copy.
Install the software, then open it and follow the directions for registration. The registration process will take one business day, after which you receive an Email with login instructions.
Acquire an Omnivision Key
In order to use Omnivision cameras with Imatest, a key for the Omnivision API must first be obtained directly from Omnivision. To obtain the key, please perform the following steps:
- Navigate to the Imatest IS installation directory, e.g. C:\Program Files (x86)\Imatest\v4.1\Image Sensor\
-
Run the supplied executable OVTKEY.exe in administrator mode by right clicking on OVTKEY.exe and select Run as administrator. This executable will produce a file named preovt.key that is machine specific, i.e. the generated key file will work for only the machine for which it was generated.
-
Contact support at Omnivision (http://ovt.com/support/tech.php) and supply the preovt.key file. From the preovt.key file, the contact at Omnivision will produce the key needed to enable Omnivision support in Imatest.
-
Place the key file supplied by Omnivision into the same directory as the Imatest Master executable.
With the key file in place, Omnivision support is enabled in Imatest.
Preparing the Camera
Connect the camera to the computer and launch Omnivision’s OVTAPantherM.exe. If multiple Omnivision cameras are connected to the computer, only one will be initialized at a time by OVTAPantherM. Once OVTAPantherM has launched and an image stream is being displayed, select one of the RAW sensor modes from the list that is displayed in the left pane (or by clicking the ‘Sensor Ctl’ button and then ‘Res/Mode’). See the example below for an OV3640 camera.

A screenshot of OVTAPantherM with the RAW mode selected for an OV3640 camera sensor.
Record the resolution (as well as the number of bits per pixel, if indicated ((Some of Omnivision’s cameras operate in 8-bit mode by default and can be changed into other modes with the appropriate register settings. Additionally, the settings can be enabled from OVTAPantherM by clicking the ‘10 bits’ button or similar and selecting the appropriate entry from the pane on the left side. )) that the camera is operating in as it will be needed by Imatest as detailed below. Correctly position the camera relative to the chart and adjust the camera gains if needed and allowed by OVTAPantherM. Note that additional register settings can be saved into a file and sent by Imatest to the camera as described below.
After the camera is aligned to the test chart, close OVTAPantherM as it cannot be open at the same time as Imatest is acquiring images from the Omnivision camera. (( Imatest and OVTAPatherM cannot acquire from the camera at the same time, and so only one should be open at a time. Imatest maintains a connection to the camera once Imatest has acquired from the camera. If a camera needs to be initialized by OVTAPantherM after being acquired from by Imatest, then Imatest must be closed first.))
Omnivision Setup in Imatest
- Close OVTAPantherM if the program is still open

- Launch Imatest
- Imatest 3.10 – 4.3 (IS): Select the Settings menu, followed by Omnivision settings.In the window that appears, enter the sensor’s width, height, the number of bits per pixel (only 8-, 10-, and 12-bits per pixel are currently supported), and select the Bayer pattern. Optionally, the name of a register settings file can be entered and the name of the entry can be customized. Once complete, click the Save button, and if this particular entry is to be loaded into Imatest, click the Load current button.
- Imatest 4.4 and above: Open the Device Manager from the Imatest main window. Select Omnivision OVTA from the Device List and supply your settings for bits per pixel (8-, 10-, 12-, 14-, 18-, and 20- bits per pixel supported for RAW capture, 8- and 10-bits per pixel supported for YUV), Bayer patter, image width and height. Optionally, the name of a register settings file can be entered and the name of the entry can be customized. Once complete, click the Save button and this particular entry is to be loaded into Imatest.
- Three Imatest interactive modules support direct image acquisition from Omnivision cameras:
- Rescharts: Measure sharpness (MTF or SFR) from any of several test charts, including ISO-12233 (or any slanted-edge chart), SFRplus, Siemens Star, Wedge (Hyperbolic or Linear), Log Frequency-Contrast, or Dead Leaves/Imatest Spilled Coins.
- Multicharts: Measure color accuracy and tonal response from a wide variety of color and grayscale charts, including the 24-patch Colorchecker, Colorchecker SG, IT8.7, DSC Labs Chroma DuMonde, ISO-14524, ISO-15739, Kodak/Tiffen Q-13/Q-14, Imatest 36-patch transmissive Dynamic Range charts, and many more.
- Uniformity Interactive: Measure vignetting (light falloff), color nonuniformity, and hot and dead pixels from a flat field image.
- Imatest defaults to reading images from files, not acquiring images directly from devices. You can configure it to acquire images from Omnivision cameras from the Imatest main window or from any of the three modules that supports image acquisition from Omnivision cameras(Rescharts, Multicharts, or Uniformity Interactive ). Click on Settings, move the cursor down to Image from file, and check Omnivision OVTA. Check Auto Reload to enable continuous realtime reloading (updating). See the example below.
- You are now ready to acquire and analyze images. Select any of the three modules and click Acquire Image to acquire and analyze the image. Click Reload (to the right of Acquire Image) to start continuously refreshing the image. The button will turn pink and display “Stop Reload nn” (where nn is the reload number). Click on it to stop reloading and display final results.
- Continuous reload produces particularly useful results (showing the focus history) with the Edge and MTF display in Rescharts Slanted-Edge SFR and SFRplus modules.
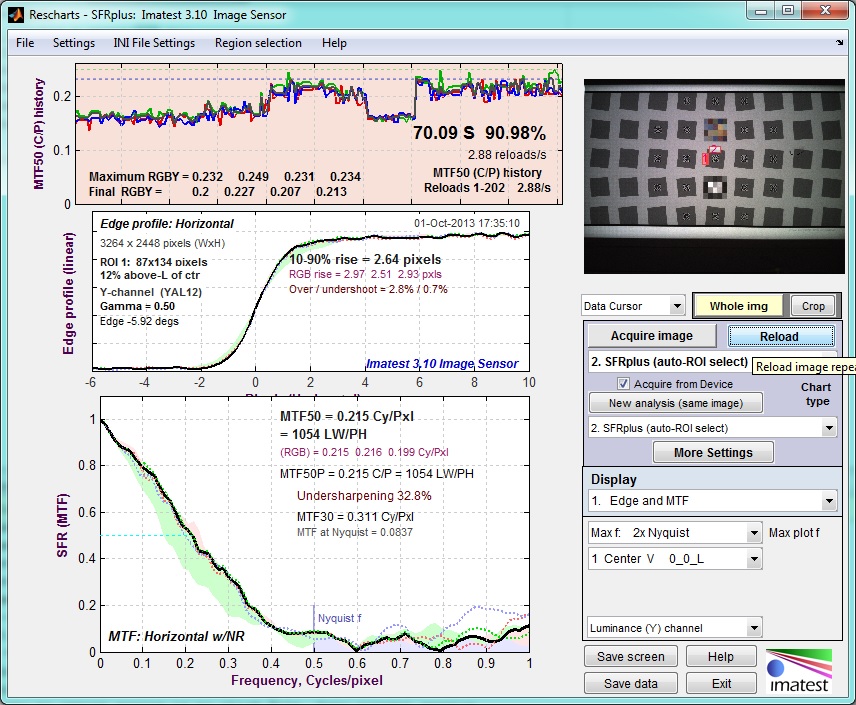
Results of pressing Reload (then Stop reload) on the Edge/MTF plot of a single region of an SFRplus image. The camera’s focus was adjusted.
- Please refer to the Imatest Help files and associated usage guides for additional information. See Useful links, below.
Purchase the Imatest Master
To purchase Imatest Master, use this link.
Useful links
You can obtain a list of introductory online documentation by clicking the Help guide button on the right of the Imatest main window.
The Table of Contents/Site Map for Imatest documentation is on www.imatest.com/docs/.
A list of image quality factors analyzed by Imatest is on www.imatest.com/docs/iqfactors/.
Sharpness – what is it and how is it measured? is a good introduction to concepts of measuring sharpness.
SFRplus is the most powerful module for measuring sharpness (over the image surface), lateral chromatic aberration, tone and color response, and more. You can find more details in www.imatest.com/docs/sfrplus_instructions. SFRplus can be run inside Rescharts using acquired Images from DevWare. The other two modules that can acquire images from DevWare are Multicharts and Uniformity Interactive.
The Imatest Store offers a large variety of test charts in addition to software.
Support
Support for the Imatest is available at [email protected]. Please report problems using this mailbox, with complete text of the error message, which is best obtained by clicking File, Copy current session, and pasting into your email. For more information on troubleshooting and error reporting, click on the Error reporting button at the bottom of the Imatest main window or go to www.imatest.com/docs/troubleshooting/.