- Important Note: If you are a manufacturing or R&D firm looking to validate your products, please see our professional lab setup page.
Setting up an image quality lab
for photographers and students
Are you interested in testing the image quality of your camera? To accurately measure the image quality of a camera system, you need appropriate lighting, a standardized image quality test chart, and analysis software like Imatest Studio. If you are a photographer, art curator, designer or student – or just interested in cameras – you can meet your image quality testing needs at a relatively low cost using Imatest Studio and the test lab setup described on this page. This page provides an introductory overview of:

Test charts
Before you select a test chart, you’ll need to determine which image quality factors you want to test. Sharpness is the most common factor tested for mobile devices and interchangeable lens cameras. It’s important to note that the resolution of your camera should not exceed the print resolution of your chart. Doing so will lead to inaccurate results. You may encounter this if you attempt to measure a high-resolution camera system with a chart printed with a lower quality print process, such as a laser printer. Charts that are professionally printed with a high-quality inkjet printer or on a high-precision film substrate, like the ones we offer at Imatest, are far less likely to have this problem. Imatest test charts are designed to present a wide array of spatial, tonal and color features for image quality analysis, so you can expect to test multiple factors with a single chart. The design, size, and substrate of your test charts are determined by the resolution of your sensor, field of view and working distances of your lens, and the image quality factors you need to test. You can use our chart finder to calculate your field of view. If you’re not sure where to start, watch the video for a test chart overview.
Lighting
Glare-free, uniform illumination of your test chart is ideal for Imatest software to accurately measure the image quality of your camera. This can be achieved using reflective or transmissive light sources.
Reflective inkjet chart lighting
Widely available LED shop lights provide an excellent solution for Imatest Studio customers whose primary interest is testing camera and lens sharpness. Little assembly is required with the exception of the need to mount them. You may need more than one type of light because they typically have just one color temperature (e.g. 4000K) and have a relatively low Color Rendering Indices (around 80 – still better than most fluorescents). Use dimmers recommended by the manufacturer; cheap dimmers should be avoided because they tend to have flicker.
Here are some examples (we don’t call them recommendations because there are so many similar lights to choose from).
-
Sunco Lighting LED Utility Shop Light, 4 FT, Linkable Integrated Fixture, 5000K Daylight
-
Sunco Lighting LED Utility Shop Light, 4 FT, Linkable Integrated Fixture, 4000K Cool White
Transmissive chart lighting
A light panel or lightbox is needed for transmissive charts, which are generally smaller than reflective charts and are available on higher resolution media. Transmissive charts can be particularly useful in smaller test labs because of their size. When selecting a light panel or lightbox, look for ones with high uniformity of lighting to ensure accurate chart readings. Integrated dimmability can be useful when measuring image quality across different levels of light.
The Artograph LightPad® Series IQ is sufficient for sharpness measurement. It is available at a lower price point than many transmissive chart lighting options; however, it has a lower uniformity of light and is not recommended for critical color and dynamic range testing.
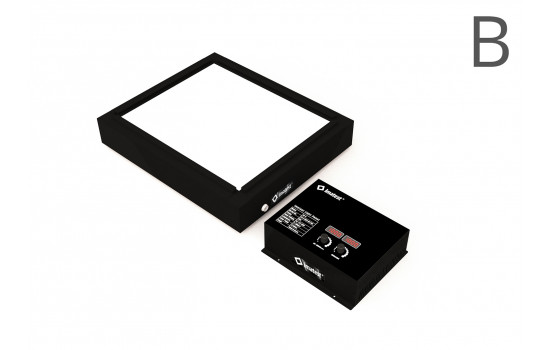
Imatest offers a light panel, the Imatest LED Light Panel, which is a versatile, low profile and lightweight light source with 90% uniformity, dimmability, wireless controls and easy integration with Imatest charts. It is more suitable for color and dynamic range testing.
Shop Transmissive Chart Lighting
Light measurement
Uniform lighting is important for accurate measurements.
The BK Precision 615 Light meter (Lux meter) is an excellent low-cost instrument (about $100 USD) for measuring incident light (illuminance). It has a flat diffuser and photopic response (similar to the human eye in bright light). It is particularly useful for measuring evenness of illumination. There are several alternative choices. The BK was chosen over similar meters because it has a flat (rather than hemispheric) diffuser that better represents the geometry of the flat targets. Readings can be somewhat slow, with settling times around 3-5 seconds.
Mounting your Camera
Versatile and sturdy mounting of the camera is critical for image quality testing.
Tripods
Select a tripod that is sturdy, easy to adjust, and easy to move. Any good tripod with a pan/tilt head should work; although geared heads are highly recommended because of the precision in the adjustments you can make (we don’t recommend ball heads). We illustrate a few Manfrotto components, which offer good value for the price. These represent typical choices – many more are available to meet special needs.
- Manfrotto 475B tripod legs with geared center column: supporting up to 26.5 lbs and with an adjustable height ranging from 16.6 – 74 in, the Manfrotto 475B is a convenient option for a tripod dedicated to a test lab. The built-in spirit level is valuable for leveling the tripod: if the base (where the head is mounted) is level, fine adjustments are easy to make.
- Manfrotto 410 compact geared head with quick release: supporting up to 11.1 lbs, it is lightweight and especially nice for making precise adjustments. It uses the 3271 quick release mounting plate which makes swapping devices a breeze.
- Manfrotto 127VS variable leg spread portable dolly is useful for keeping legs in place while moving a tripod.
- Solidtrax Video Tripod Dolly is an option when you need to move the tripod to various distances from the test chart.
- Glide Gear Aluminum Track can be used with the above dolly – you can also build your own track using 1-inch Schedule 40 PVC plastic pipe.
Mounting a smartphone or tablet
Though a regular quick-release tripod mount is appropriate for most cameras, a sturdy clamping system is needed for testing camera phones, webcams, and tablets. You can purchase a tripod adapter clamp for smartphones, or make one yourself.
How to make a smartphone camera mount
There is no standard way to make your own smartphone camera mount, however, we suggest the following items:
- Either a small quick-release clamp or micro quick-release clamp depending on your device testing needs,
- A 1/4 inch bolt at least 1.5 inches long,
- (2x) 1/4 inch coupling nuts,
- A T-brace with 1/4 inch mounting holes, and
- A quick-release mounting plate such as the 3271 quick release mounting plate
Step 1: Secure your T-brace to your quick-release mounting plate via your preferred method (i.e. Velcro).
Step 2: Check the clamp for an appropriate-sized hole in the moveable part of the clamp in which to secure the 1/4 inch screw. If none such exists, pre-drill an appropriate-sized hole. This is how you will attach your clamp to the mounting plate.
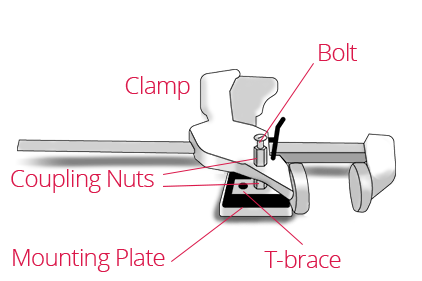
Step 3: Send the 1/4 inch bolt first through a 1/4 inch coupling nut, then through the hole in the clamp from Step 2. Then, send the bolt through the second coupling nut, and into the T-brace from Step 1. Securely tighten by hand.
Additional accessories for your test lab
Several additional items can come in handy: a small level, a flashlight (LED models are cool), rulers, a few clamps, etc. A bubble level mounted on a camera’s accessory shoe can be particularly helpful for alignment.
A laser distance measurer is very convenient for measuring precise distances— much more accurate than measuring tape.
Putting it all together
Now that you understand the components of lighting, charts, and camera mounting – here’s how to arrange it all to work with Imatest software.
Lighting setup
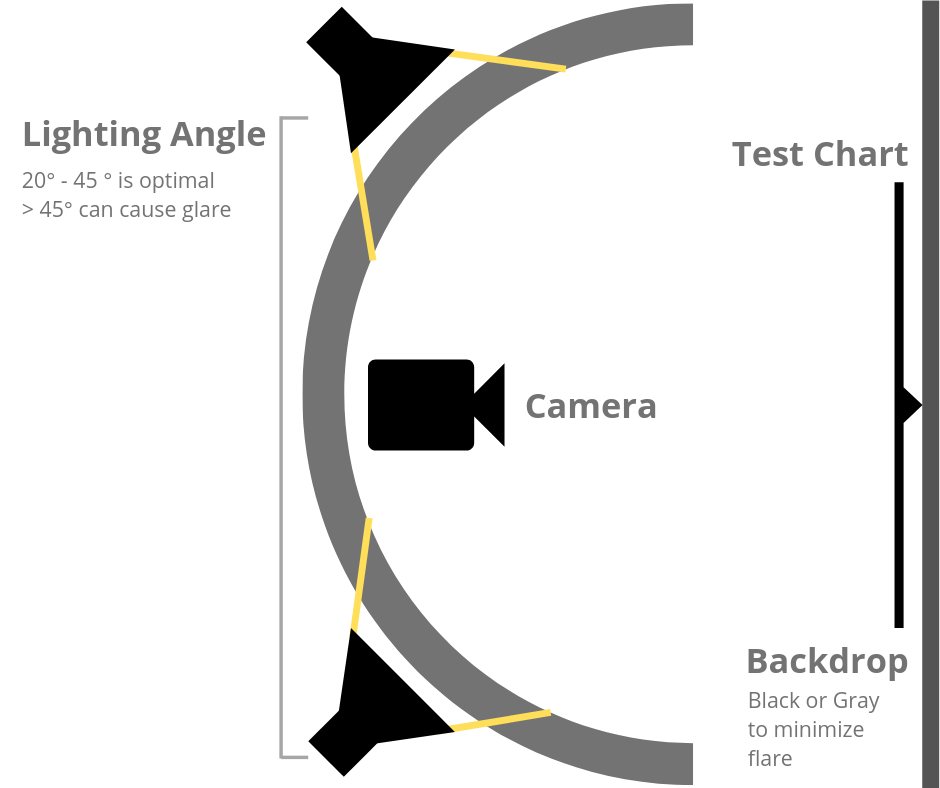
Select a dark room with as little ambient light as possible for your image quality test lab. The diagram in this section summarizes how the lights should be positioned. The goal is even, glare-free illumination. The lamps represent a stack of three LED shop lights, as described above. Lighting angles between 35° and 45° work well for normal and long lenses. Avoid lighting behind the camera, or at an angle of over 45° as that can cause glare and shadows on the test chart. An angle of under 20° can lead to uneven lighting and over-emphasized texture. Ambient light should be minimized, or eliminated if possible. Check carefully for glare and lighting uniformity before you expose, especially with wide-angle lenses. When glare can be difficult to avoid, such as with wide angle lenses, you may have to arrange your lab so that you can decrease the angle between the lights and the test chart — or allow glare in portions of the chart, taking care that it doesn’t affect critical areas. For example, since slanted edges on our eSFR ISO test chart are used to measure sharpness, you would want to make sure that the majority of edges are not affected by glare to ensure the software can measure accurately across the imaging plane.
Lighting uniformity is strongly affected by the distance and orientation of the lamps. The lamps in the diagram are roughly 50 inches (125 cm) from the center of the chart.
Verifying uniformity of light
Use a lux meter to check for evenness of lighting. Think of the chart like a grid, and check the illuminance level in each grid square. Start by checking the center square, then each corner, and then each side. Check the illuminance at each key graphic of the chart, such as the slanted-edge squares in the eSFR ISO test chart shown.
You should have no more than 20% variance in uniformity over the entire chart for SFR/MTF and distortion measurements, where small portions of the target are analyzed and exposure is not critical.
Uniformity with only ±5% variance or better is required for accurate tonal and color measurements (Stepchart, Colorcheck, and Multicharts).
Check the illuminance level at each key graphic of the chart.
Addressing glare
Glare in the outer patches of your test chart can ruin measurements. With semigloss charts, it’s hard to avoid, even with careful lighting placement. You can reduce it by decreasing the angle between the lights and the chart, but be sure to verify your illumination levels remain consistent. Matte charts are best suited for avoiding glare under most test scenarios.
Chart setup
Always wear clean, white cotton gloves when handling your test chart to protect your chart from blemishes. You can purchase these at most art supply stores or professional print shops.
Take great care when mounting your Imatest test chart. We strongly encourage you to bring your Imatest test chart to a professional printing and mounting service local to you. Many art stores, print shops, and photo framing shops will offer this service. Imatest will also professionally mount your test chart for an additional fee — contact sales for more information about this service.
We discourage you from attempting to mount your Imatest test chart yourself because there are many variables that can negatively affect your image quality measurements, such as bubbling, rippling or misalignment of the chart.
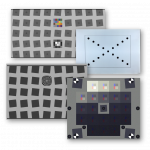
Hang your chart on a vertical, smooth flat surface, such as a magnetic whiteboard. If you are planning on doing a lot of testing, consider the Modular Test Chart Mounting System, which offers great efficiency and versatility. If you are testing with multiple charts, there are overall cost savings associated with this system rather than having each test chart mounted individually. The base model consists of a 48″ x 75″ (122 x 190.5 cm) gray center panel attached to a rolling stand frame, allowing you to easily mount charts.
Camera alignment
Proper alignment of your camera is of utmost importance for accurate chart measurement. This can be achieved using items you likely already have readily available in the home, such as a hand mirror and a bubble level (attaching it to the camera’s accessory shoe can be of great help when aligning the camera to test charts).
Mirror trick for camera alignment
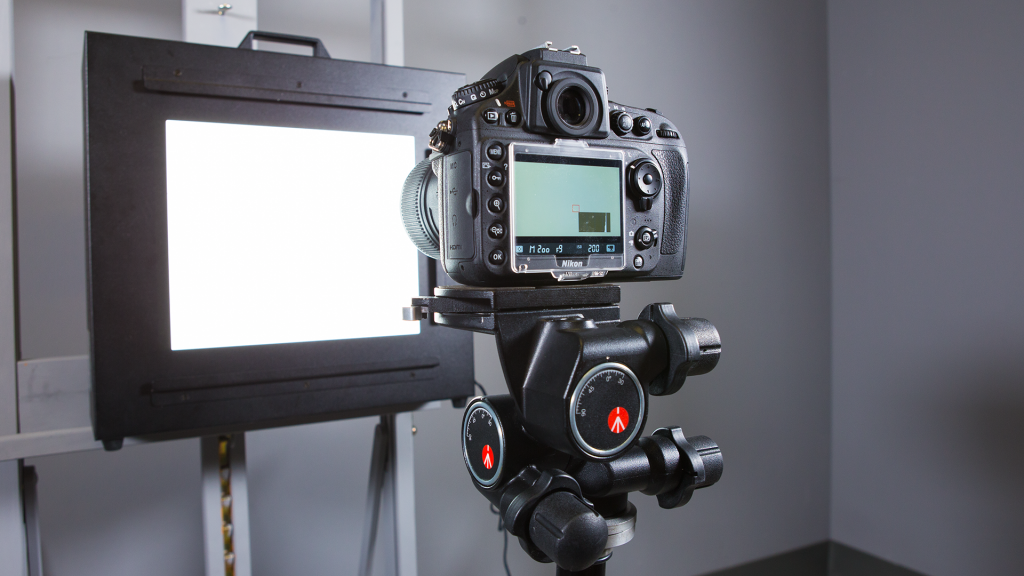
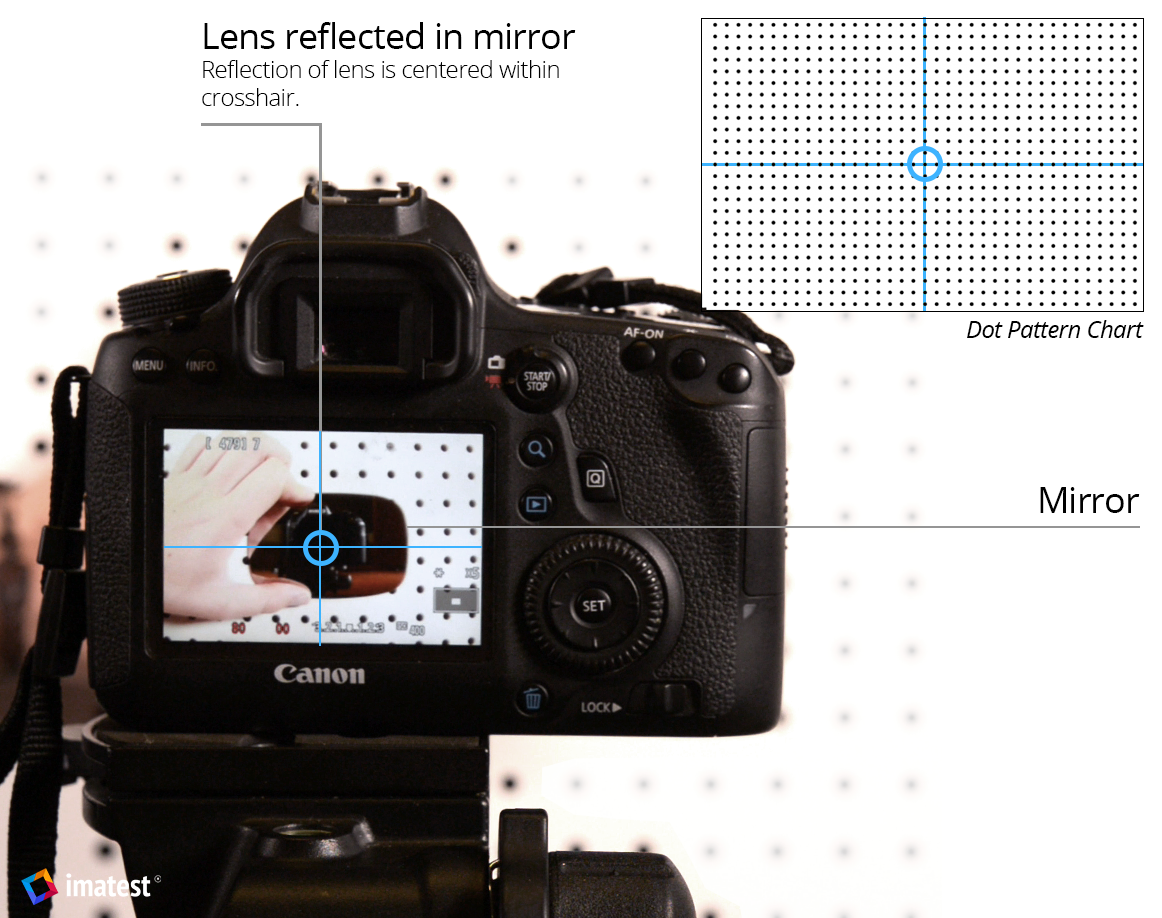
The mirror trick uses a mirror held against the center of the chart to align the camera’s lens to the center point of the chart. Depending on how far your test chart is from your camera, you may want a second person to help. In the example below, we locate the center point of the dot pattern test chart.
- Hold the mirror flat against your test chart as shown in the photo.
- Look through the camera’s viewfinder while adjusting horizontally until the lens appears centered in the mirror.
- The camera is positioned properly if the center of the lens is aligned with the center of the chart — so, you will see the camera’s lens in the center of the mirror through the viewfinder, where the vertical and horizontal lines cross.
- Shift the camera horizontally until vertical alignment is achieved.
- For horizontal adjustment, rotate (pan) the tripod pan/tilt head so the chart is centered in the viewfinder.
- At this point you should be close enough to correct alignments so the final, fine adjustments should proceed quickly.
Hint: to verify alignment, you can use a grid feature on your camera’s viewfinder, if you have one, or take a photo and measure the location of the lens on the mirror/chart in a post-production program such as Adobe Photoshop.