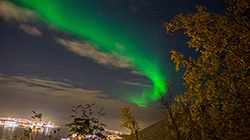
Witnessing the Aurora Borealis should be at the top of every photographer’s bucket list. This guide details the most important considerations for capturing images of the Northern lights. To be successful, you’ll need to be in the right place at the right time, equipped with the right camera and a decent amount of luck on your side.
Author: Alex Schwartz
Photographing the Northern Lights
Greetings From the Path of Totality
If you were lucky enough to travel to the path of totality on Monday, August 21st, you know firsthand how incredible it is to suddenly experience twilight in the middle of the day. The sun transforms into a hole in the sky, casting eerie shades of purple and a 360º sunset on the clouds. Just minutes later, the sun rises over the moon, creating a diamond ring effect. Witnessing this astronomical spectacle in person can’t compare to the photos and descriptions, but the images that I captured in Kearney, Nebraska are truly remarkable! Fewer than 1 in 1,000 people ever have the chance to see the Sun’s atmosphere in their lifetime, and I am extremely grateful to be one of them!

My camera setup. Panasonic GH3 with Canon adapter and 55-250mm Canon lens. I made my own solar filter with film purchased from Spectrum Telescope. I forgot my tripod, so I had to use my gorilla pod.

Composite image of totality! The solar filter was removed during totality and then reapplied for the final phase.

“God’s diamond ring”
Timelapse
Each frame was taken 3 seconds apart and play back is 24 frames per second. The solar filter was removed during totality and then reapplied for the final phase.
– Alex Schwartz, Video Production & Mechanical Engineering Intern
Shooting the Great American Total Solar Eclipse
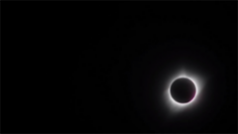
As predicted by astronomers years in advance, a peculiar cosmic event will occur on the morning of August 21st. Passing directly in front of the sun, the moon will cast a shadow racing across North America at supersonic speeds. From Salem, Oregon to Charleston, South Carolina, the 70 mile wide shadow will darken everything in its path. Outside the path of totality, all of North America will still be able to observe a partial solar eclipse! (more…)
Using the DarkWorld chart mask
This post is meant to help with the correct setup and operation of the new DarkWorld Chart Mask
The DarkWorld mask pairs with the Imatest 36 patch Dynamic Range Test Chart and frame to block additional light from entering the camera. This allows for more accurate measurements by reducing the flare light coming from the target. Tests with transmissive targets should be performed in a completely dark environment with no ambient lighting apart from the light box.
DarkWorld Chart Mask Setup
If you have previously ordered a Dynamic Range Chart, setting up the new DarkWorld chart mask is as easy as 123! Each DarkWorld chart mask comes with six strips of Velcro. If you order the frame and mask together, you will not have to worry about applying these strips yourself.
Step 1: Verify that you have a new DarkWorld chart mask and a 36 patch dynamic range chart with a frame, as well as six strips of Velcro: 2 soft, non adhesive-backed strips and 4 smaller, rough adhesive-backed strips.
Step 2: Place the chart mask in the frame, and apply the 4 rough velcro strips by peeling off their adhesive backing. The Velcro is best placed in the vertical center, on both the left and right side. They should be placed end to end with a small gap to prevent interference when applying and removing the mask.
Step 3: Firmly apply the soft, non adhesive-backed strip to the velcro on the chart mask. That’s it! Now you can ahdere the hanging tabs to the frame or peel them off to remove the Chart mask.
The assembly is now ready for testing with an ITI Lightbox! Simply slide the frame into the rails on the front of the lightbox, and follow the intructions for using Multicharts to measure the dynamic range of your camera system with a single image.
Artograph LightPad® LX Series – Operational Guide
PLEASE NOTE: Imatest no longer carries Artograph products. Click here for support from Artograph.
This post is meant to help with the correct setup and operation of the new Artograph LightPad® LX series.
LightPad® LX vs Classic
The classic LightPads, which were operated with an on/off switch, have been discontinued by Autograph. At full brightness, the new LX series outperforms its predecessor with a more neutral, and brighter source of white light. However, the LX model has a dimming feature which utilizes Pulse Width Modulation (PWM). While imperceptible to the human eye, PWM causes flickering which is unsuitable for digital imaging.
LX LightPads must be turned to full brightness to avoid flickering!
Setting the LightPad® LX to full brightness
- The correct power adapter must be used for proper functionality
- To turn the LightPad on, tap the touch-sensitive power button on the upper right of the front face.
- The LightPad will return to the brightness level it was set to when turned off.
- Holding the power button will cause the brightness level to change.
- If at full brightness, holding the power button will decrease the light level until its lowest setting is reached.
- If at the lowest setting, holding the power button again will increase the light level until maximum brightness is reached.
- If the power button is released at mid-brightness, holding the power button again will cause the light level to continue in the same direction.
- Flickering will occur at every light level below the maximum setting.
- Full brightness can be verified by pointing a digital camera or mobile phone at the device. There should be no apparent banding in the image.
- At lower brightness levels, banding in the image will be apparent in digital images.
- Below full brightness, a buzzing noise can also be heard from the power adapter.
- While you might not be able to see pulsing light with the naked eye, you can actually hear the frequency of the LED driver turning on and off!