Transmissive Color Targets

This new 24-patch Transmissive Color target can be used for evaluating color accuracy using a lightbox, which can be more compact and uniform than a reflective lighting system.

These targets are produced with high-precision Light-Valve Technology. (more…)

Read More

Imatest 4.3 MCR v9.0 Update

As of Imatest 4.3 we will be upgrading the required Matlab Compiler Runtime library to v9.0 (R2015b). We had upgraded to v8.5 (R2015a) in Imatest 4.2 but several major changes made upgrading again worth the effort. Matlab has introduced a new runtime Execution Engine that dramatically improves the speed and efficiency of core aspects of program execution such as function call overhead and object-oriented programming overhead. What this means for you is that nearly all aspects of Imatest should have improved speed in 4.3 and up.

So how much difference are we talking here? To illustrate, let me pull the curtain back a bit on the Imatest development process. Internally we have a series of tests for Imatest IT that run on an hourly basis on the current major release code. These tests primarily look for changes in results to make sure that nothing we do will cause changes in results, and if they do we’ll get notified immediately. It also lets us know when someone does something they weren’t supposed to that stops a whole module from working! So do to a little timing test I’ve taken a section of the SFRplus test suite and run it on both MCR versions.

speed_test_v85-v90

The first couple runs of both versions are quite slow, this is a consequence of the Matlab JIT execution engine. The first run includes overhead for compiling the code down one step. After about 5 runs though you can see the results start to become a little more stable. v8.5 and v9.0 steady out at ~2.9 and ~2.1. So on average, v9.0 runs 27% faster on this test! Significant changes! Before we celebrate though, it’s worth noting that while these results are useful for illustrating the changes that are coming with Imatest 4.3, you should not assume that all tests will reflect these level of difference. Nor that you will see this level of improvement on your computer. These kinds of results are often highly system and test dependent. Some images and some test setups will see more improvement than this, some will see less. However, overall Imatest 4.3 and on will be that bit faster!

Read More

Automated Manufacturing Test Equipment

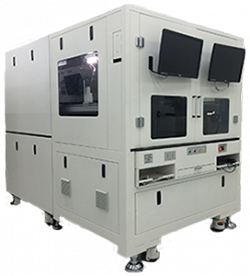
Imatest is pleased to announce our partnership with isMedia, a specialist in building digital imaging test machines and custom test solutions. This partnership will provide customers with a wide range of highly customizable test machines capable of extensive image quality analysis on manufacturing lines.

(more…)

Read More

Sinusoidal Siemens Star Target

The Sinusoidal Siemens Star test chart allows you to measure MTF and limiting resolution with a chart that provides angular response and may be less affected by signal processing (especially sharpening) than slanted-edges. Siemens star MTF20 (the spatial frequency where MTF is 20% of its low frequency value) is a good estimate of limiting resolution. (more…)

Read More

SFRreg Target

The SFRreg test target consists of a slanted-edge quadrant pattern enclosed within a circle. It is used for measuring MTF and lateral chromatic aberration. A test image typically contains several targets that are automatically detected and analyzed by Imatest 4.2. (more…)
Read More

Visual C++ Runtime Library: “The Application has requested the Runtime to terminate in an unusual way. “

Symptoms of problem:

Running the library leads to this error:

UnusualRuntime


Root cause of problem:

This error is typically the result of a conflict between the Microsoft Visual C++ Redistributables libraries supplied with MATLAB, and those that are supplied by some third party applications.


Solution to problem:

To revert to a previous version of the C++ Redistributable libraries, you should uninstall all versions of your current 2005 and 2008 C++ Redistributable libraries through your Windows Control Panel, and reboot you machine. You can then re-install them by running the MATLAB-provided installers which can be found in the following locations:

For 32-bit Imatest:

 C:\Program Files (x86)\MATLAB\MATLAB Compiler Runtime\v81\bin\win32\vc90\vcredist_x86.exe

For 64-bit Imatest:

C:\Program Files\MATLAB\MATLAB Compiler Runtime\v81\bin\win64\vc90\vcredist_x64.exe

Note: for older releaseses, a different matlab folder will be used, for example, v714 for releases 3.10 and below.

See Also:

Read More

Best Practices for Calling Imatest IT Libraries

Only run in a single thread

The MATLAB runtime library does not support multiple threads using the same library.

For high speed parallel testing Imatest IT Parallel can use multiple processes to increase testing throughput up to three times. As of 5.1 ITP is now rolled in to IT.


Only initialize a single time for multiple runs

Initializing the library has significant computational cost. and the first call made to the library will run slower than subsequent runs.

The library should remain initialized throughout the life cycle of the calling program that should have reasonable longevity of its own.


mclTerminateApplication() or terminate() must be called once only per process

Calling mclTerminateApplication (C/C++) or terminate (Python) more than once may cause your application to exhibit unpredictable or undesirable behavior.


Do not use busy waiting while analysis runs

A main tester program that invokes a separate tester program should not use busy waiting or spinlocks to wait for the analysis to be completed.


Pass images directly instead of writing to disk

Use the direct passing of images in order to avoid having to write files to disk, only for them to be immediately read back by Imatest IT.

The availability of high speed SSD and HDD caches may reduce the expense of repeatedly writing and reading from disk, but have other risks associated with them and  


Use analysis modules that combine tests

SFRplus and eSFR ISO perform many different calculations on a single image.  These modules will always perform better


For SFR tests, use multiple regions on a single image

Multiple region selections allow a single module to test multiple points on the image. If you are cannot use the combined anaysis modules mentioned above, and are forced to use SFR for sharpness tests, make sure to use the multiple region selection.


Set the MCR_CACHE_ROOT and MCR_CACHE_SIZE environment variables

To substantially reduce startup times of IT/DLL and IT/EXE call, create and set the  MCR_CACHE_ROOT environment variable to a folder for which the user has read/write access, and the MCR_CACHE_SIZE environment variable to a value of 900000000 or higher. When these environment variables are set, the lengthy decompression stage that happens during IT initialization results in the data being stored in the MCR_CACHE_ROOT folder, instead of a temporary directory that is deleted after IT exits. If the relevant decompressed data is already present in MCR_CACHE_ROOT, then the decompression stage is skipped and substantial time is saved (~10s).

Example:

For Windows Vista and above:

To permanently set this environment variable you can use the  setx command. Open a command window and enter the following (substitute the folder path with your desired path)

setx /m MCR_CACHE_ROOT "C:\Users\<this_user>\My Documents\MCR_Cache"
setx /m MCR_CACHE_SIZE "900000000"

Note the ‘/m’ indicates that the variable will be defined for all users and that the new environment variable is only available after the command window is closed.

For Windows XP, please follow Microsoft’s instructions for setting environment variables.

For Linux:

To make MCR_CACHE_ROOT and MCR_CACH_SIZE available for all users, append its definition to either /etc/environment or /etc/profile.

MCR_CACHE_ROOT="/home/<this_user>/Documents/MCR_Cache"
MCR_CACHE_SIZE=900000000

Otherwise, modify the ~/.profile or ~/.bashrc files to append the definition.

 export MCR_CACHE_ROOT=/home/<this_user>/Documents/MCR_Cache
 export MCR_CACHE_SIZE=900000000


Throw hardware at the problem

When software configuration changes cannot give adequate speed improvements, utilizing computing hardware with faster clock speeds and more processor cores is the brute force way of increasing performance.


See Also:

Read More

Java issue with OS X 10.10 Yosemite

Symptoms of the problem:

After upgrading OS X to 10.10, Imatest no longer starts

Source of the problem:

A newer version of the java virtual machine can conflict with the version used by Imatest.

Solution: 

  1. Open an OS X terminal window  (hit ⌘-Space 
  2. Enter the following command:
    sudo rm -rf /Library/Java/JavaVirtualMachines/jdk1.8*.jdk
  3. Press return and authorize the change by entering your OS X user password
  4. Download and install the latest Imatest full release (not the upgrade).
  5. Deactivate and reactivate your license. The license manager is found by selecting help>license manager in the tool bar.
Read More

High Dynamic Range Target, ITI LED Lightbox

We are pleased to announce our new High Dynamic Range (HDR) test chart with a density range exceeding 120dB (optical density >6.0). This chart allows you to the measure the dynamic range, tonal response and noise of HDR cameras with a single image instead of multiple, exposure bracketed images. It also contains slanted edges for MTF measurements. (more…)

Read More

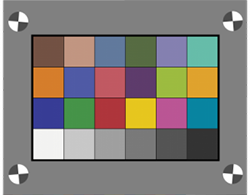
Color difference ellipses
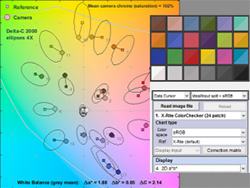
Imatest has several two-dimensional displays for comparing test chart reference (ideal) colors with measured (camera) colors, where reference colors are represented by squares and measured values are represented by circles. (more…)

Read More

Imatest version 4.2

Imatest has released Version 4.2. New features include:

SFRreg ModuleAnalyze a camera’s Spatial Frequency Response (sharpness) using automatically-detected slanted edges in registration mark patterns, which can be arbitrarily placed in a camera’s field of view. (more…)

Read More

Non-Latin characters appear as boxes in Windows 10

Non-Latin characters in the Imatest UI may appear as boxes in Windows 10, as shown.

Step 0

This is likely caused by not having the appropriate language pack(s) installed for your locale. You should not need to entirely switch the locale of your operating system.

The language resources mentioned in this post are provided by Microsoft and can be downloaded directly from your system’s control panel.

Before installing any language pack(s), exit Imatest. To install the desired language pack(s), access “Region & language settings” from the Windows 10 control panel. Alternatively, you can search for the terms “region language” in the start menu, as shown.

Step 1

From the Region & language settings window, select “Add a language”.

Step 2

Locate the language you wish to install. Repeat this step along with the previous for each language you wish to install.

Step 3

Windows 10 will download the necessary resources and automatically install the language pack

Step 4

At this point, the necessary language resources have been installed. Restarting your computer is recommended.

If, after restarting your computer, Imatest still is unable to display the desired language(s), return to the “Region & language” settings window. Select the desired language, and click “Options”. Depending on the language you wish to install, you may also need to Download additional resources, as shown.

Step 5

If you are still unable to view Imatest in your selected language, please contact support@imatest.com.

Read More

INI file format changes in 4.2

In Imatest 4.2.0 a new INI format was introduced. Previous INI files are not compatible with newer versions and INI files created in 4.2+ are not compatible with previous versions.

The most critical changes involve escaped characters. In prior versions, no characters were escaped in strings stored in the INI file. As of 4.2, special characters must be correctly escaped to be read correctly. Among other things, this allows us to handle non-ACII characters in INI file strings. For more details on these changes, see the Technical Details section below.

When starting 4.2+ Master, IS, or Studio for the first time, Imatest will check for any previous INI files. Specifically Imatest will search for imatest.ini, rescharts.ini, and multicharts.ini. If any of these files are found, they will be combined into a single file and scanned for any characters that should be escaped. A new file will be created: imatest-v2.ini. This will become the default INI file for all future 4.2+ use. Please note that this process does not apply to custom INI files.

To update a custom INI file to the current INI format, select the INI using the Select INI File… option in the INI File Settings menu. Once you have selected your INI file, click Update INI File. This will create a new file with the following format: <your-name>-v2.ini  Any rescharts.ini or multicharts.ini files in the same folder as your selected INI file will be merged into the new file and updated.

Important Imatest IT Note

If you are using Imatest IT these changes are particularly important to note. Imatest IT never modifies INI files, this is intentional to ensure that an INI file used for margin-sensitive testing are not accidentally changed in the middle of production. Because of this design, you can not use a pre-4.2 INI file with Imatest IT 4.2+ and you can not use a 4.2+ INI file with Imatest IT pre-4.2.

To update an INI file to be used with Imatest IT, please follow the instructions above for updating and INI file.

Technical Details

This section will enumerate the specific changes made to the actual format.

INI File Version

A new INI key has been introduced related to the new INI version. To assist tracking of INI file version the following key has been added:

IniFileVersion = #

Where # will be the version (2 in 4.2). You should never modify this value (removing this line will cause it to be replaced during the next run). Changing this value will likely result in a crash.

Escaped Characters

Prior to Imatest 4.2.0, no special characters in Imatest INI files were escaped. As of 4.2.0, special characters that might have other meanings (primarily backslashes) must be escaped to be properly read. For example, the following line might appear in a pre-4.2 INI file:

save_dir = C:\imatest\my_images\Results

In 4.2+ this line will appear as:

save_dir = C:\\imatest\\my_images\\Results

Unicode Characters

In previous versions of Imatest, INI files were not able to handle non-ASCII characters. As a result, no non-Latin characters could appear in file names or paths. The new INI format does allow for Unicode characters to be saved. This is accomplished by using the standard Unicode character code with special preceding characters. For example, 文件名 would be represented as the following:

\u6587\u4ef6\u540d

Arrays

In previous versions, INI file arrays were not always completely robust for all data types. The new format allows for more complex arrays.

Pre-4.2:

roi_mult: 10 10 20 20; 100 100 0 0;

4.2+:

roi_mult: [ 10 10 20 20; 100 100 0 0;]

Nested arrays will allow for 3+ dimensional arrays. However, these larger dimension arrays are not currently used by Imatest.

Read More

4.2 Public Beta Release, Imatest Events

Imatest version 4.2 is now available as a public beta. Join our Beta Test Group to access 4.2 updates. Highlights include:

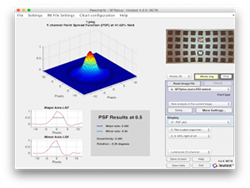
  • Point Spread Function (PSF): Imatest can now estimate an imaging system’s loss of resolution (PSF) using a pair of collocated, near-sagittal and tangential slanted edges on SFRplus, eSFR ISO and SFRreg targets. Easily analyze and improve sharpness, chromatic aberration, and distortion measurements. (more…)
Read More

Windows 10 Licensing Issue

Nalpeiron-licensed applications running on a machine upgraded from Windows 7/8/8.1 to Windows 10 may require a re-installation of the Visual C 2010 runtime library. 4.2 downloads now include this in all Imatest installers, however if issues persist you can download appropriate versions of the runtime here:

x86:https://www.microsoft.com/en-gb/download/details.aspx?id=5555
x64:https://www.microsoft.com/en-gb/download/details.aspx?id=14632


If you continue to have issues, please contact us at support@imatest.com

Read More

SFRreg: SFR from Registration Marks

Imatest SFRreg performs highly automated measurements of sharpness (expressed as Spatial Frequency Response (SFR), also known as Modulation Transfer Function (MTF)) and Lateral Chromatic Aberration from images that contain registration mark patterns (circles with two light and two dark quadrants). Unlike standard test charts, these patterns do not need to be located on a flat (planar) surface. Depending on the image source, they offer two advantages. You can

  • Test images at infinity distance (or any distance of choice) using a compact projection system such as the Optikos Meridian camera test system.
  • Test the sharpness of extreme fisheye lenses (with angular fields of view over 180 degrees, whose MTF cannot be measured near the image boundaries with a single flat target) using an array test charts, each consisting of an individual registration mark. Registration mark charts, such as the one shown on the right, may be purchased from the Imatest store or printed on a high-quality inkjet printer. Since Region of Interest (ROI) selection is automatic, they may be positioned where needed. They work best when facing the camera.
registration_markRegistration mark

Details of the regions to be analyzed are based on user-entered criteria (similar to SFRplus or eSFR ISO, which it closely resembles).

Sharpness is derived from light/dark slanted edges inside the registration marks, as described in Sharpness: What is it and how is it measured? SFRreg can handle a wide range of camera aspect ratios and chart arrangements.

SFRreg operates in two modes.

  • Interactive/setup mode  allows you to select settings and interactively examine results in detail. Saved settings are used for Auto Mode.
  • Auto mode  runs automatically with no additional user input. ROIs are located automatically based on settings saved from the interactive/setup mode. This allows images of different sizes and framing to be analyzed with no change of settings. Auto mode works with large batches of files, and is especially useful for automated testing, where framing may vary from image to image.

Part 1 of the instructions introduces SFRreg and explains how to obtain and photograph the chart. Part 2 shows how to run SFRreg inside Rescharts and how to save settings for automated runs. Part 3 illustrates the results.


SFRreg images from the Optikos Meridian projection system

Imatest SFRreg is originally designed designed to work with images from the Optikos Meridian system, which consists of several projectors that project registration mark patterns towards a camera. These patterns appear at infinity focus at the camera. A typical image is shown below.

MERIDIAN-7-4K-e1423515004804

Optikos_9_proj_640WImage acquired from a 9-projector Optikos Meridian system

SFRreg images from arbitrary arrays of printed registration mark charts

SFRreg also works with printed registration mark patterns, which can be placed anywhere in the image. For extreme wide-angle (fisheye) lenses they should be oriented facing directly towards the camera. Here is a synthesized image (we’ll add a real one soon). You can add other charts— typically color or grayscale— to the image for additional measurements.

reg_marks_fisheye_fakeFisheye lens image with synthesized registration mark charts oriented facing the camera

SFRreg chart print options (can be selected when ordering)

  Options Notes
Media Inkjet (reflective),
LVT film (transmissive)
Inkjet (reflective) is usually the most practical choice.
Contrast
4:1, 10:1
4:1 contrast is specified in the new ISO 12233:2014 standard.
Surface Matte or semigloss Semigloss is slightly sharper, but is more susceptible to glare (specular reflections), especially with wide angle lenses. Matte surface is recommended for wide angle lenses or difficult lighting situations.


Slanted-edge algorithm The algorithms for calculating MTF/SFR were adapted from a Matlab program, sfrmat, written by Peter Burns () to implement the ISO 12233:2000 standard. Imatest SFR, SFRplus, SFRreg, and eSFR ISO incorporates numerous improvements, including improved edge detection, better handling of lens distortion, a nicer interface, and far more detailed output. The original Matlab code is available on http://losburns.com/imaging/software/SFRedge/index.htm. In comparing sfrmat results with Imatest, note that if no OECF (tonal response curve) file is entered into sfrmat, no tonal response curve is assumed, i.e., gamma = 1 (linear response). Since the default value of gamma in Imatest is 0.5, which is typical of digital cameras, you must set gamma to 1 to obtain good agreement with sfrmat.

Obtaining and photographing the charts

Registration Mark charts can be purchased from the Imatest store in a variety of inkjet media (reflective and transmissive) (Other media will be available on request.) Although we recommend that you purchase the charts, they can be printed on photographic-quality inkjet printers, but you must have fine materials, skill, and a knowledge of color management.


SFRreg results

When calculations are complete, results are displayed in the Rescharts window, which allows a number of displays to be selected. The following table shows where specific results are displayed. Results plots are very similar to SFRplus and eSFR ISO. We show two samples of results below.

sfrreg_display_selectionSFRreg display selections

Measurement Display
MTF (sharpness) for individual regions 1. Edge and MTF
MTF (sharpness) for entire image 4. Multi-ROI summary
12. 3D plot
13. Lens-style MTF plot
Lateral Chromatic Aberration 2. Chromatic Aberration
Original image showing region selection 8. Image & geometry
EXIF data 7. Summary & EXIF data
Acutance/SQF (Subjective Quality Factor) 3. SQF / Acutance
Edge roughness 14. Edge roughness
Chromatic Aberration (radial) 15. Radial (Chr Aber, etc.)

Multi-ROI summary display


sfrreg_multi_regionSFRreg results in Rescharts window: Multiple region (ROI) summary
(Only upper Vertical regions have been selected to keep the view uncluttered.)

The multi-ROI (multiple Region of Interest) summary shown in the Rescharts window (above) contains a detailed summary of SFRreg results. (3D plots also contain an excellent summary.) The upper left contains the image in muted gray tones, with the selected regions surrounded by red rectangles and displayed with full contrast. Up to four results boxes are displayed next to each region. The results are selected the the Display options area on the right of the window, below the Display selection.

The Results selection (right) lets you choose which results to display. N is region number. Ctr-corner distance % is the approximate location of the region. CA is Chromatic Aberration in area, as percentage of the center-to-corner distance (a perceptual measurement). A legend below the image shows which results are displayed.

The View selection (far right) lets you select how many results boxes to display, which can be helpful when many regions overlap. From top to bottom the number of boxes is 4, 3, 2, 2, and 1, respectively.


Results selection
View selection

Edge and MTF display


sfrreg_edge_MTFEdge and MTF display in Rescharts window
Diffraction-limited MTF and edge response are shown as a pale brown dotted lines
when pixel spacing (5.7um for the EOS-40D) has been entered.

This display is identical to the SFR Edge and MTF display. The edge (or line spread function) is plotted on the top and the MTF is plotted on the bottom. The edge may be displayed linearized and normalized (the default; shown), unlinearized (pixel level) and normalized, or linearized and unnormalized (good for checking for saturation, especially in images with poor white balance). Edge display is selected by pressing More settings.

There are a number of readouts, including 10-90% rise distance, MTF50, MTF50P (the spatial frequency where MTF is 50% of the peak value, differing from MTF50 only for oversharpened pulses), the secondary readouts (MTF @ 0.125 and 0.25 C/P in this case), and the MTF at the Nyquist frequency (0.5 cycles/pixel). The diffraction-limited MTF curve (not shown above) is displayed as a pale brown dotted line when pixel pitch is entered.

MTF is explained in Sharpness: What is it and how is it measured? MTF curves and Image appearance contains several examples illustrating the correlation between MTF curves and perceived sharpness.


Read More

A module that formerly worked has stopped working

A module that formerly worked but now crashes can often be fixed by removing the section for the module in imatest-v2.ini (or in imatest.ini, multicharts.ini or rescharts.ini prior to Imatest 4.2). We show how to do this conveniently using the INI File Editor.

An error reporting window normally opens when a crash occurs. We recommend sending us the error report before applying the fix.

Click on Send Error Report,
enter your correct email address,
then press Send.

Note that a screen capture of the window
does not contain
all the information
 we need to diagnose the problem.

The Imatest Error Reporting window

We encourage you to send us the image (in a separate email to support@imatest.com). Having the image can make it easier for us to replicate and fix the error.


Note 1:  Please check to be sure the problem isn’t caused by a badly framed or badly photographed image. In such cases,
     (a) images that worked previously will continue to work, and
     (b) there may be some indication of the problem in the text preceding the error message.

Note 2:  Reinstalling the same build of Imatest rarely solves this type of problem, although downloading and installing the current build of the most recent version your license allows often helps. Go to www.imatest.com/support/download/, select the appropriate release and operating system, then click Download Upgrade.

Note 3:  All settings are stored in imatest-v2.ini, which can be opened for editing from the INI File Settings dropdown menu in the Imatest, Rescharts, Color/Tone Interactive, or Uniformity Interactive windows. imatest-v2.ini is compatible with non-Latin characters (Asian languages). Changes after Imatest 4.2 are described in INI file format changes in 4.2.

Note 4:  To help us prevent similar errors in the future, please send the error report. In most cases an Error reporting window (shown above) will appear. Follow the instructions, making sure to enter your correct email and a brief description of what you were doing. If the Error reporting window fails to appear you can click File, Copy current session, then paste the session into an email to support@imatest.com. If you’ve closed and restarted Imatest since encountering the error, you can click File, Copy last session.


How the fix the error (by removing the INI file section with corrupted data)

Quick summary: the key to fixing this type of error is to remove the section (or critical lines in the section) of the INI file (usually imatest-v2.ini) that corresponds to the broken module. This restores the default values. Section names are enclosed in brackets ([…]) in the INI file.


  • Record or remember important settings for the broken module that you may want to restore after you’ve done the fix. This can often be done conveniently using a screen capture utility.
  • Click the INI File Settings dropdown menu in the Imatest, Rescharts, Color/Tone Interactive, or Uniformity Interactive window, then select INI File Editor to open imatest-v2.ini, as shown below.

The INI File Editor is a powerful tool for editing ini (settings) files.
You can often fix a broken (but formerly working) module by selecting the section
corresponding to the module, then clicking Delete section. followed by Save.

  • Select a section to view, edit, or delete from the Section dropdown menu (near the top). Section names usually correspond to module names. Errors can often be fixed by (A) removing an entire section (this restores the default values) or (B) by editing a single line (if you know what you’re doing). Note that section names are enclosed in brackets ([…]) in the INI file.

Some section names don’t fit the pattern. We are leaving section names unchanged (for now) for backwards compatibility. We apologize for the confusion.

    • Stepchart module:
      [q13] is used for the Stepchart module, which originally supported only linear grayscale stepcharts, such as the Kodak Q-13 and Q-14. Note that [stepchart] is used for grayscale stepcharts in Color/Tone Interactive and Autonot for Stepchart.
       
    • Color/Tone Interactive and Auto modules
      [gamut] is used for settings common to all (or most) Multicharts/Multitest charts. There are also sections for individual test chart analyses whose name corresponds to the chart name (generally abbreviated). Here are the lists of names (taken from the code).
      For (mostly) color charts:  {‘cc24’; ‘it8’; ‘special’; ‘qpcard’; ‘ccsg’; ‘stepchart’; ‘special’; ‘cdm28’; ‘sfrp20’; ‘utt’; ‘spydercheckr’; ‘hale’; ‘te226’; ‘mxn’; ‘cdm-dc48’; ‘colorgauge’; ‘rezchecker’; ‘cmp’; ‘esfriso’; ‘iso-16505’}
      For multi-row Grayscale charts:  {‘iso-14524’; ‘qa-61’; ‘qa-62’; ‘iso-15739’; ‘ite’; ‘oecf-20’; ‘sqcirc’; ‘eia’; ‘qa-79’; ‘mxn’; ‘sdr-36’; ‘sq-20’; ‘contrast-res’; ‘te269’}
       
  • (A) To fix a problem by resetting a section, Select the section, then press Delete section. You will need to manually set the desired settings to the your preferred values. This method is recommended for most users.
     
  • (B) To fix a problem by editing a line, Select the section that contains the line, select the line in the large window, make the change in the line edit window just above the large window, then press Enter. This method requires more knowledge than (A).
     
  • To save your changes press Save, which is grayed out until changes are made. If you with to cancel your changes, press either Reload ini file or Close.
Example: Checkerboard stops working. Press the INI File dropdown menu, then select INI File Editor. Select the [colorcheck] section, then press Delete section, Save, Close. You’ll need to manually restore your old settings in the next run.

This can also be accomplished in a text editor by pressing INI File, View/Edit INI file.

Other solutions

Sometimes the problem is in the image file itself. Matlab has difficulty reading files with bad header data. Look at the command window to see if there are warnings about problems reading the file. You can often fix such problems by “laundering” the file by reading it into an image viewer/editor such as Irfanview (an excellent free program), then saving it with a similar name.

Read More

New High Precision SFRplus Target for GL-30E Lightbox

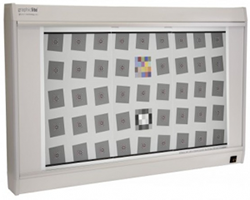
The High Precision SFRplus Target for GL-30E Lightbox is our most detailed resolution target. You can test high-resolution devices in compact environments using one-third the space required for extra-large Inkjet charts.

(more…)

Read More

How to store and retrieve region (ROI) selections

Full up-to-date documentation on region selection and how to use ROI files is now on
Saving and Retrieving Regions of Interest (ROIs)

Imatest can store Regions of Interest (ROIs) for most modules that use manual region selection.

Regions of Interest can be stored in small named ini files that only contain region information, and can be retrieved whenever needed.

This can be done for most modules that use manual region selection (even when automatic selection is an option). These modules include

SFR, Colorcheck, Dot Pattern, Distortion, Multicharts, Multitest, Random/Dead Leaves, Log Frequency-Contrast, Star, and Wedge, and Rescharts (with the four preceding modules)

Stepchart (with a restriction: method 1 (below) should not be used)

[Omitted: Blemish Detect, Uniformity, which usually use the entire image. Automatically detected Rescharts modules like SFRplus and eSFR ISO ]

Saving the region selection

The ROI can be saved by one of the following methods.

1. The Save ROI settings… button in the settings window

When you open a module, select a Region of Interest, then press Yes (not Express mode), a settings window opens that that contains a Save ROI settings… button, typically located somewhere in the Settings section. Its location is not consistent: it can be different for different modules. This method is not recommended for Stepchart*. Examples:

Save ROI settings… button for Random/Dead Leaves and SFR modules

2. The Save ROI settings… button in the Save results window that typically appears when a run is complete.

3. From the Imatest, Multicharts, or Rescharts windows:

INI File Settings –> Save ROI Settings can save settings from the most recently run module (if you didn’t save it in the Settings window).

*The Stepchart Settings window differs from other modules in that it lets you select the grayscale chart type. The Fine ROI adjustment window opens after the Settings window, so it is never a good idea to save the ROI from the Stepchart Settings window. You can set it afterwards with methods 2 or 3 (described above). This is one of several reasons that Multicharts and Multitest (which can analyze color as well as grayscale charts and display more noise detail) are recommended.


Selecting Save ROI settings… opens a window that lets you select the file for saving the ROI settings.

Save ROI settings window

The Optional Navigation Area assists with navigation: It affects the initial folder that appears when you click Save ROI Settings. The ROI settings INI file contents list box displays the ROI file contents, described in the gray box below. When you press Save ROI settings you can navigate to the desired folder and specify the file name.

All modules except for SFR and Wedge store image width (nwid_save), height (nht_save), and Regions of Interest (roi) for up to 20 recently-run images (where images are distinguished by their height and width). The most recent image size is first. Each image has a single width and height and either 4 or 8 numbers describing the ROI. SFR and Wedge store multiple regions for a single image.

4 ROI numbers, sufficient for describing rectangles, are used in SFR, Wedge, Dot Pattern, Distortion, Uniformity, and Blemish Detect. Each set of four numbers consists of [UL(x) UL(y), LR(x), LR(y)], where UL = Upper-Left and LR = Lower-Right (location in pixels relative to the upper-left corner of the image).

8 ROI numbers, sufficient for describing four-sided polygons (quadrilaterals), which generally contain inner rectangles, are used in all other modules. Each set of eight numbers consists of [UL(x) UL(y), LR(x), LR(y), UR(x), UR(y), LL(x), LL(y)].

Retrieving the region selection

Because the region selection window opens first for most modules (before the Settings window) you need to load the ROI before running the module. This can be done from the Imatest, Multicharts, or Rescharts windows by clicking

INI File Settings –> Load (merge) ROI Settings

This opens the following window that lets you select a previously-saved INI file. It will be merged into the main INI file (imatest-v2.ini, unless otherwise specified).

Load ROI settings window

The upper box (OPTIONAL NAVIGATION AREA) assists with navigation by helping to locate the initial location for reading the ROI Settings file. It is completely optional and may be ignored.

Loading the region requires three steps.

  1. Press 1. Read ROI Settings file.  You can specify the actual file location to load in the Open dialog box.
  2. Examine the contents of the ROI settings file, which are displayed when the file is loaded.
  3. Press 3. Load (Merge ROI Settings). If this operation is successful a message will be displayed to the right of the button.
Read More

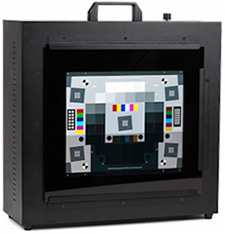
New Photographic eSFR ISO & June Trainings

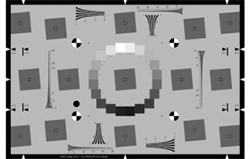
New Photographic eSFR ISO

The ISO 12233:2014 Enhanced eSFR Photographic Target is our newest reflective test chart. Photographic prints have over twice the resolution of inkjet prints, making them more suitable for higher resolution camera systems like DSLRs. The photographic substrate will benefit customers interested in testing high-resolution sensors as well as those performing close-range macro tests.  (more…)

Read More